This project was part of an ongoing paid partnership with Lowe's.
Our last weekend at the cabin, we worked on the loft bathroom. Of course, if we would have known it was our last, we wouldn't have. We would have gone sledding with the girls and enjoyed more dips in the hot tub and took in the scenery. But a 24 hour makeover of the tiniest space in the cabin at least allowed us to sneak in some of those things, too.
While we documented the whole thing on Instagram stories (did we get enough tile?! ...no, no we didn't--the suspense.) and I saved it to my highlights here, I forgot my actual camera to take after photos. I almost snapped some with my phone, but we had planned to come back up on Monday to take photos of the new kitchen appliances (oh man, this is all very difficult to think/write about) so the only after photo I took was a sneak peek for the Instagram story followers late that Saturday night. Almost everything else in this post, I took screen grabs of videos.

Here's where we started.

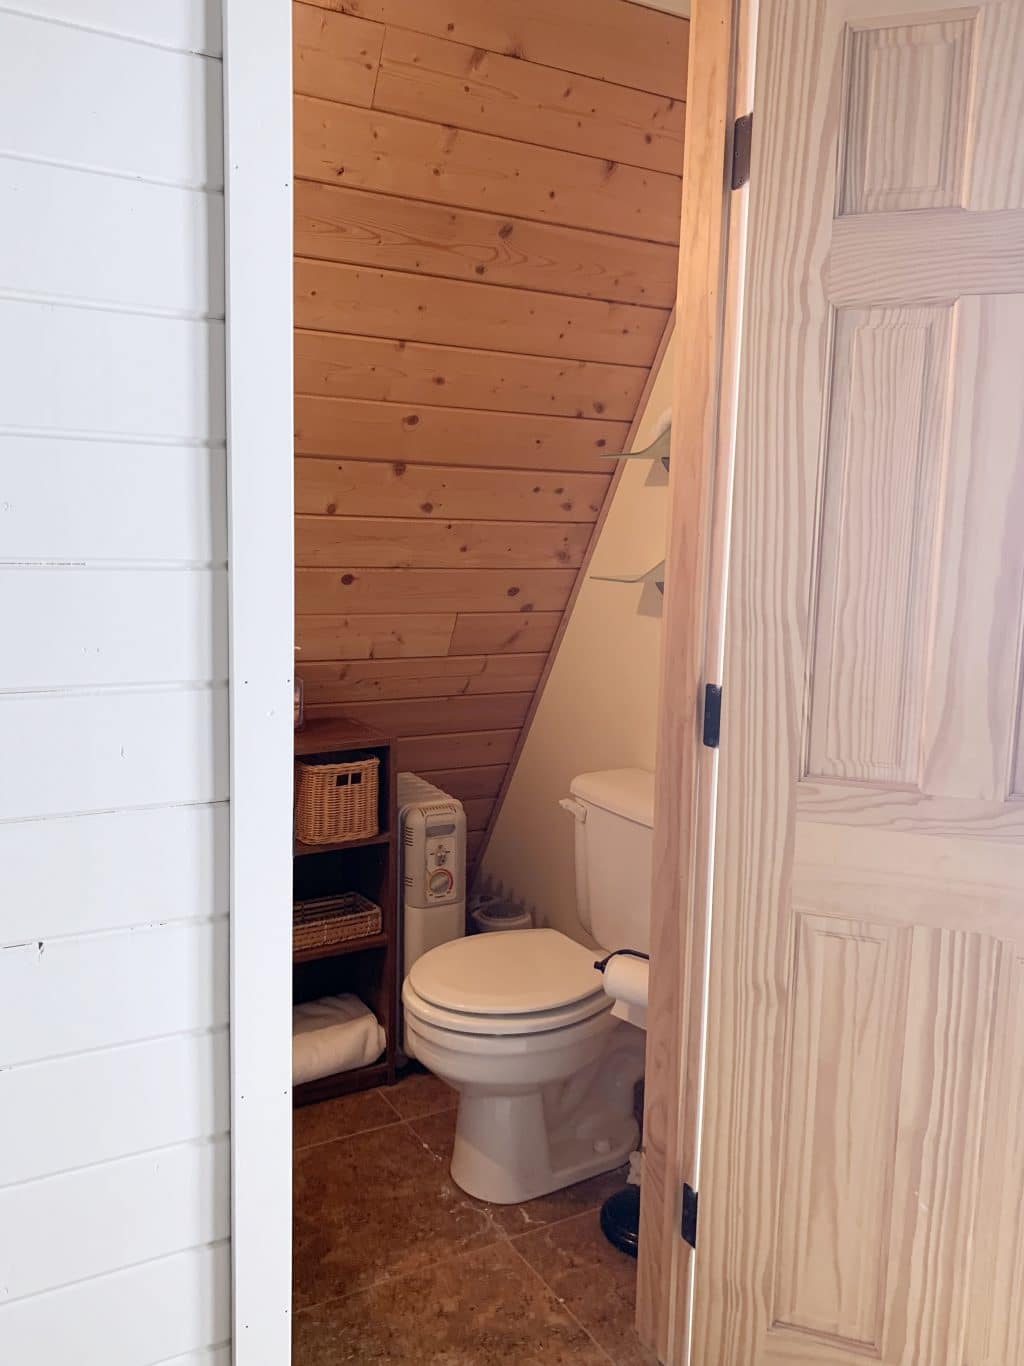
The tiny bathroom needed a new faucet because the old one shot water straight out at whomever was using it. The toilet also had a shy flush (you know the type) and a leaky base. So we decided to take the opportunity to do a quick, inexpensive makeover that included new tile floors, painting the walls, replacing the toilet and a few finishing touches.
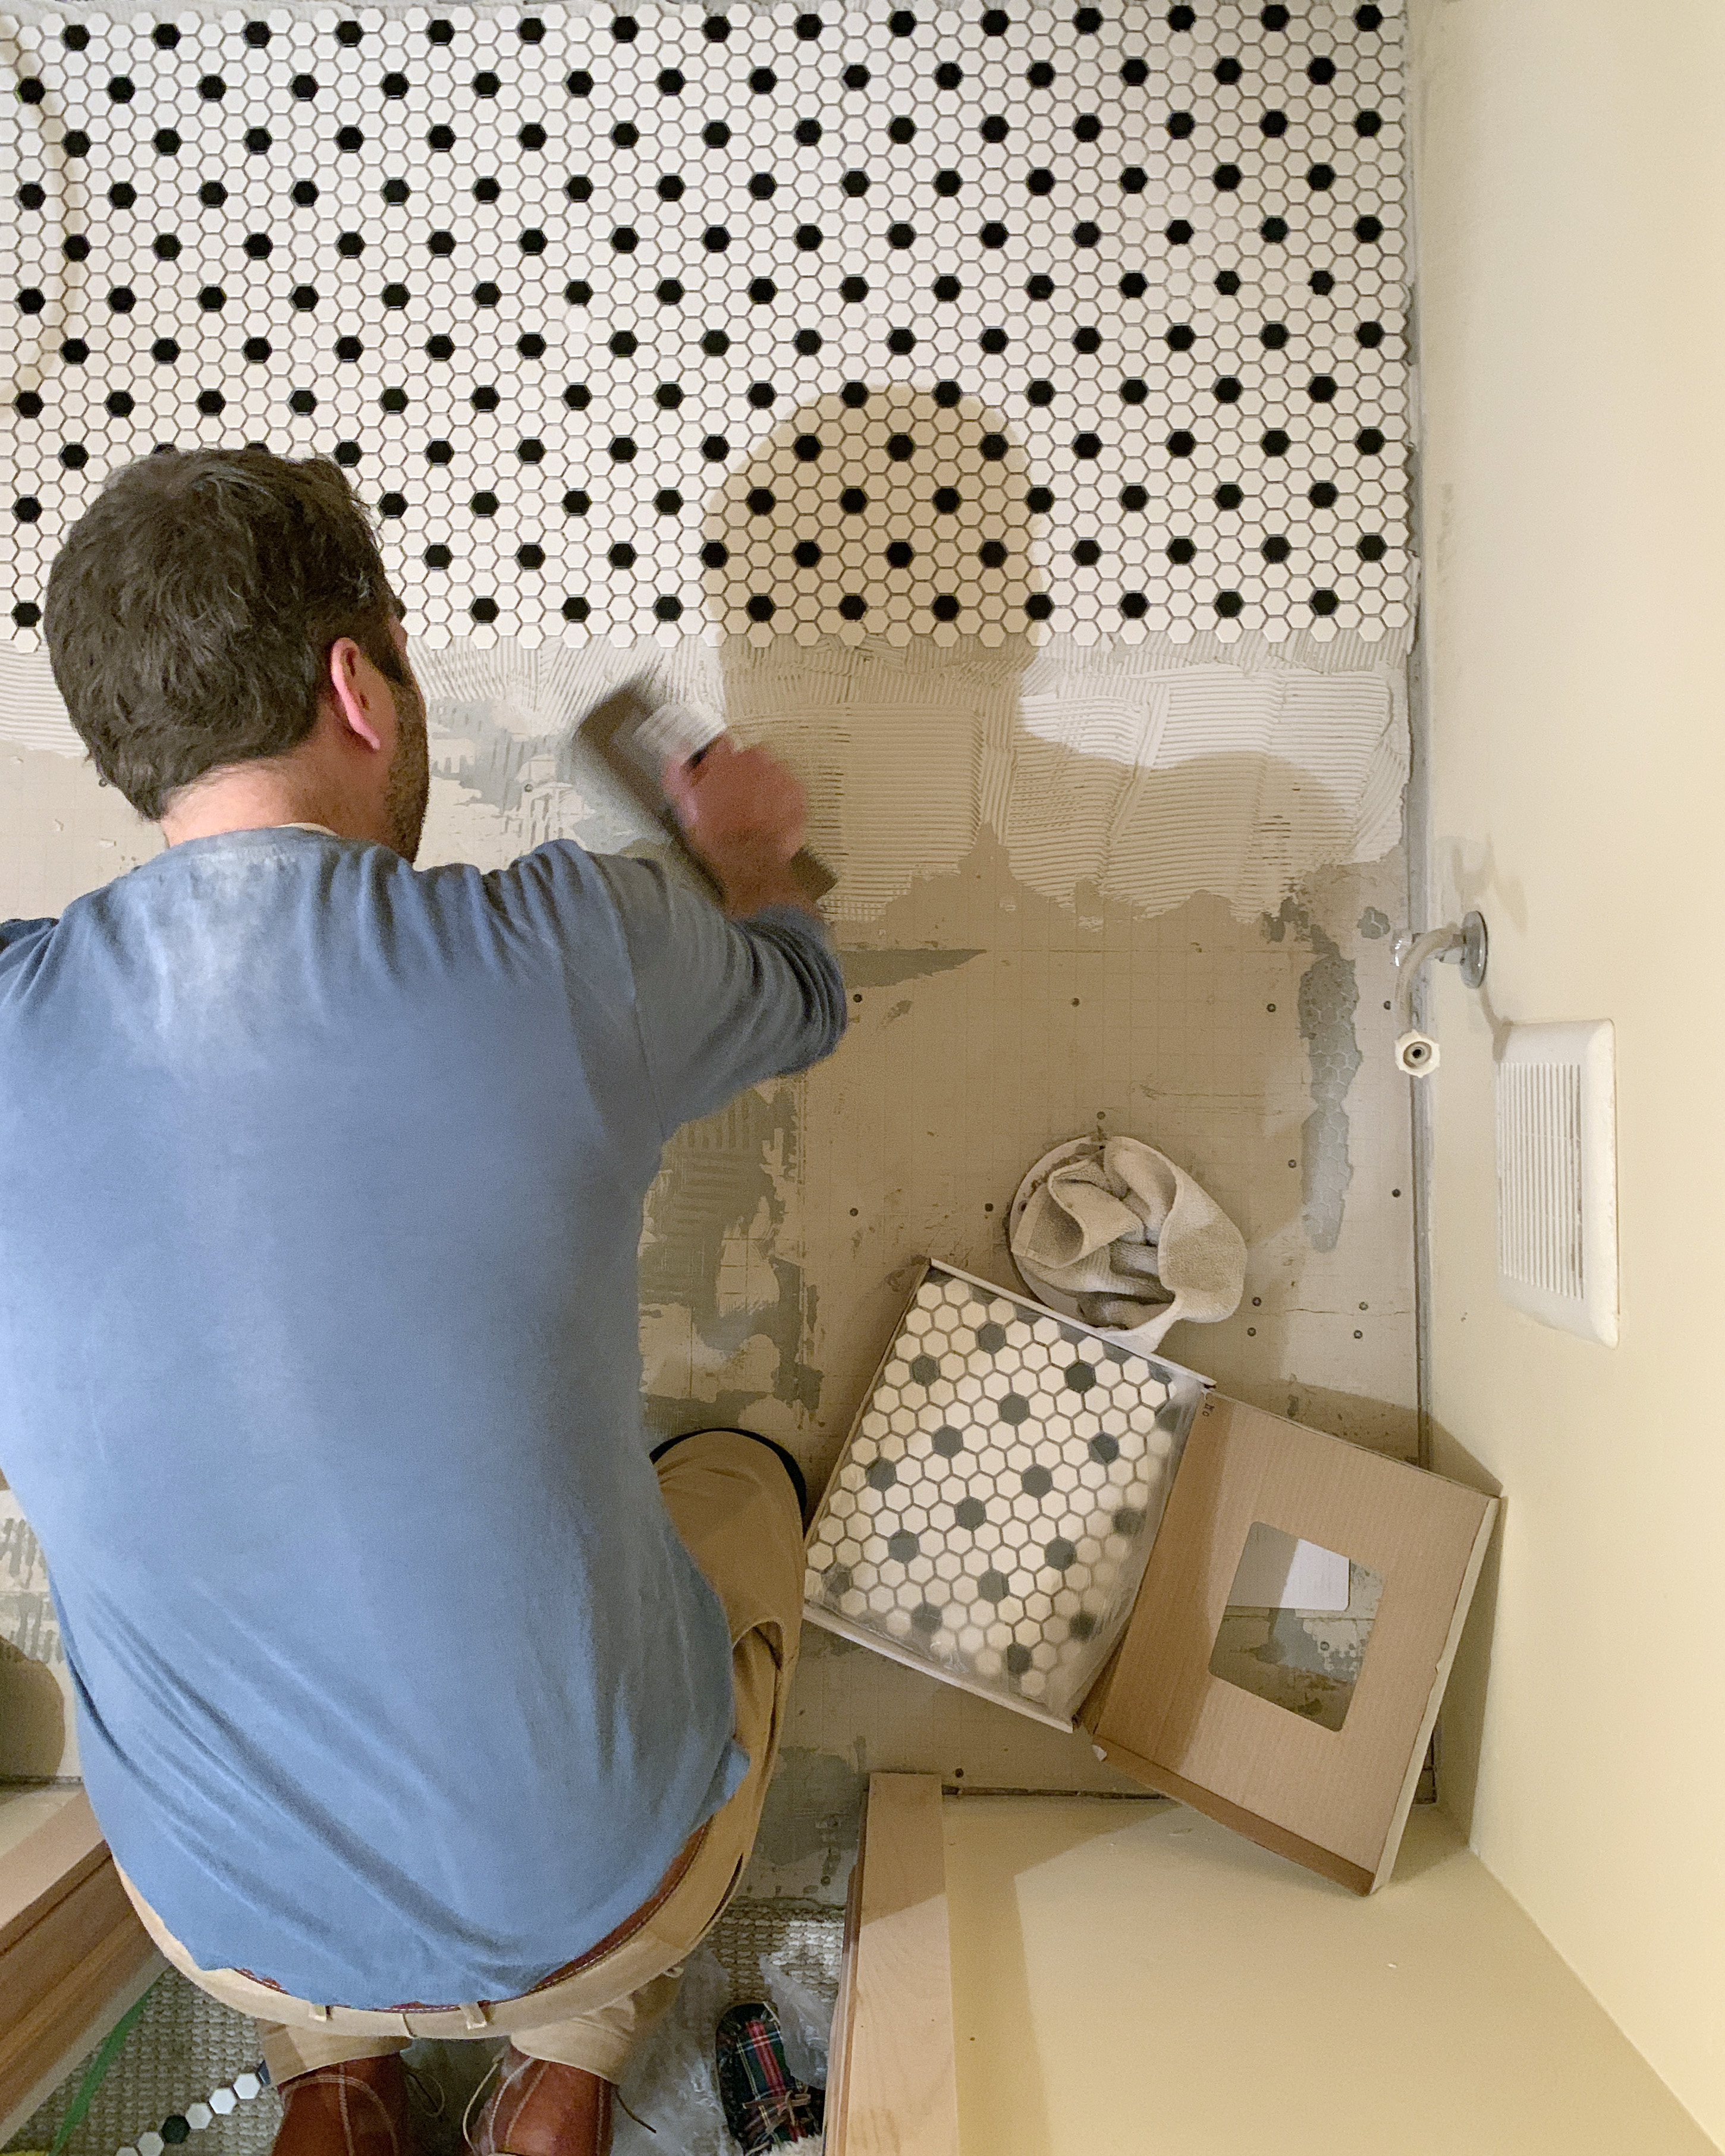
The first step was taking up the old tile. It's a small room, so it only took a few minutes with a crow bar and a hammer. Instead of ripping up the Hardie Board underlayment just to put new stuff back down, we tented the whole room (and put a suit and mask on Chris!) and he went at the mortar with a concrete grinding attachment on an angle grinder to get all the old mortar up. This is a very dusty job in such an enclosed area, but he took breaks to let the dust settle and had a shop vac running to keep it as clear as possible.
This is when we would normally paint. But it was already getting late in the night and since the tile would need to dry overnight before grouting, we thought we'd better get it down and paint in the morning. But if time is on your side, painting without concern for dripping on your new floor is ideal.
This American Olean hex penny tile was the easiest tile we have ever used! The sheets went down fast. We were able to cut small portions out with a razor blade when needed. And we got close enough to the wall that baseboard would cover the rest without much effort--easy! If you're a beginner tiler, mosaic tile with a mesh backing is a great way to get your feet wet.
Once tiled, I primed and painted the walls the same color we had the rest of the a-frame interior painted in December (Benjamin Moore China White), color-matched to Valspar paint from Lowe's. Chris then grouted the tile with premixed grout in Warm Gray.

When we removed the baseboards, we took special care to keep them in-tact so we could just put them back on after the tile was complete. Before doing that, though, I used the Cabot solid stain in Black we had left over from painting the exterior of our cabin to paint them black and give a substantial transition from the newly white walls to the floor. It was the unexpected touch the room needed.

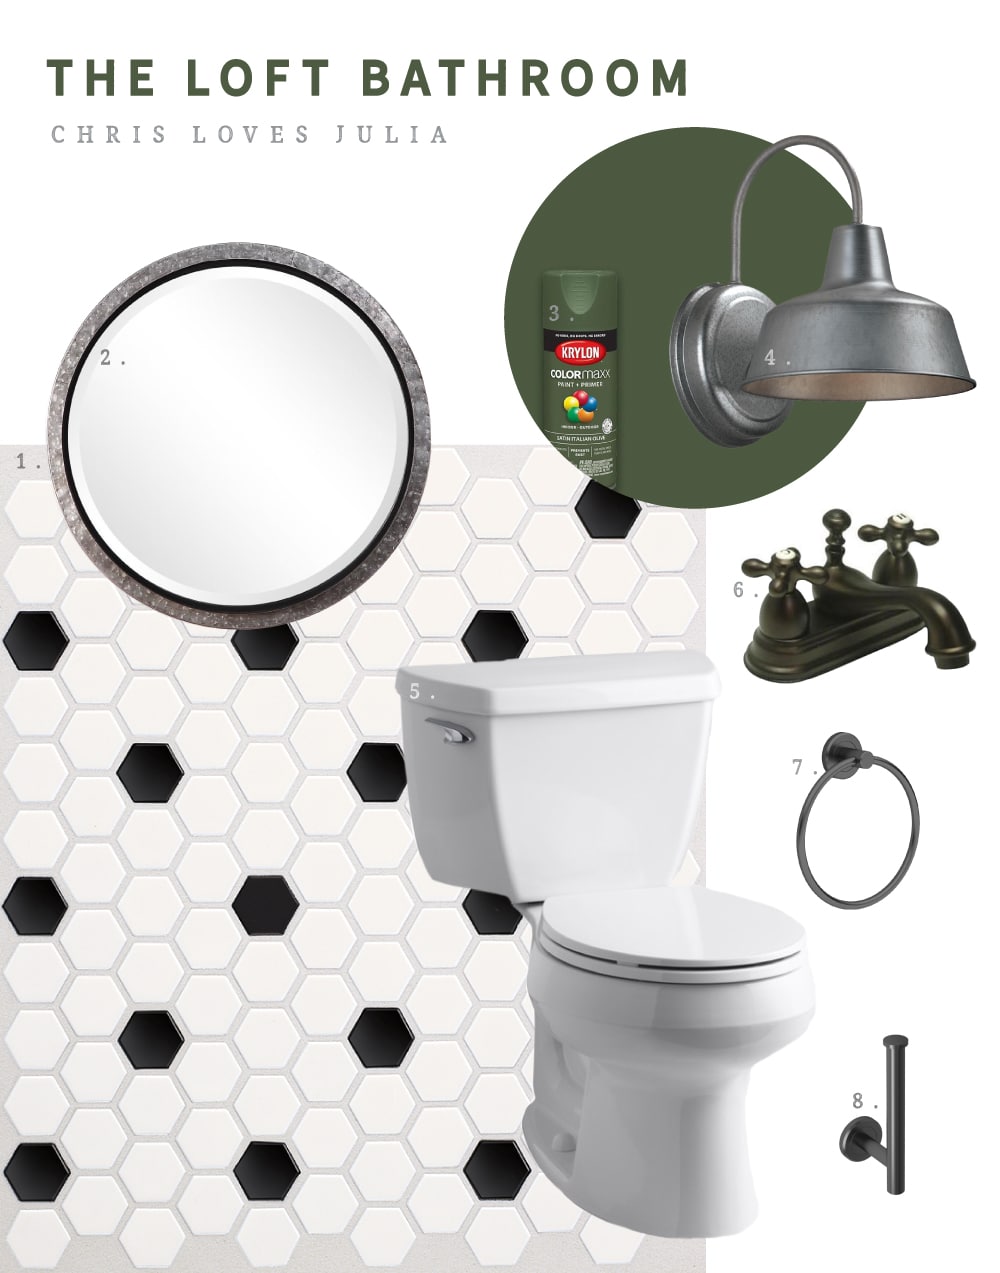
As for finishing touches, we loved this galvanized mirror from Lowe's and this inexpensive interior/exterior fixture. The only downside? Galvanized on galvanized would definitely be overkill, so I used Krylon spray paint to make the light fixture a beautiful olive green (taking care to plug the socket inside with paper towel before painting)--it looks 10x more expensive and was such a perfect addition to that room.

After putting the original pedestal sink back in place, adding a new faucet, and replacing the toilet, this bathroom was miles away from where we started and the perfect way to finish out the loft, where our kids and their cousins and friends spent most of their time on our visits.

And though we regret not snapping more pictures of the finished space, we're so proud of what we were able to create over a weekend for just over $600. Here are all of the sources:
1. Tile $4.98 (this is the Grout we used!)
2. Mirror $129
3. Spray Paint $3
4. Light $3
5. Toilet $149
6. Faucet $97
7. Towel Ring $14
8. Toilet Paper Holder $17
On a connected note, we realize it's difficult for people to know how to approach the topic of our cabin. And while there is a lot of sadness associated with its loss, there's also a lot of joy in remembering what it was before the fire. So we hope nobody feels that the topic is off limits, or that photos of the spaces we were able to finish shouldn't be shared. We want to be able to celebrate it with you, and remember it for all it was becoming.
Leave a Reply

WE'RE CHRIS + JULIA

Portfolio

Projects










We bought a fan and I wanted to paint the light fixture. I remembered this post and we got the same paint you used on the light - I'm so excited about it! I know this bathroom update was a relatively simple and small project, but it's one I'm going to be referencing a lot:)
Thanks for all you do!
I’m glad you still shared this post even without “perfect” pictures. I just saved almost every item to my pin board for the powder room in the cabin we are building in Michigan. I’m so sorry about the loss of your A-Frame I can’t even imagane what you all are going through.
Hi Julia! I can’t get enough of this little bathroom! It’s left me so inspired for our own half bathroom we want to get started on. Just a heads up - the price you listed for the light fixture seems to be wrong. Lowe’s website has it listed for $39.98.
There's two sizes, I think .
How did you transition from the tile in the bathroom to the carpet outside the door? I know some people will put down a slab of marble or something like that. What did you do, or what have you done on other projects?
Since we removed the previous tile, when we laid this one down it was perfectly flush so we just made a straight cut and no other transition.
What a sweet small bathroom! I love the hex penny tile. What color grout were you planning to use? I am thinking of using this in our master bath. I have done tile work before but really don't want to have to rent a wet saw for large tile. This sounds so much easier.
It's listed in the post above - warm gray from Lowe's. :)
i love that olive green! what a great idea! now i'm wondering if i should paint the base of my bathroom light before i install it..............................
Curious if you painted with any kind of Kilz to prevent knots from coming through. We have a cabin with lots of wood walls and I don't want to cover them all but might want to paint some. I was curious if you did any kind of pretreatment for your walls. Thanks for sharing! Love the changes you made & that you're continuing to share about the cabin!
We did prime with Kilz before painting.
Stunning! That tile is gorgeous and such a bargain!
Julia, what program should I use to create a mood board? I think it would be super helpful for us since we are finishing our basement and there are lots of decisions to be made
I use Photoshop and illustrator.
Is $4.98 for the tile a typo? Because that would be amazing if it were real.
Per sheet.
Julia, could I ask about the baseboards? looks like the baseboards were on the floor rather than going up the wall as baseboards usually do? or is it some kind of black-tile border around the mosaic tile? it's a lovely look -- just wondering how you did it.
I think it might just be an optical illusion. The baseboards go up the wall, just the normal way. :)
Thank you very much for sharing your bathroom renovation and your feelings with us. You are an inspiration to a lot of people and to me especially. It must take a lot strength, courage and thoughtfulness to share and openly talk about the fire to the people that follow you. I wish you and your family the best of luck for the future. Thoughts and prayers are sent to you all the way from the Netherlands. :-)
I know this had to be hard to write, but it was so helpful to read! We’ve been slowly updating (mostly cosmetic) our 1970s colonial and our powder room is next. I’m so intimidated by it - every other room so far was easy - paint, new light fixtures, etc. this will involve tile and plumbing. A short post like this makes it feel more doable than one that is super in depth with the step by step for some reason.
Thank you for sharing. I wondered two things as I read: was it hard having to write this in the past tense? and have the previous owners seen what happened to the cabin and have they tried to contact you about it? I know that may seem random, but for some reason I am curious about it.
The post was hard to write all the way around for lots of reasons. But on a positive, the previous owner called us the second he saw it on the news and a couple times since. We became close before the fire because a lot of the visions he had for the cabin, family and aesthetically, we were excited to carry on. He has offered to buy back the land if we want or sell us additional land to build on--he's just a really supportive, kind man.
This warms my heart. It’s good to know there are so many kind people left in the world.
I’m excited for your future projects as well as filled with admiration for the joy and creativity you approach everything you do with. Onwards and upwards!
How special to have a supportive friend who can appreciate your love for the cabin because he loved it before!
Oh wow, that is wonderful! Thank you for answering ❤
Such a beautiful space! As always, your style and creativity shine through! Continued thoughts and prayers for you and your family as you discover new ways to express your creative abilities. You are such an inspiration to me as you approach this situation with such grace. Thank you for being open with us. Love to you and your family.
This looks GREAT. Awesome inspiration for a tiny space. I love that ceramic tile too and good to know it can be cut with a razor blade?!!! Still so sad you won't get to use it.
I think she means the mesh backing is easily cut with a razor blade and with the small tiles they can get close enough to the wall that gaps will be covered by grout and baseboard. ????
Thank you for sharing! I can only imagine how hard it was for you but I know all of your fans really wanted to see what you had done, especially after seeing the sneak peek.
I have been thinking of you and your family your family often. I am sure you realize that you impact the lives of others on a daily basis regarding decorating and homeownership. However, I want to let you know that you also influence so many with your calm sensibilities, your love of family, and your total lack of pretentiousness. Thank you for always helping me start my day with a sense of well-being.
What a beautiful comment that completely captures my thoughts exactly.
Yes, this is exactly how I feel about you and the space you have created. ????
Thank you SO much for sharing. I love this renovation for so many reason <3