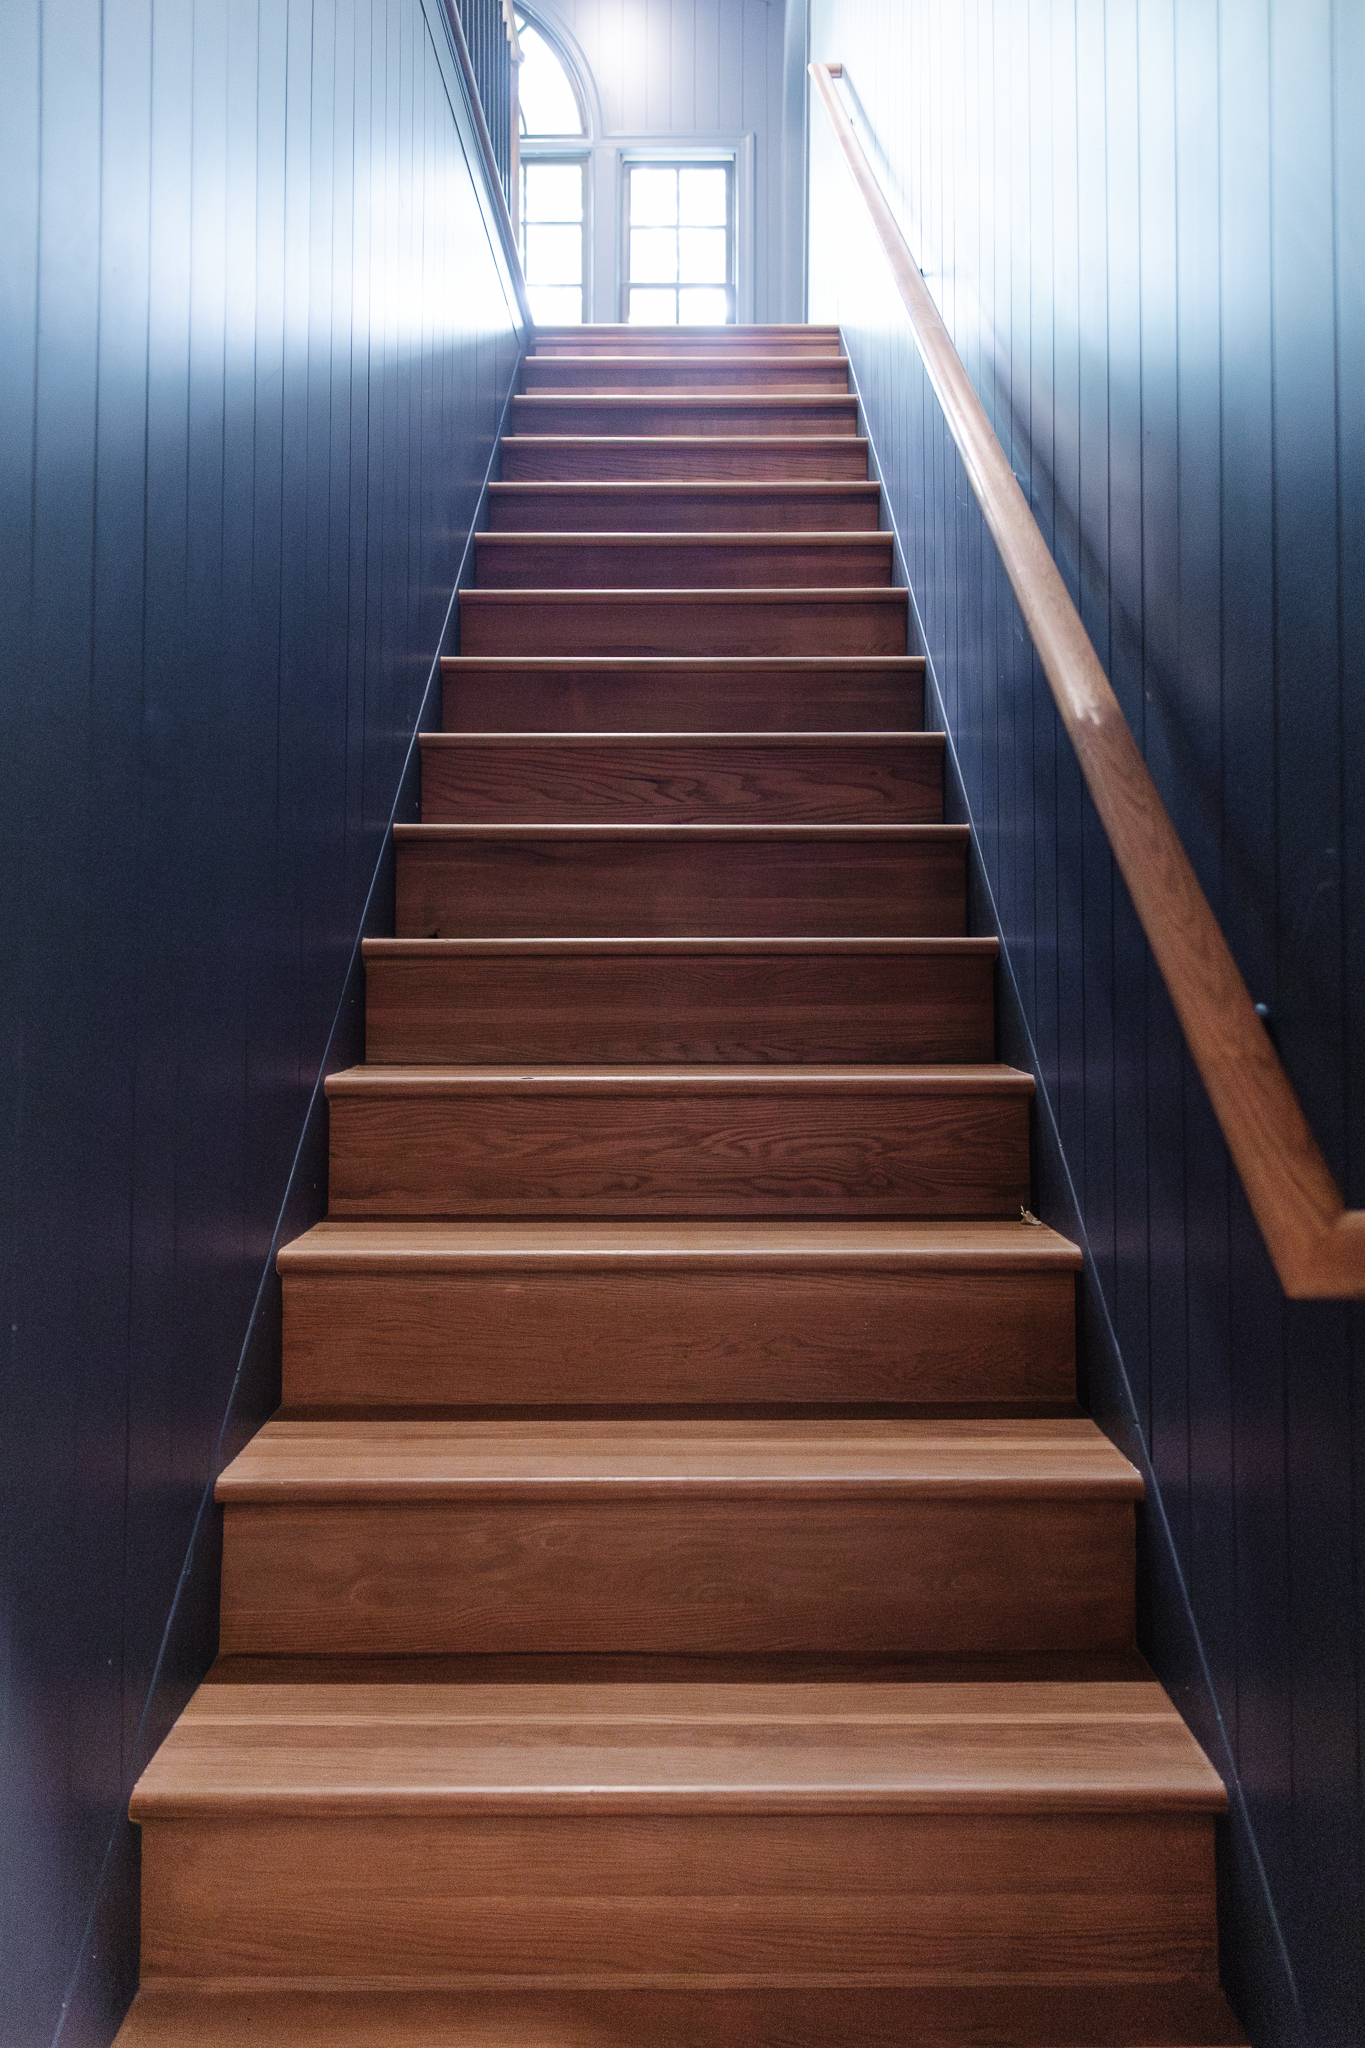
I’ve been wanting to add a stair runner to our back hallway/mudroom staircase for a while now, and we finally had a couple of days set aside to do it! Chris did a lot of research on how to install a stair runner and stair rods, and we’re going to share every step we took — it turned out amazing and so much less expensive (under $1,500!) than going custom.
CLJ x Loloi Judy Natural/Sky Runner | Polished Brass Stair Rods
Choosing a Stair Runner Rug
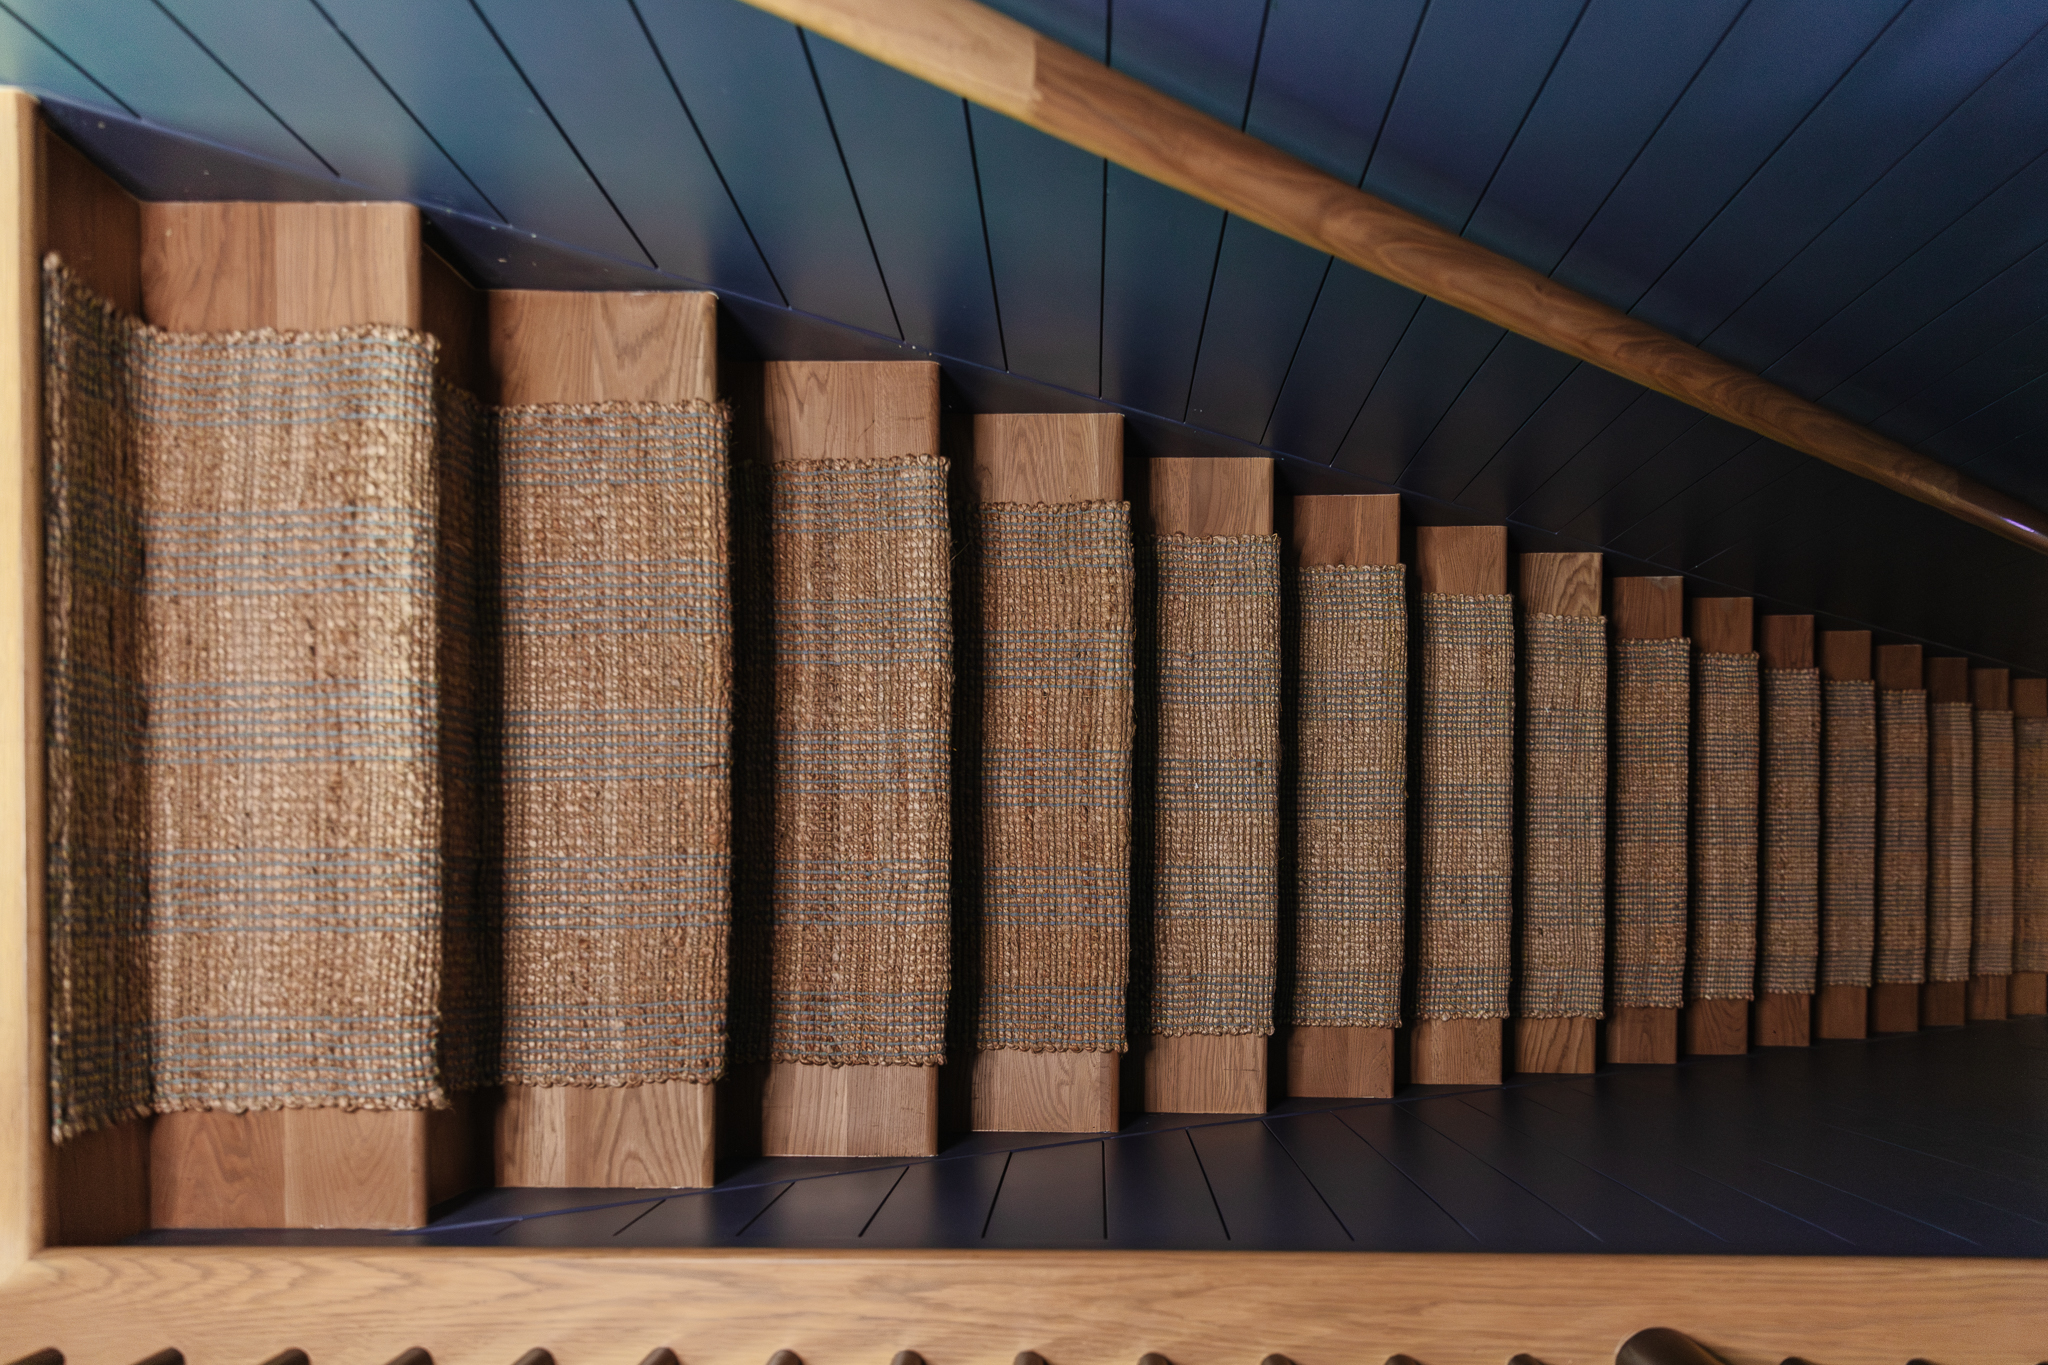
The first step was choosing the runners. The staircase leads to the blue bonus room upstairs and the back hallway has the grasscloth wallpaper with vertical stripes. I wanted the runner to also have vertical stripes so it kind of leads you up the stairs, so I picked our CLJ x Loloi Judy rug in Natural/Sky. I love that it also has some blue in that gives a nod to the bonus room. I ordered 5 of the 2'6"x7'6" runners so we had enough, but we only ended up using 4 (each runner covered about 4 stairs, with a little extra that needed trimmed off).
Measure and Mark Off the Runner Path
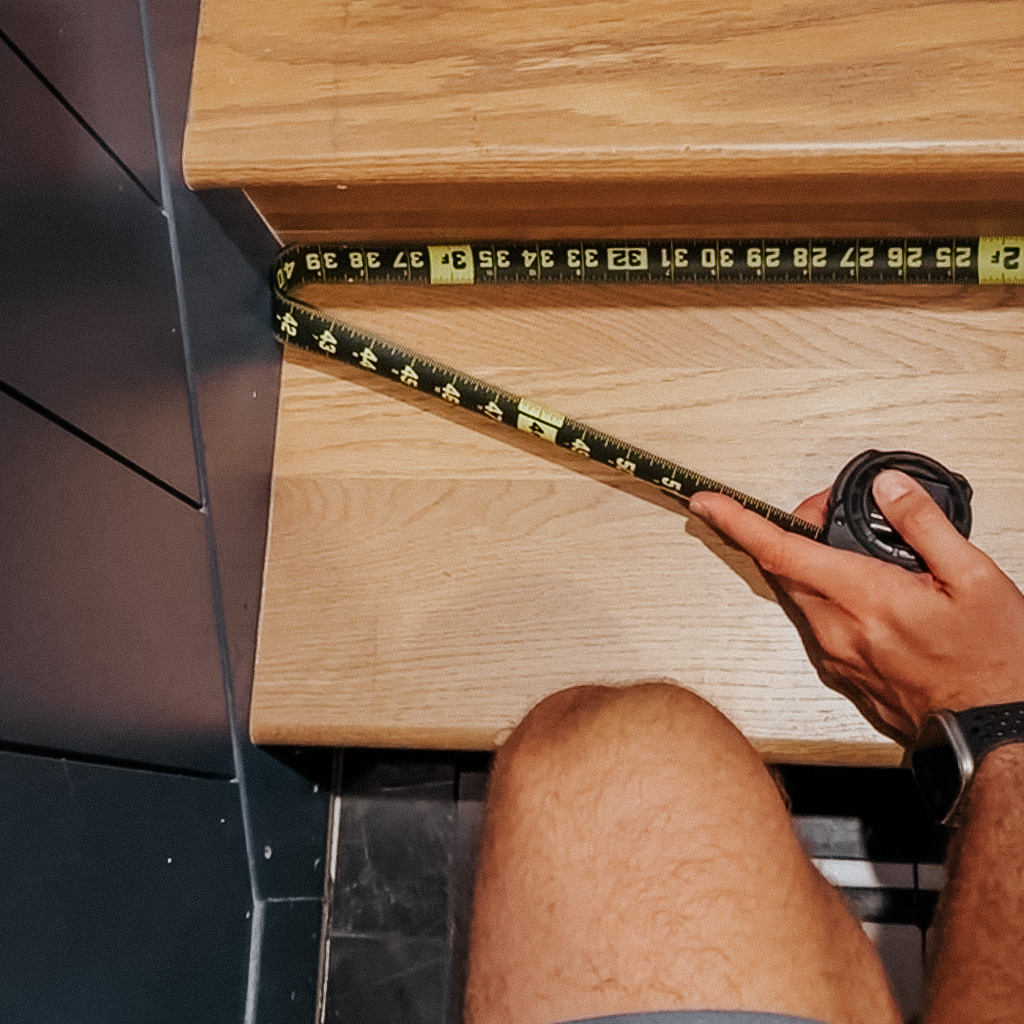
Our stairs are 39 ¾” wide and the stair runner is 30” wide, so we just marked 4 ⅝” on the right edge of the tread away from the skirtboard. The truth is that most halls and stairways are not perfectly square, and that is the case here. While our stairs are generally 39 ¾” wide, it's not perfectly consistent stair to stair. If we tried to keep the runner centered on each stair, due to the stripe in the rug you would see the runner jogging from left to right slightly as it went up, and that's not a great look. So we made a mark 4 ⅝” in on the right edge of the stair treads and risers, and we followed that side up to keep the runner straight. Visually, the difference is not enough to tell its not centered - the blue stripes being straight was more important to us.
Measure and Cut Carpet Tape for Rug Pads
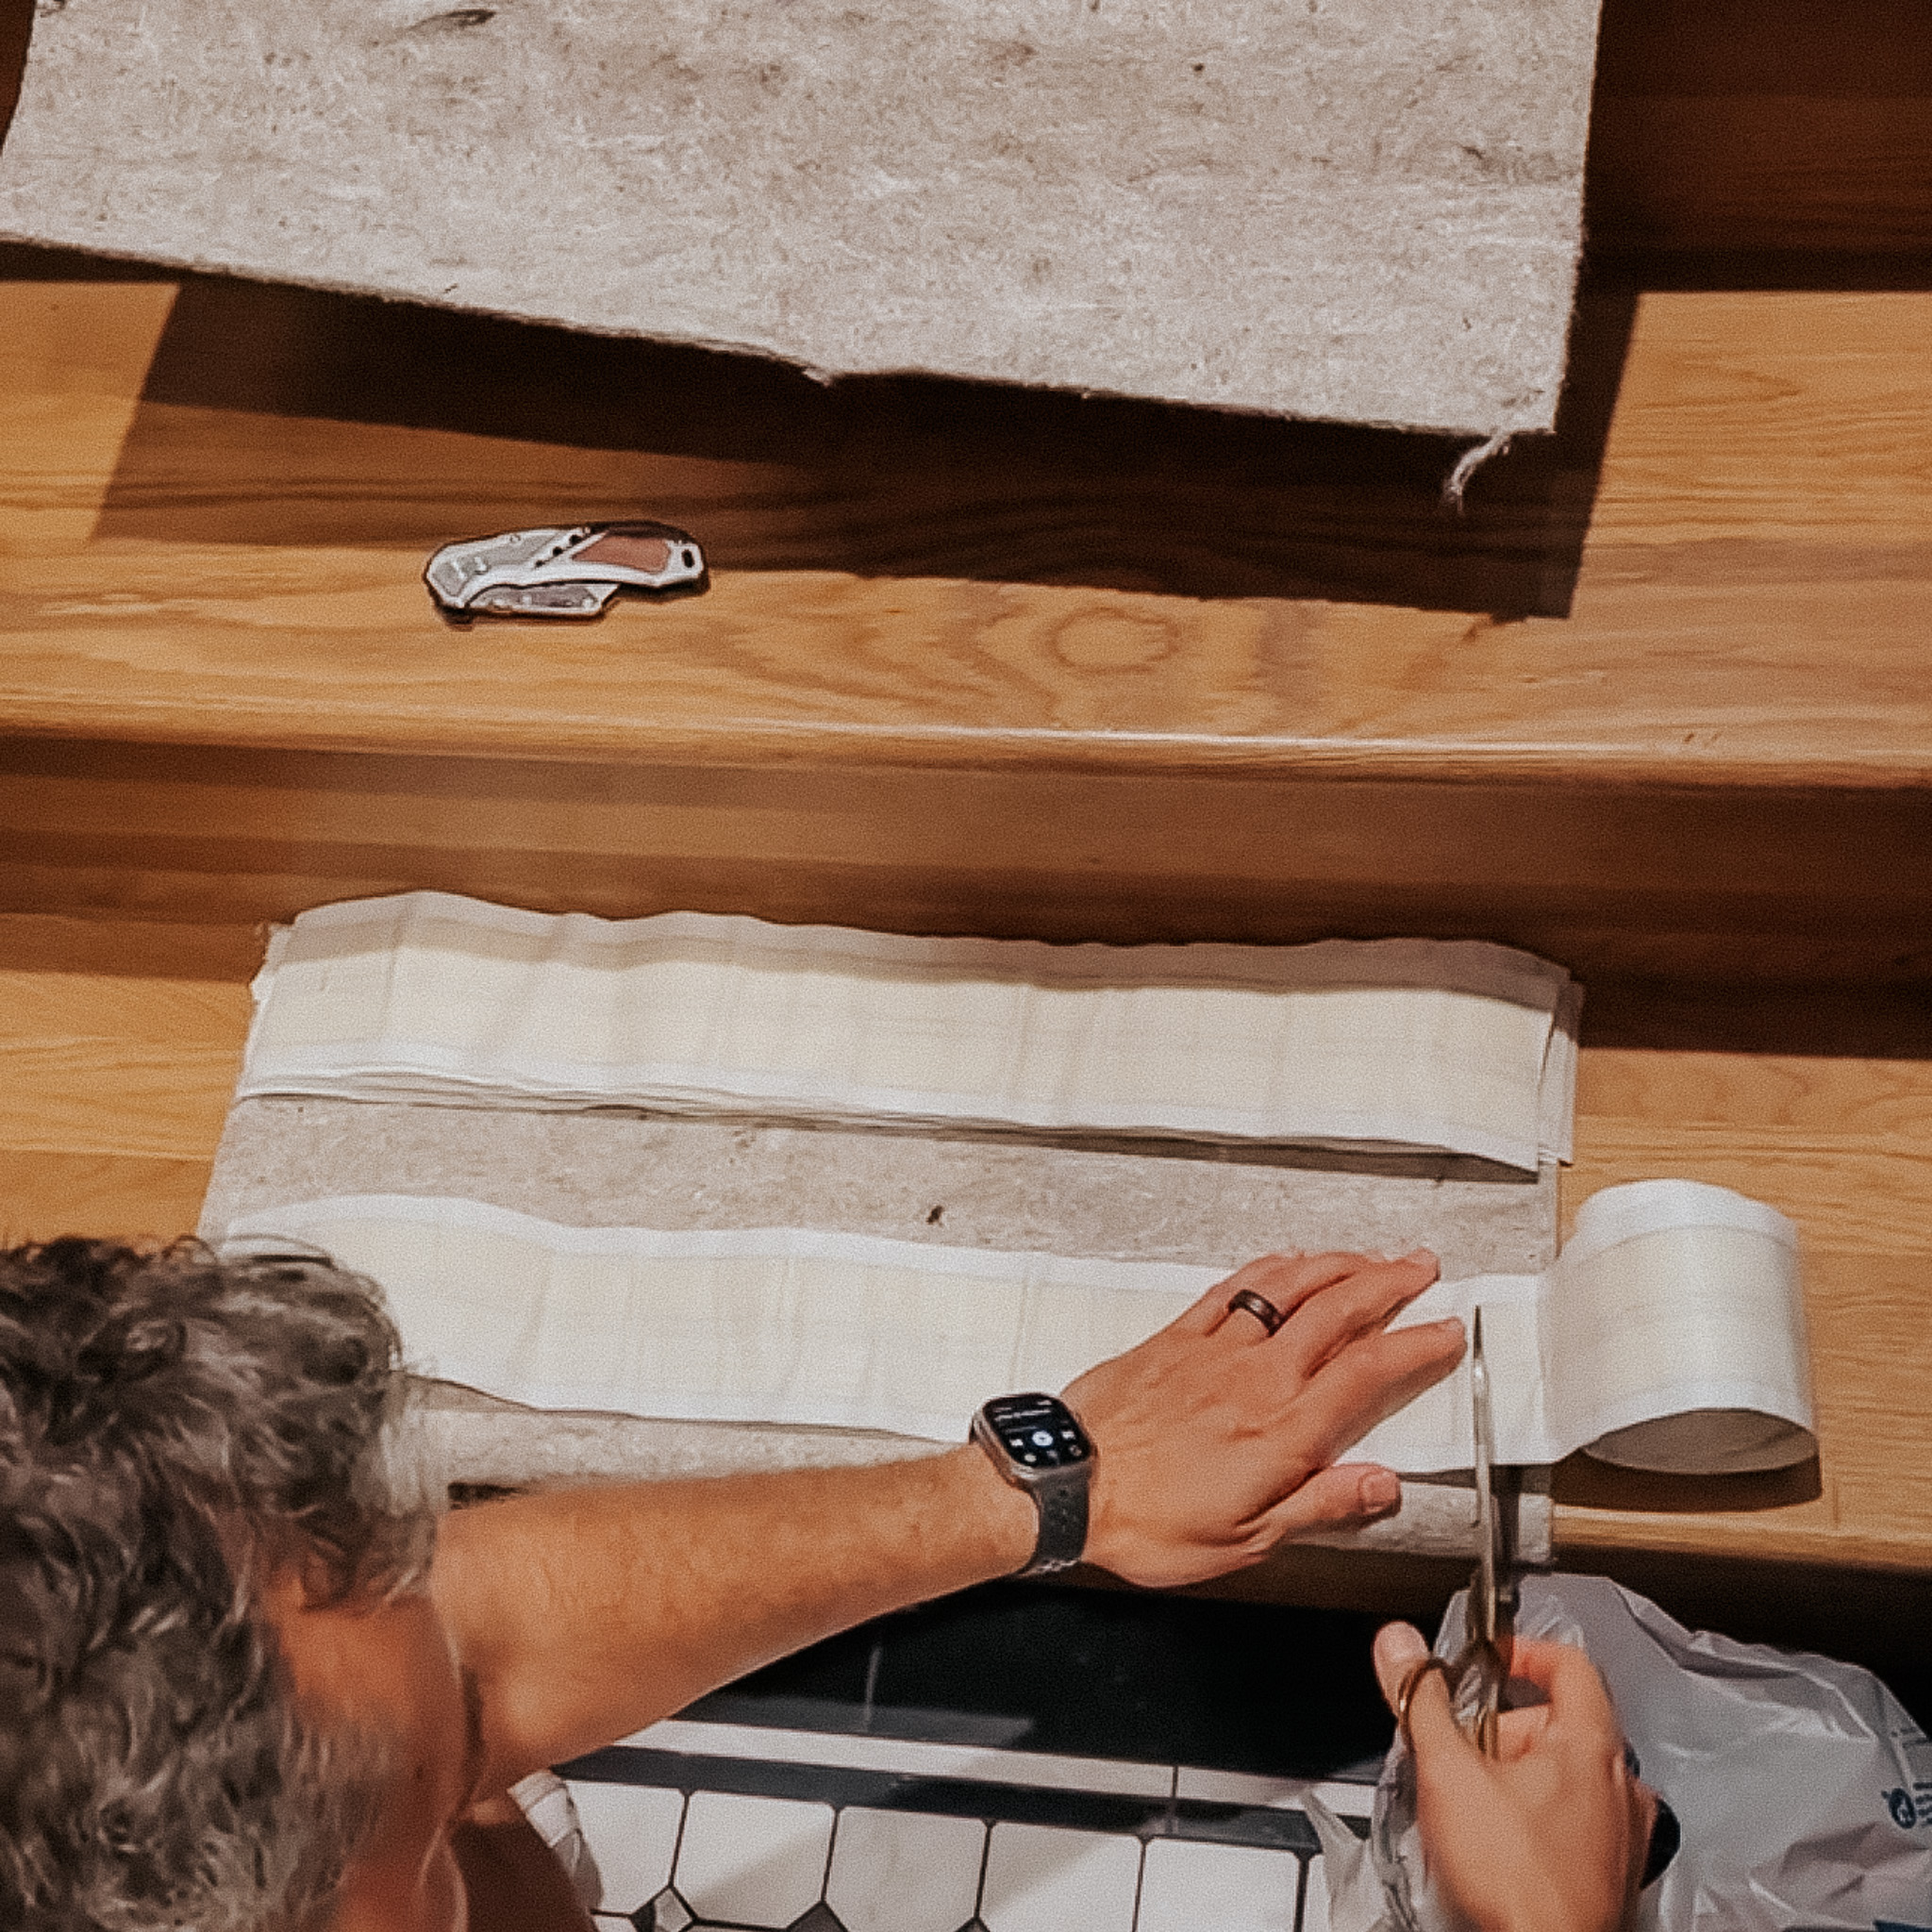
Carpet Tape | Rug Pad | Scissors | Utility Knife
Rug pads help the runner last and feel really good underfoot. I picked up 1/8" thick felt & rubber rugs pads in a size just a couple of inches more narrow than the runner (2'x8'). I wasn’t sure how many we would need so I got several rug pads. For 16 stairs, we used two full pads and part of a third one.
To secure the rug pad, we applied two strips of double-sided carpet tape width-wise (parallel) to the front and rear ends of the tread. We felt these were the areas that would be most prone to "slumping" over time, so we added the tape to help keep it tight during installation, and hopefully long term. We laid out the tape over the width of the rug pad and cut to measure (subtracting about an inch to prevent the tape showing on the edges). Take some time and cut all your pieces up front to help speed up installation.
Install Rug Pads
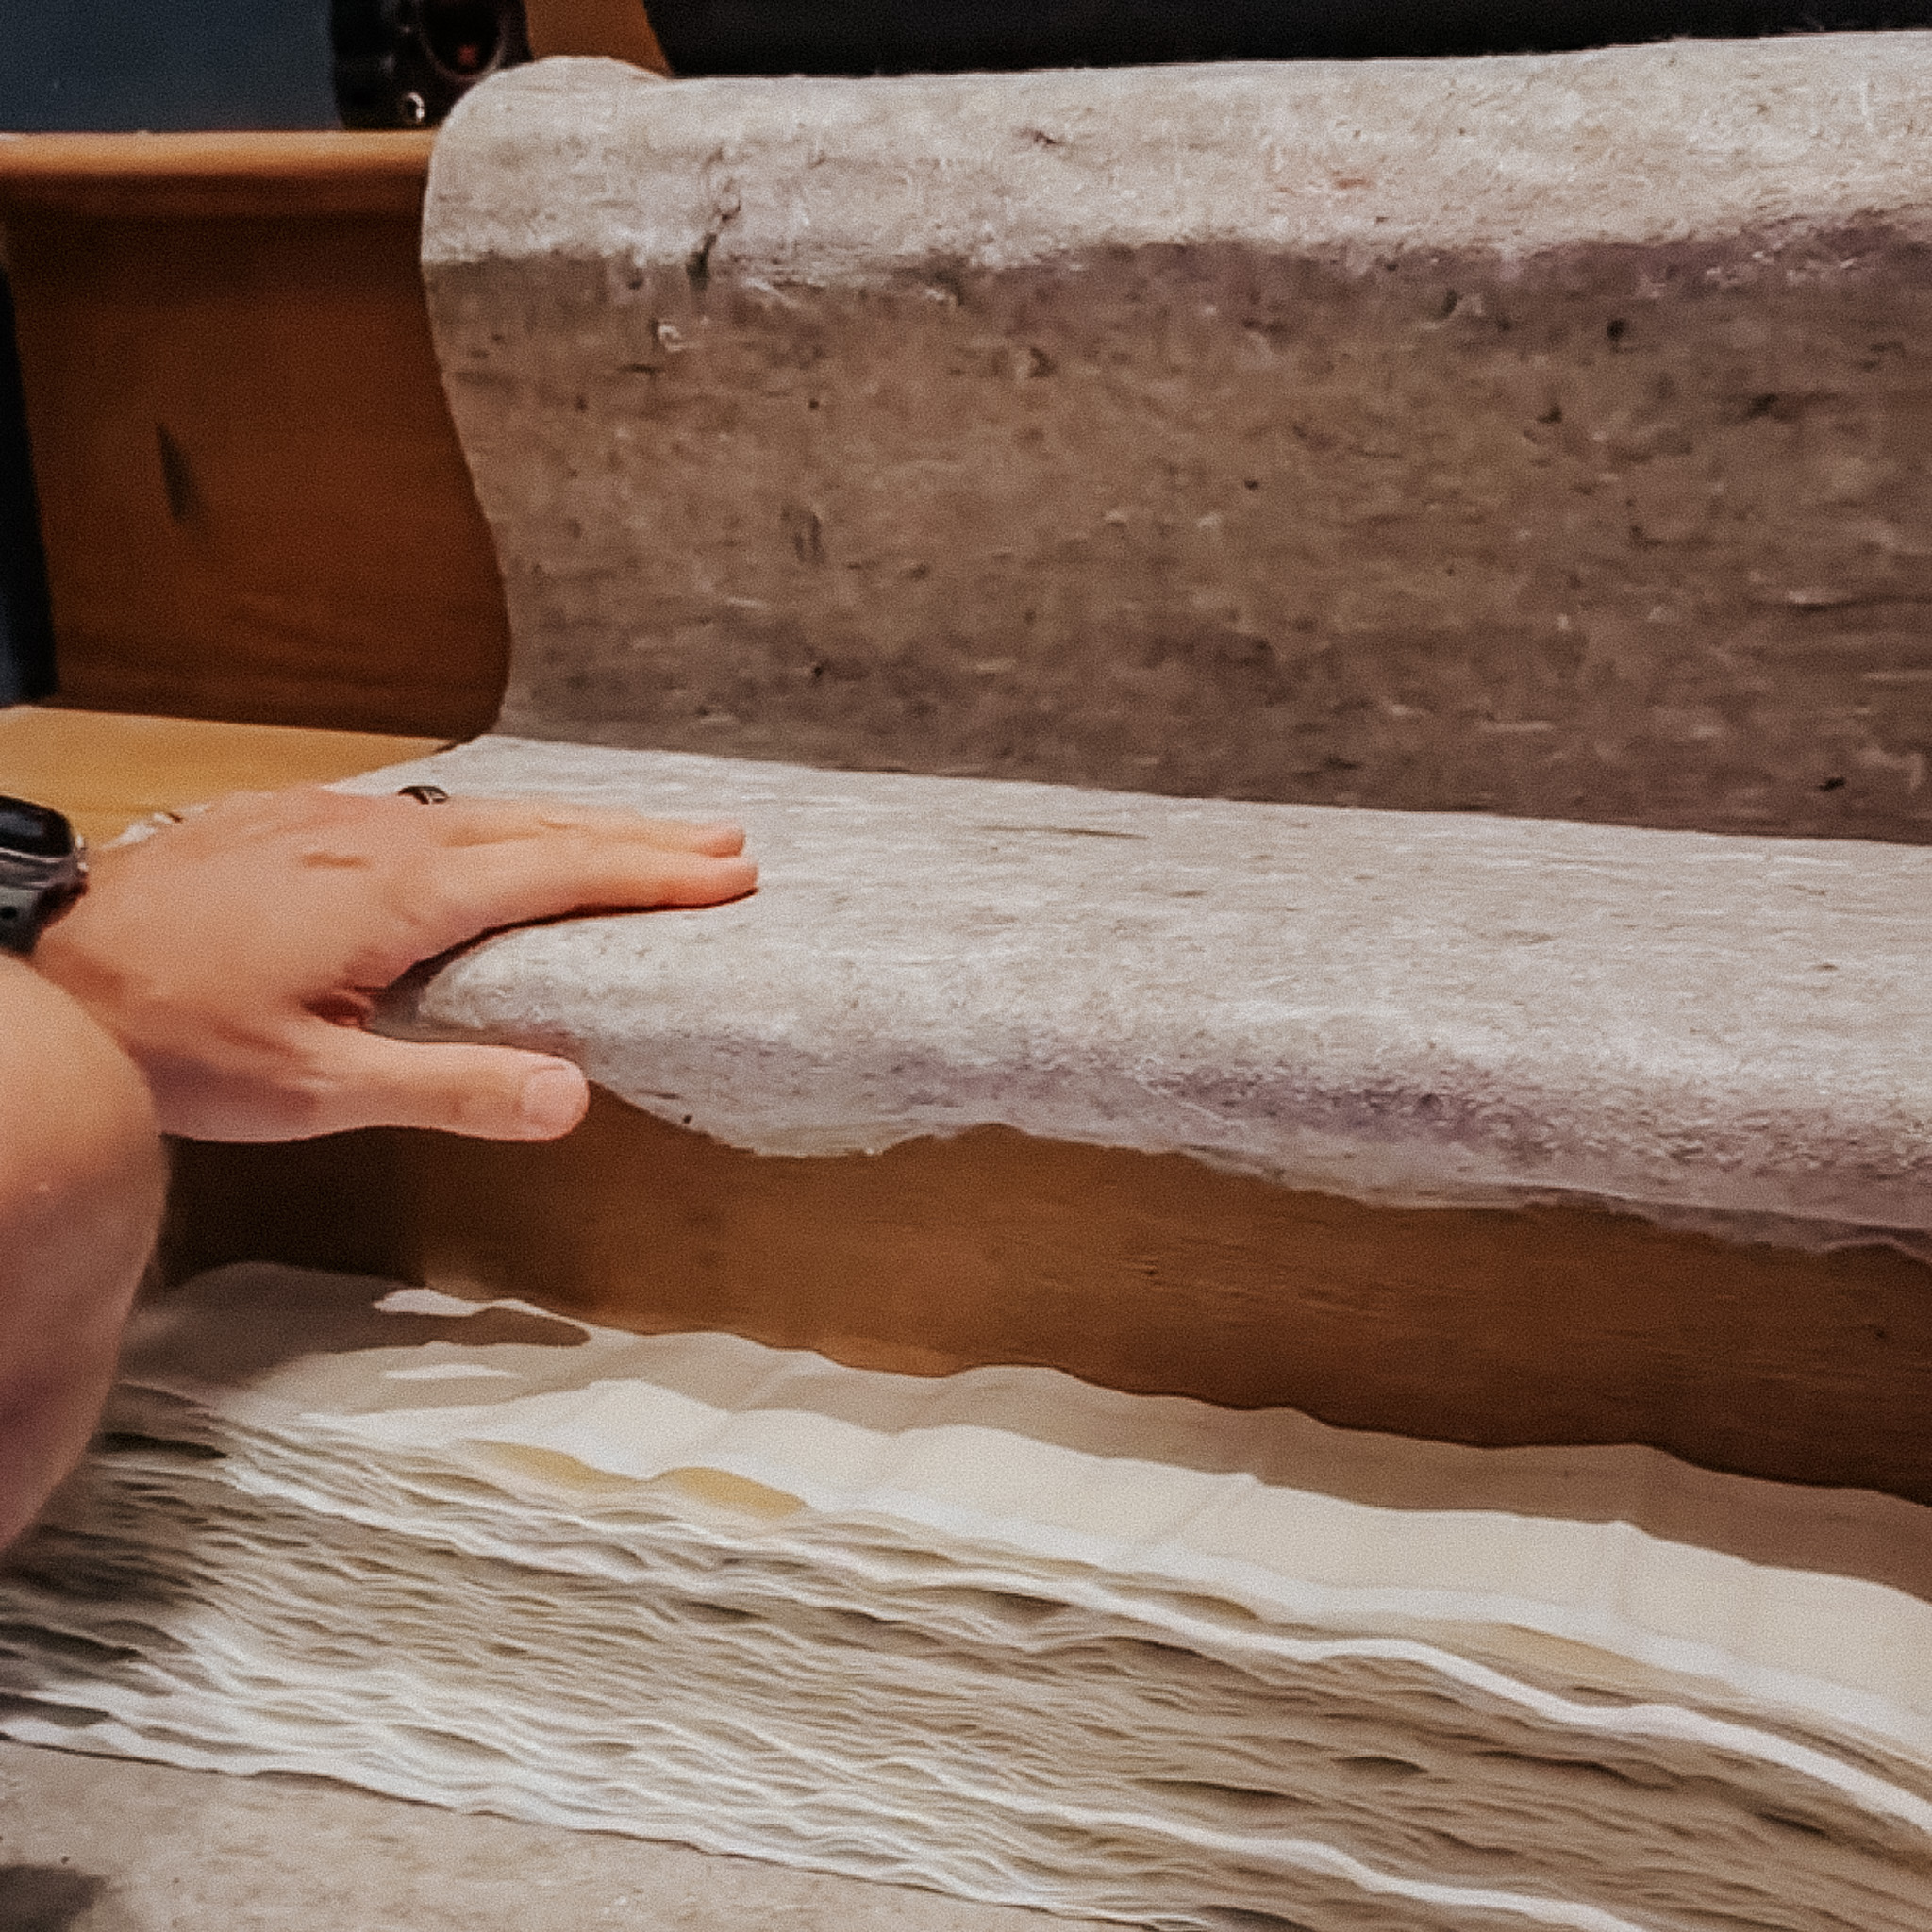
We decided to wrap the rug pad around the bullnose of the stairs, otherwise you would see a clear line where the rug pad ended.
We applied the carpet tape within the marked off runner area on the front and back of the tread with about a 3” overhang for the runner on either side.
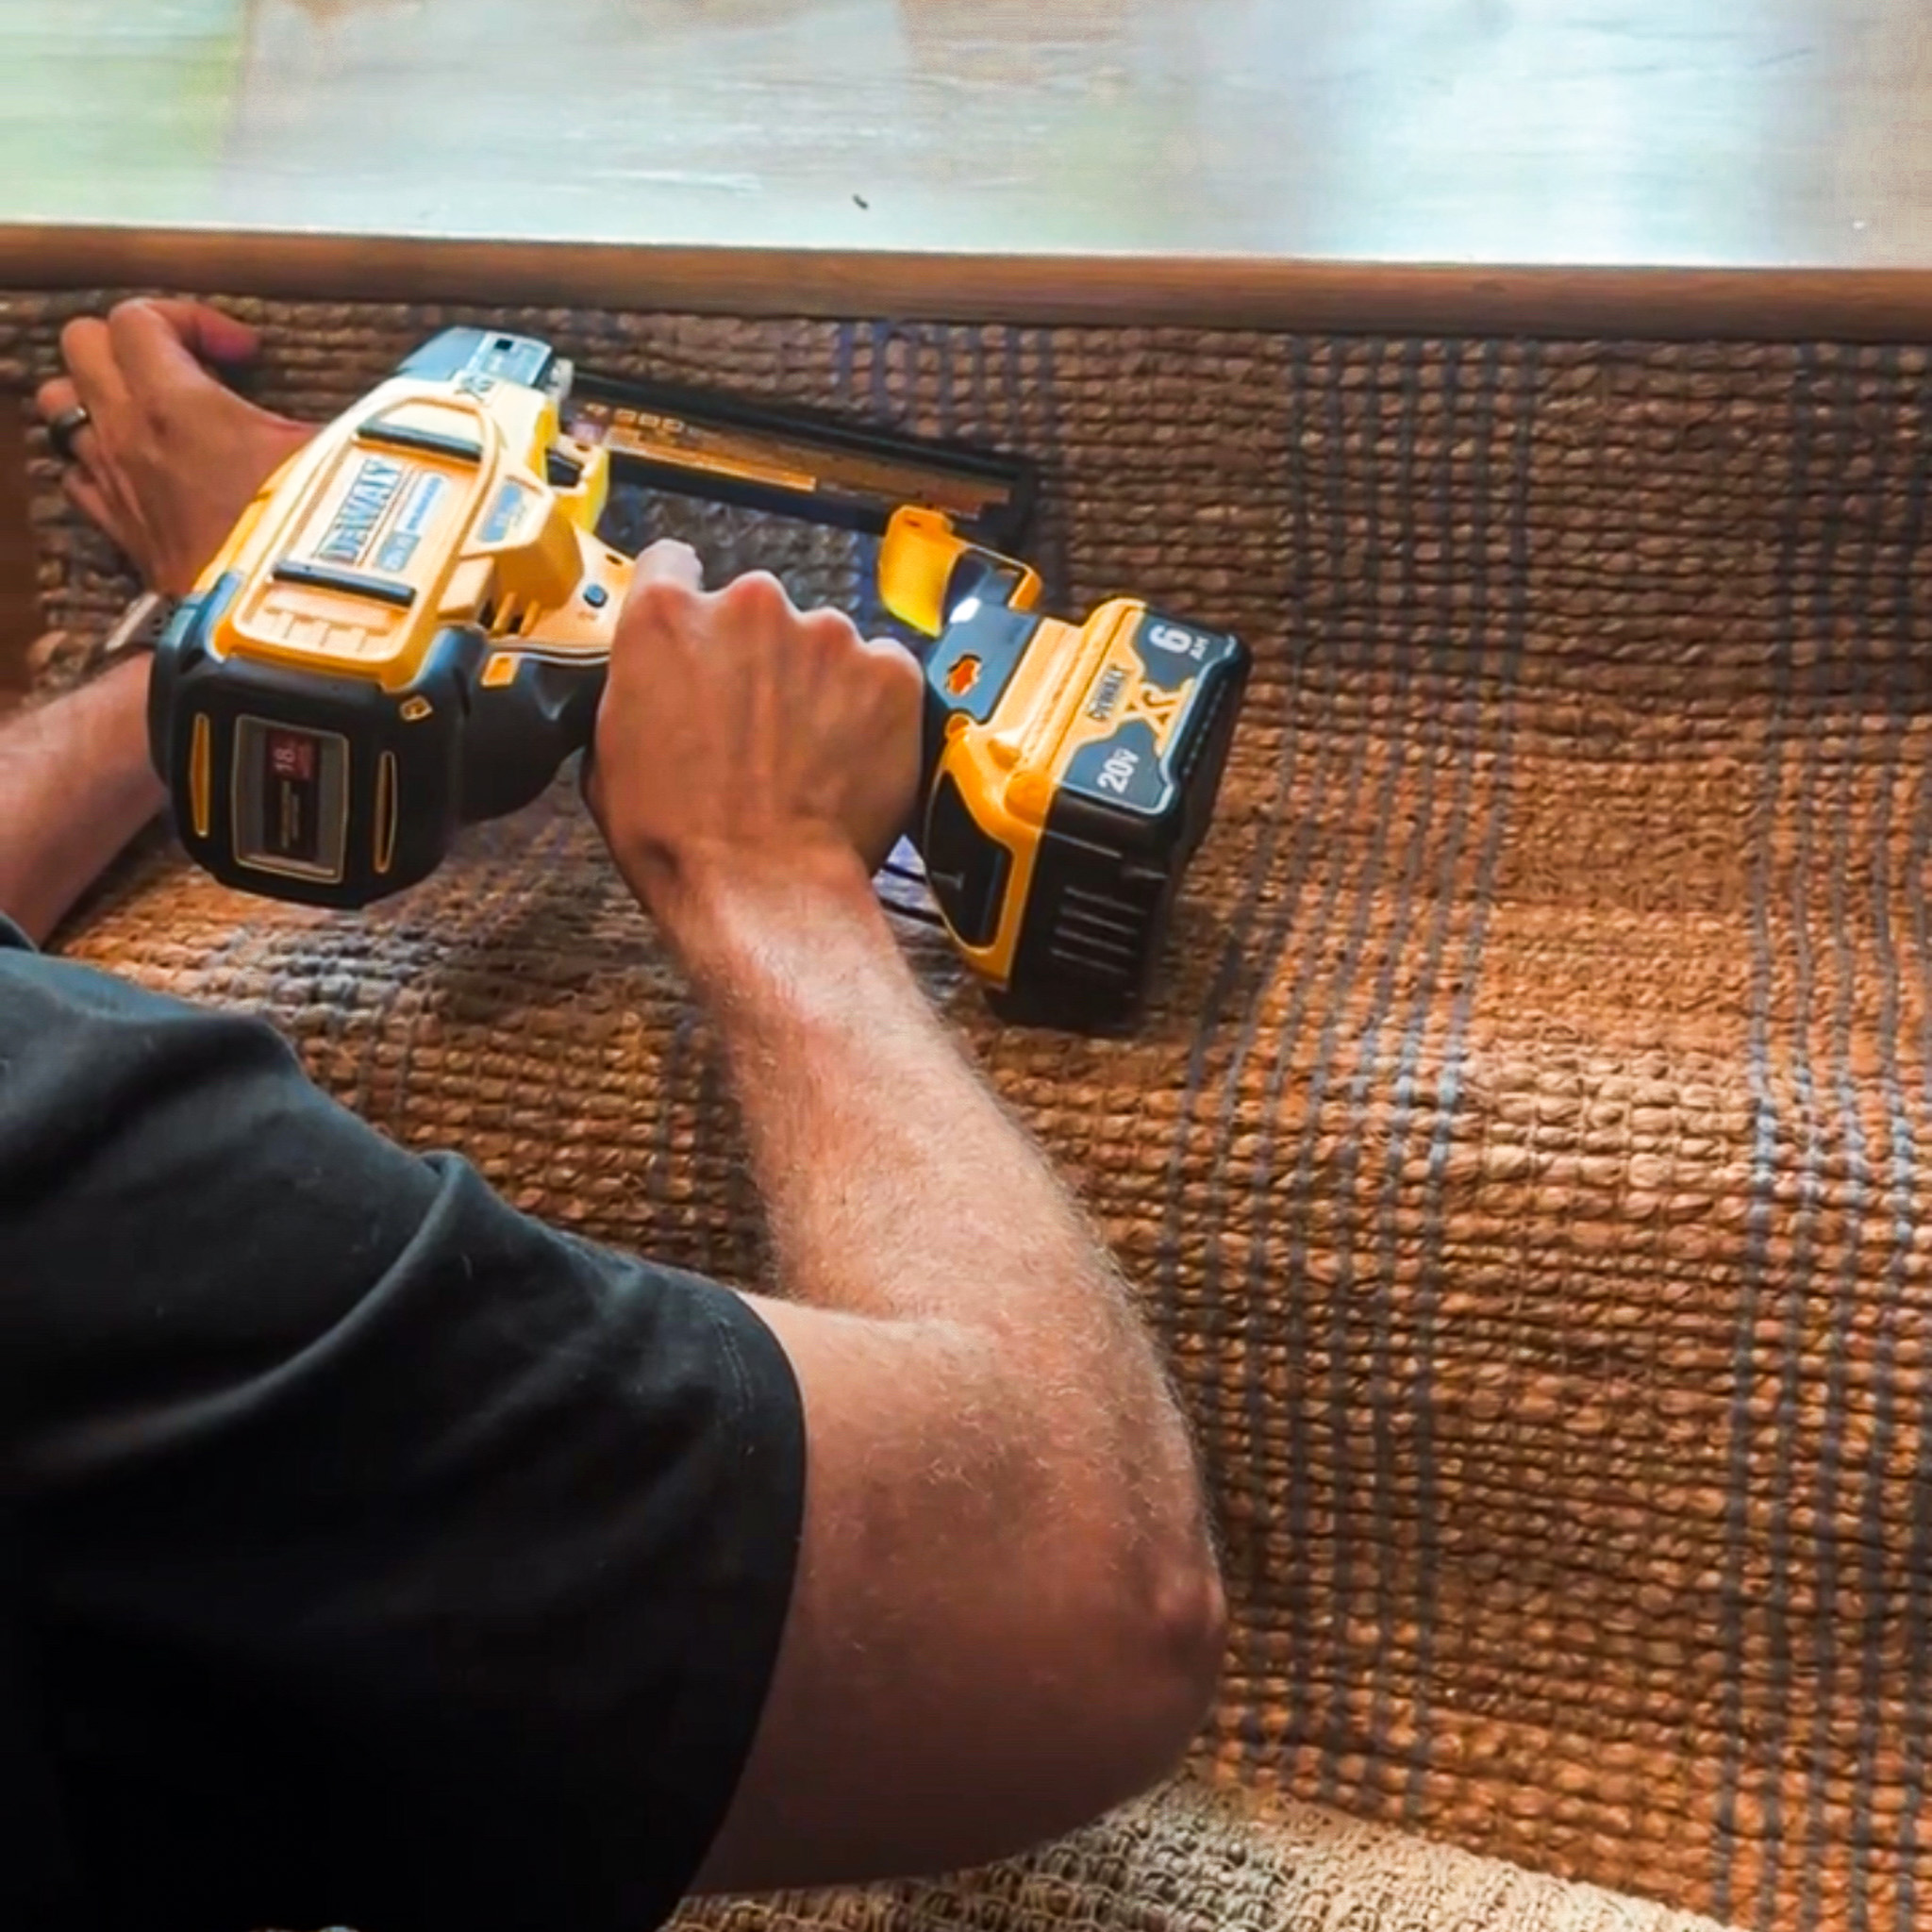
After wrapping the piece of padding around the bullnose, Chris stapled it under the bullnose and ensured it was taut to the back of the next riser below. Then he used a utility knife to cut the rug pad across the back (you could use a carpet knife if you want to be fancy).
Stapler | Utility Knife | Rug Pad
(Optional) Cut and Apply More Rug Tape
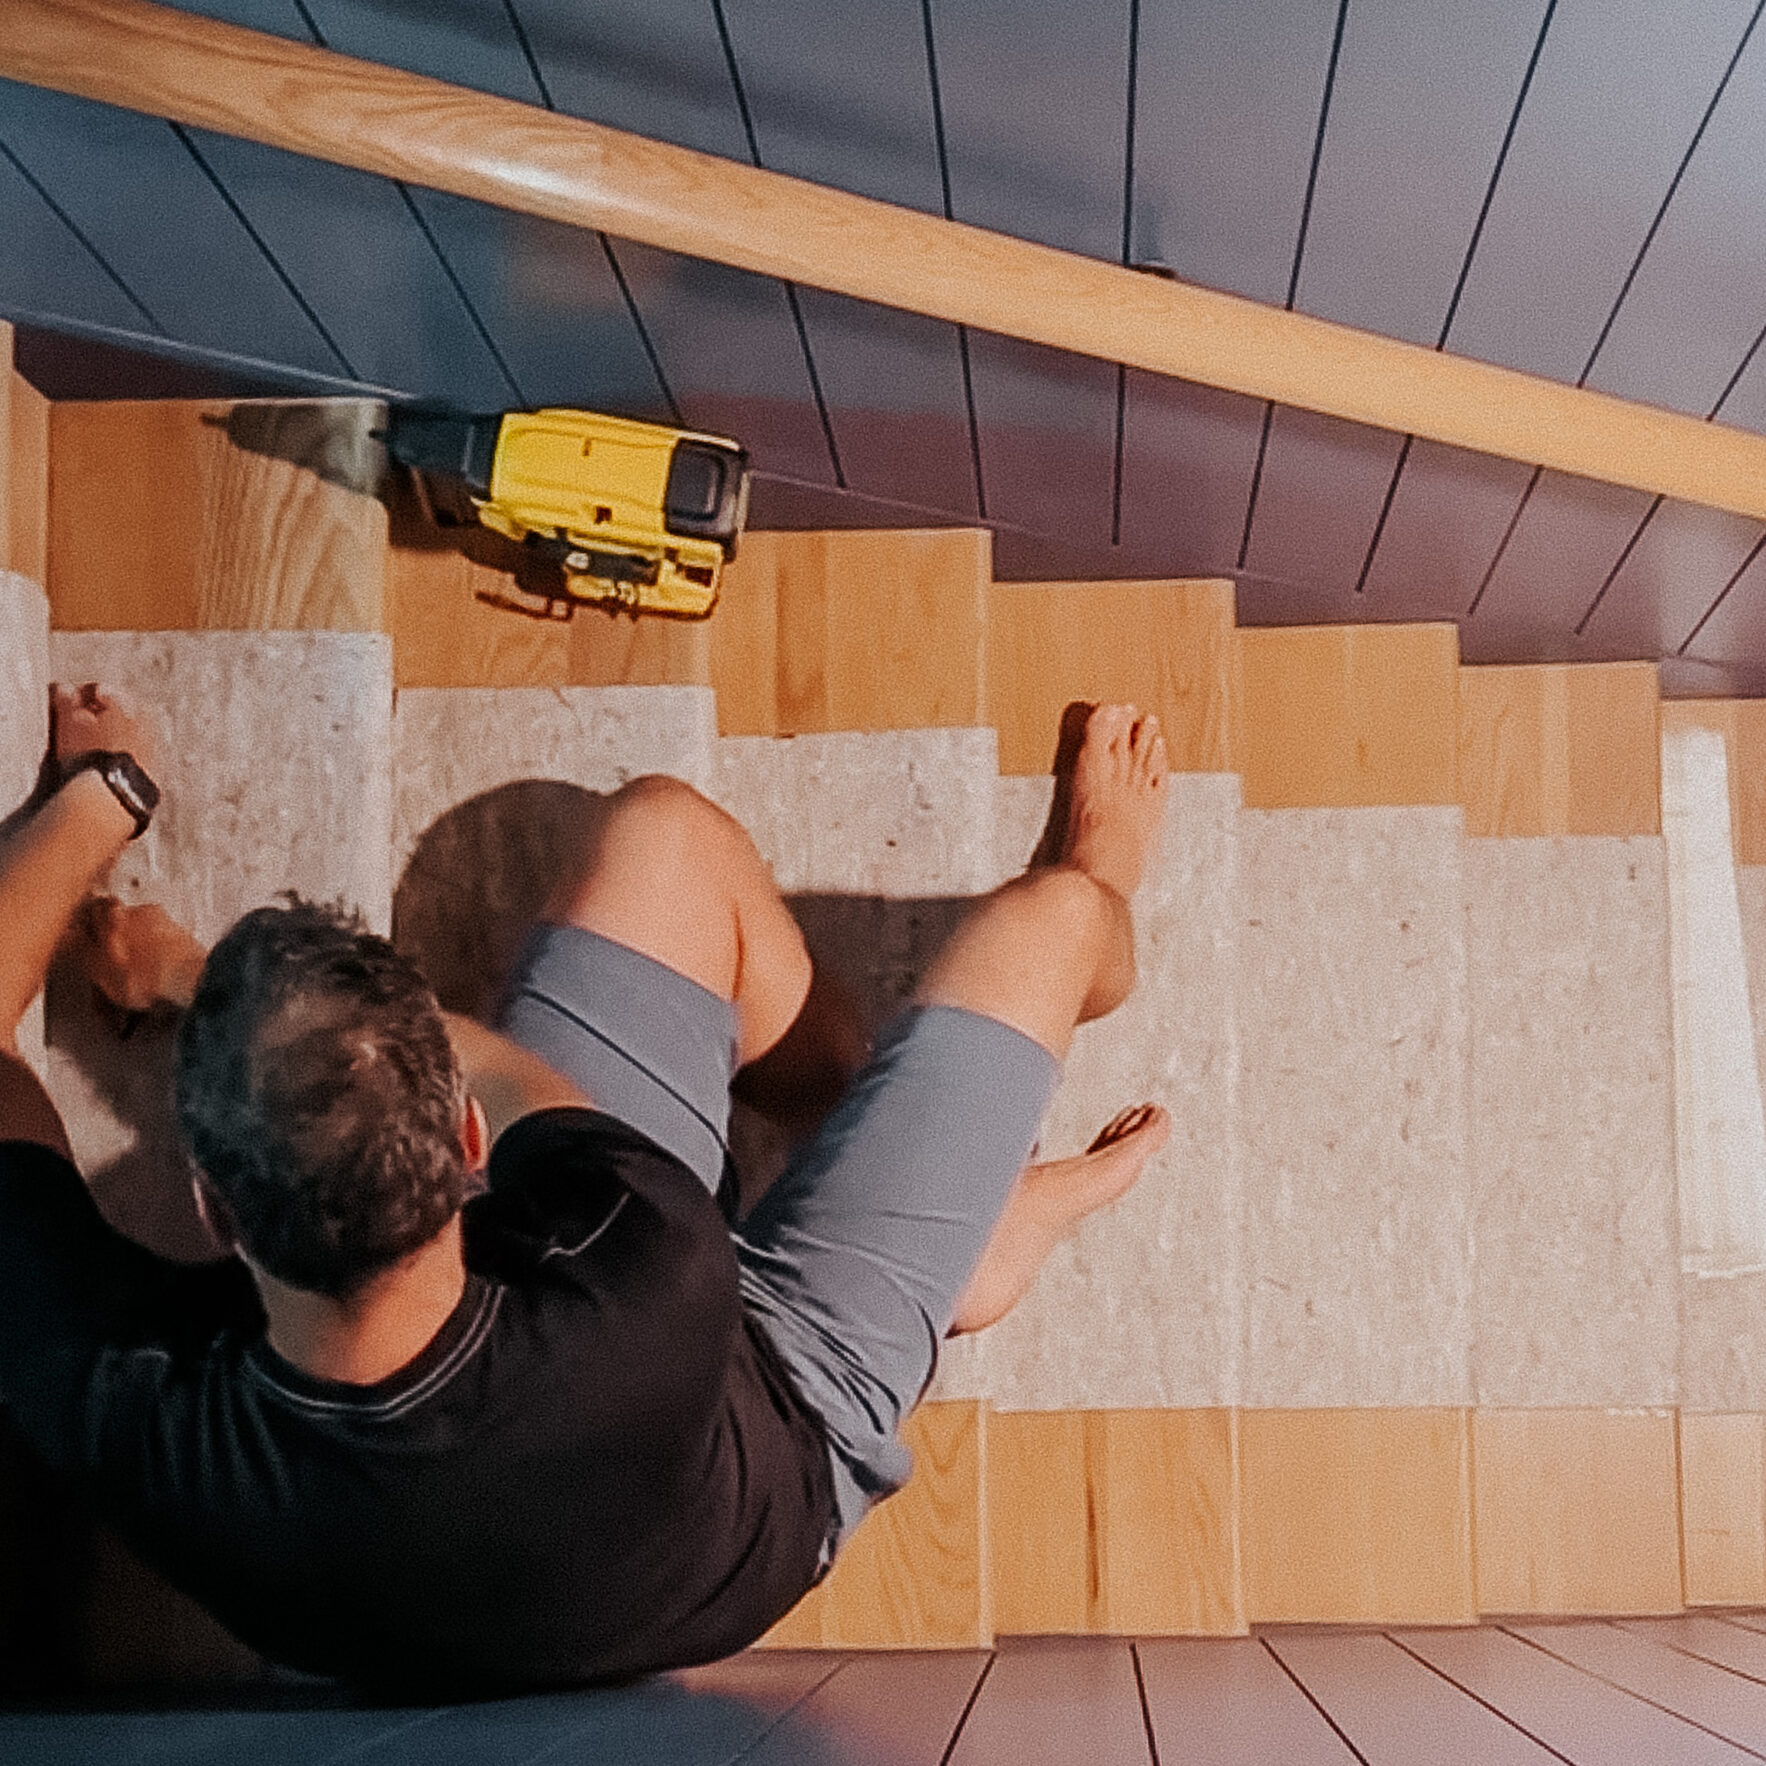
Chris is very thorough. You could probably just go over the runner with a stapler but Chris wanted to add carpet tape along the sides of the rug pad (half on the pad and half on the stair), as well as the riser, so the runner really wouldn't move out of place over time. Better to be secure than sorry!
Start Installing the Runner
There are two installation options when it comes to stair runners: the waterfall option and the upholstered option.
In the waterfall option, the runner goes over the nosing and then is attached to the very bottom of the riser/back of the tread (so there’s a gap behind the runner in front of the top of the riser).
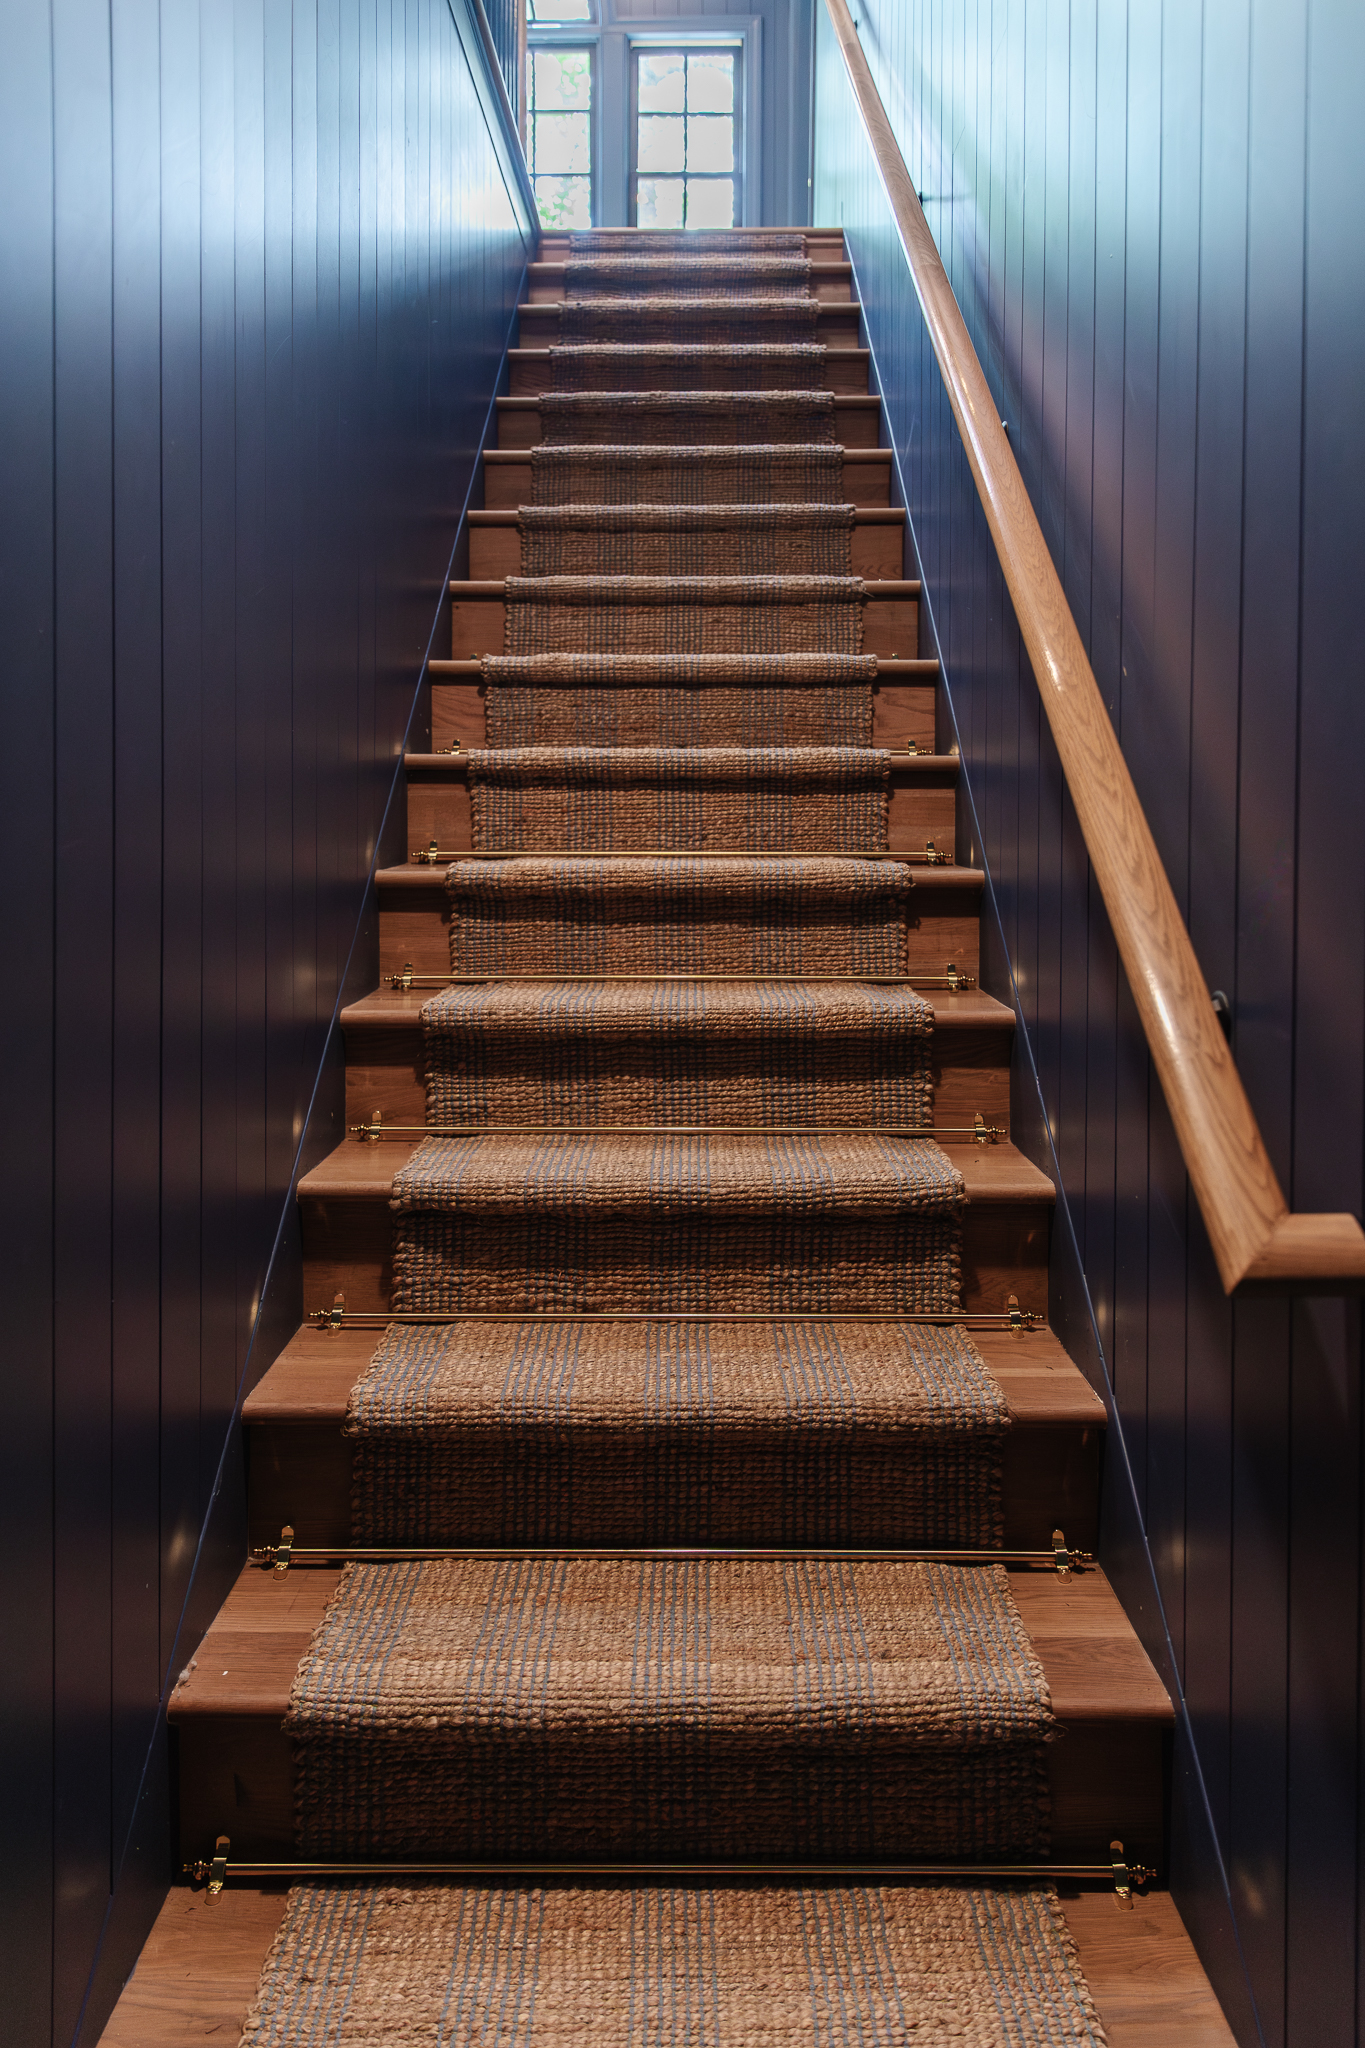
The upholstered version, which is what we did, attaches the runner at the top of the riser/back of the tread. It requires more length of runner, but it has a more high-end, custom look.
Chris set the rug by stapling the edge of the rug to the lowest back riser, then stapled at the top of that riser (hidden beneath the bullnose), and then he pulled it taut around to the bottom of the next riser and stapled again. We did a few steps and then decided to work on the transition when we would inevitably run out of rug.
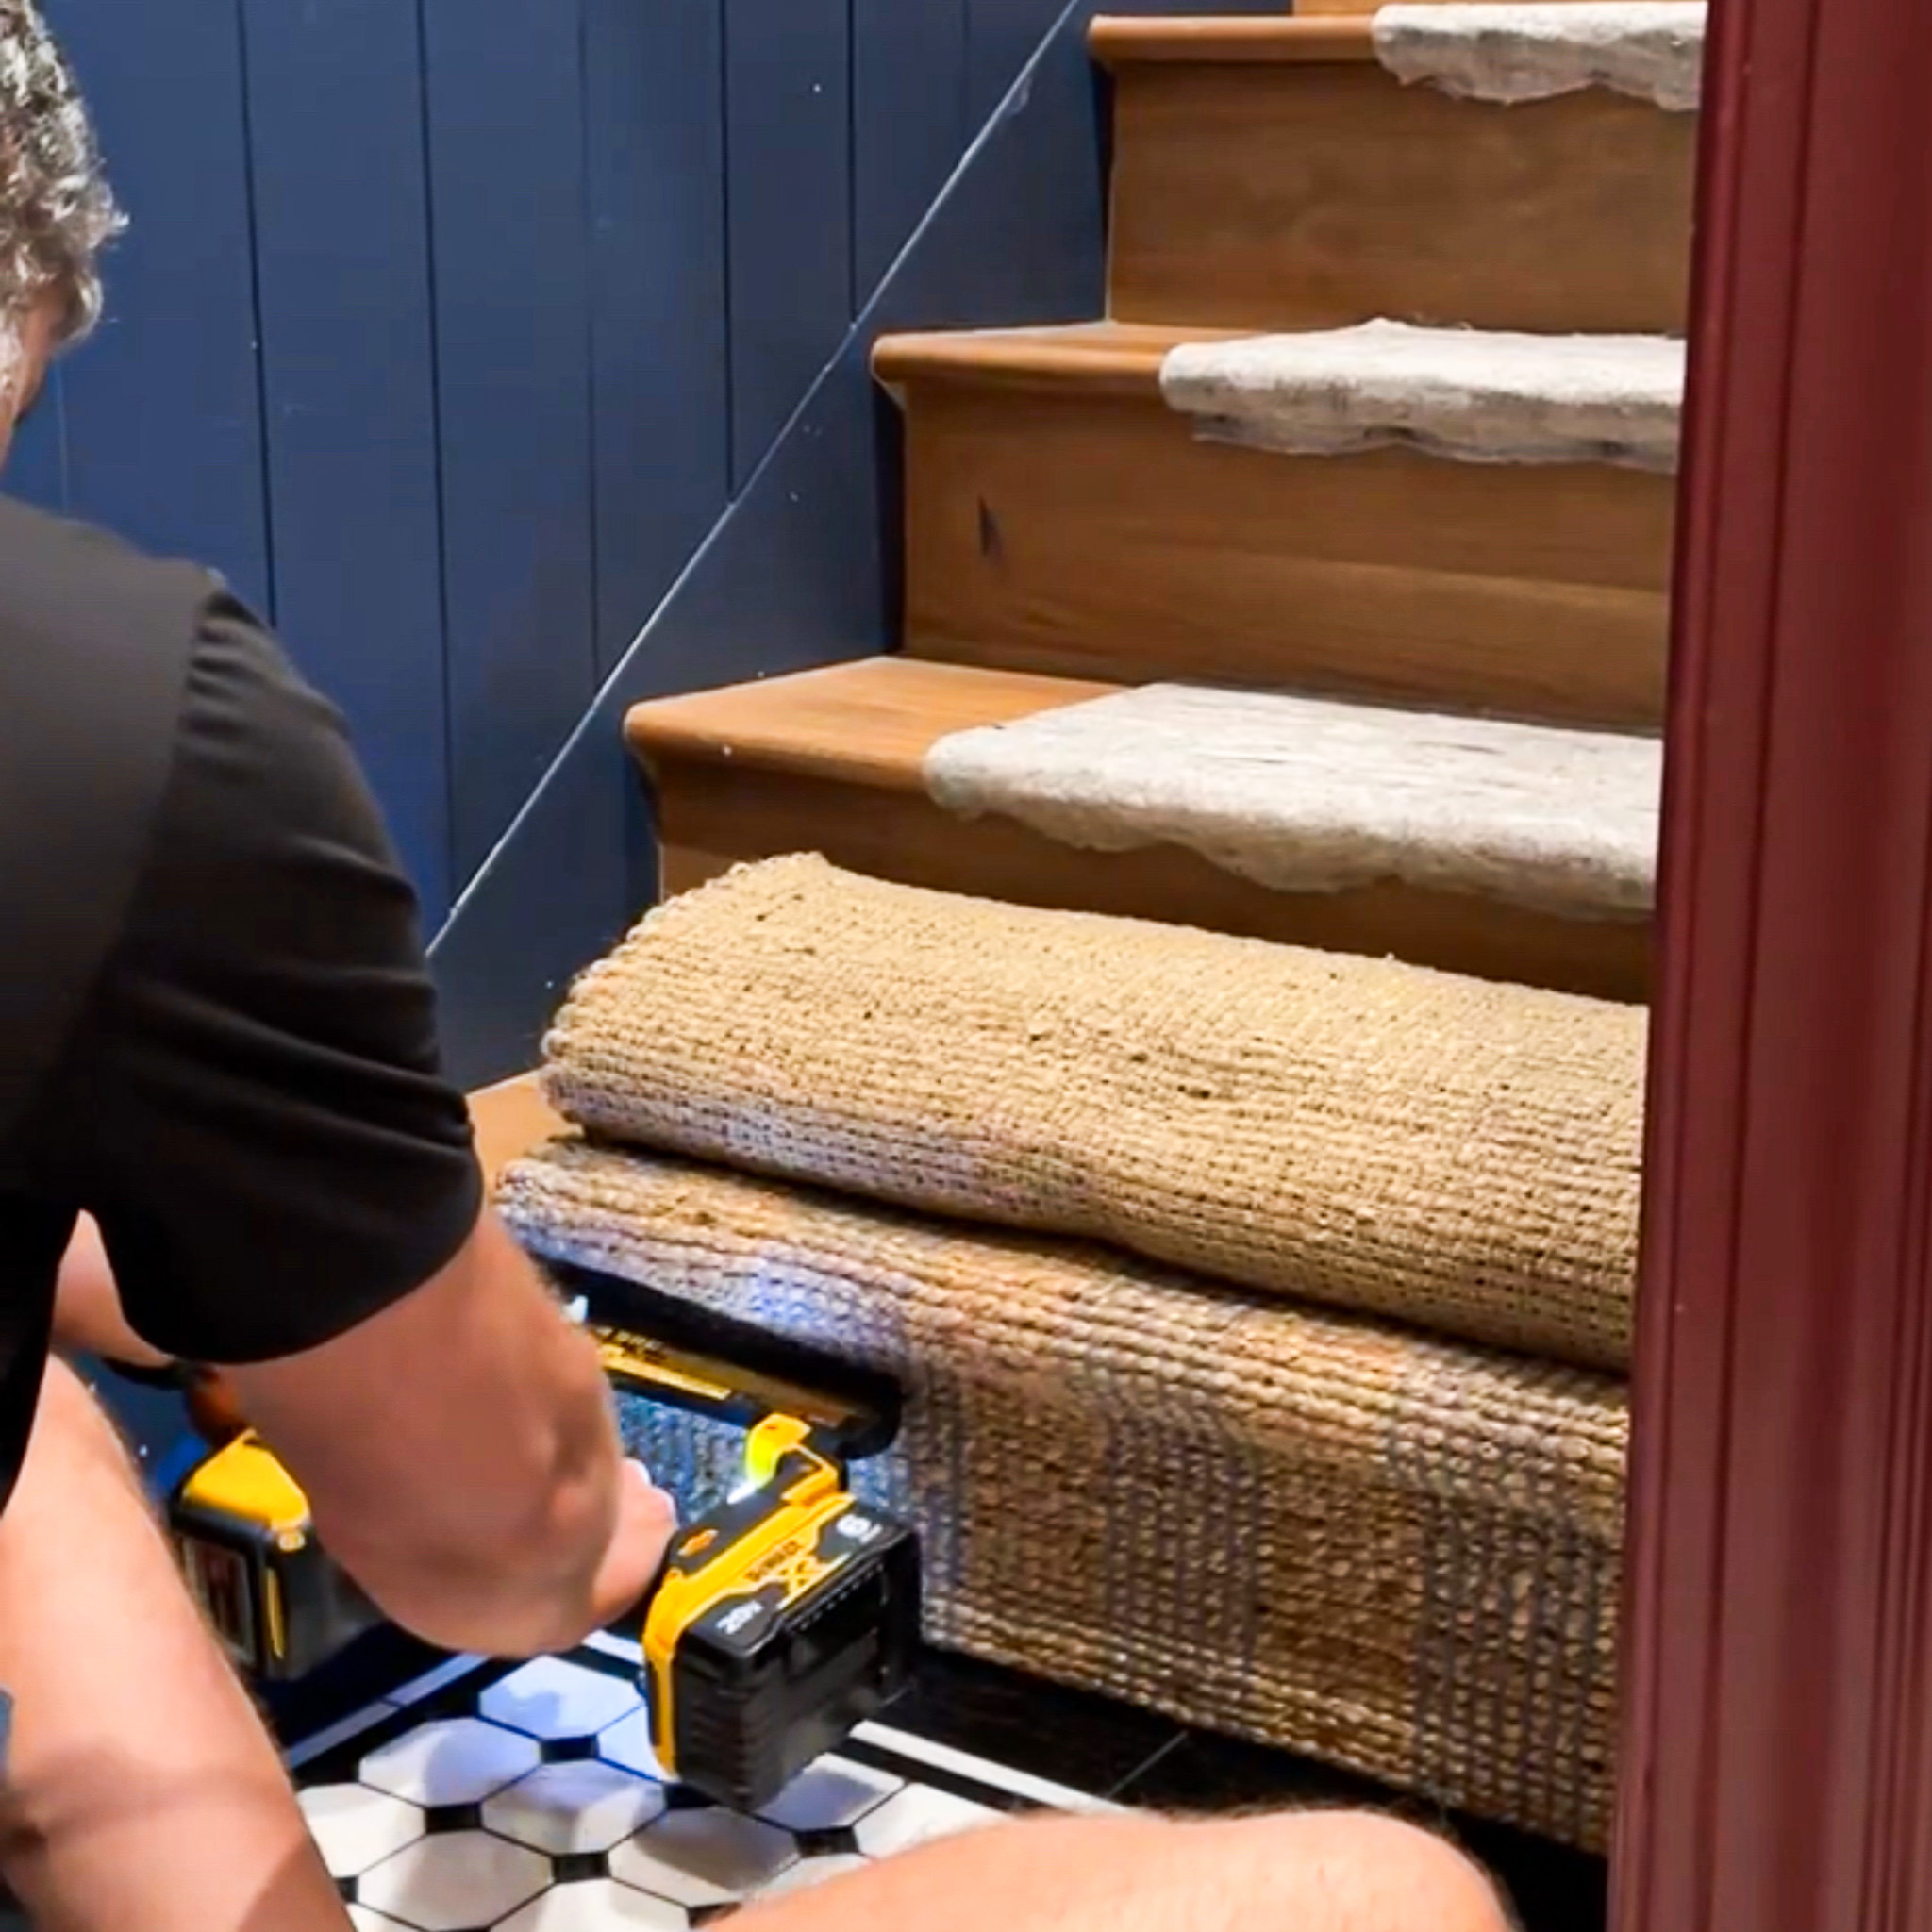
How to Handle the Transition Between Rugs
CLJ x Loloi Judy Natural/Sky Runner
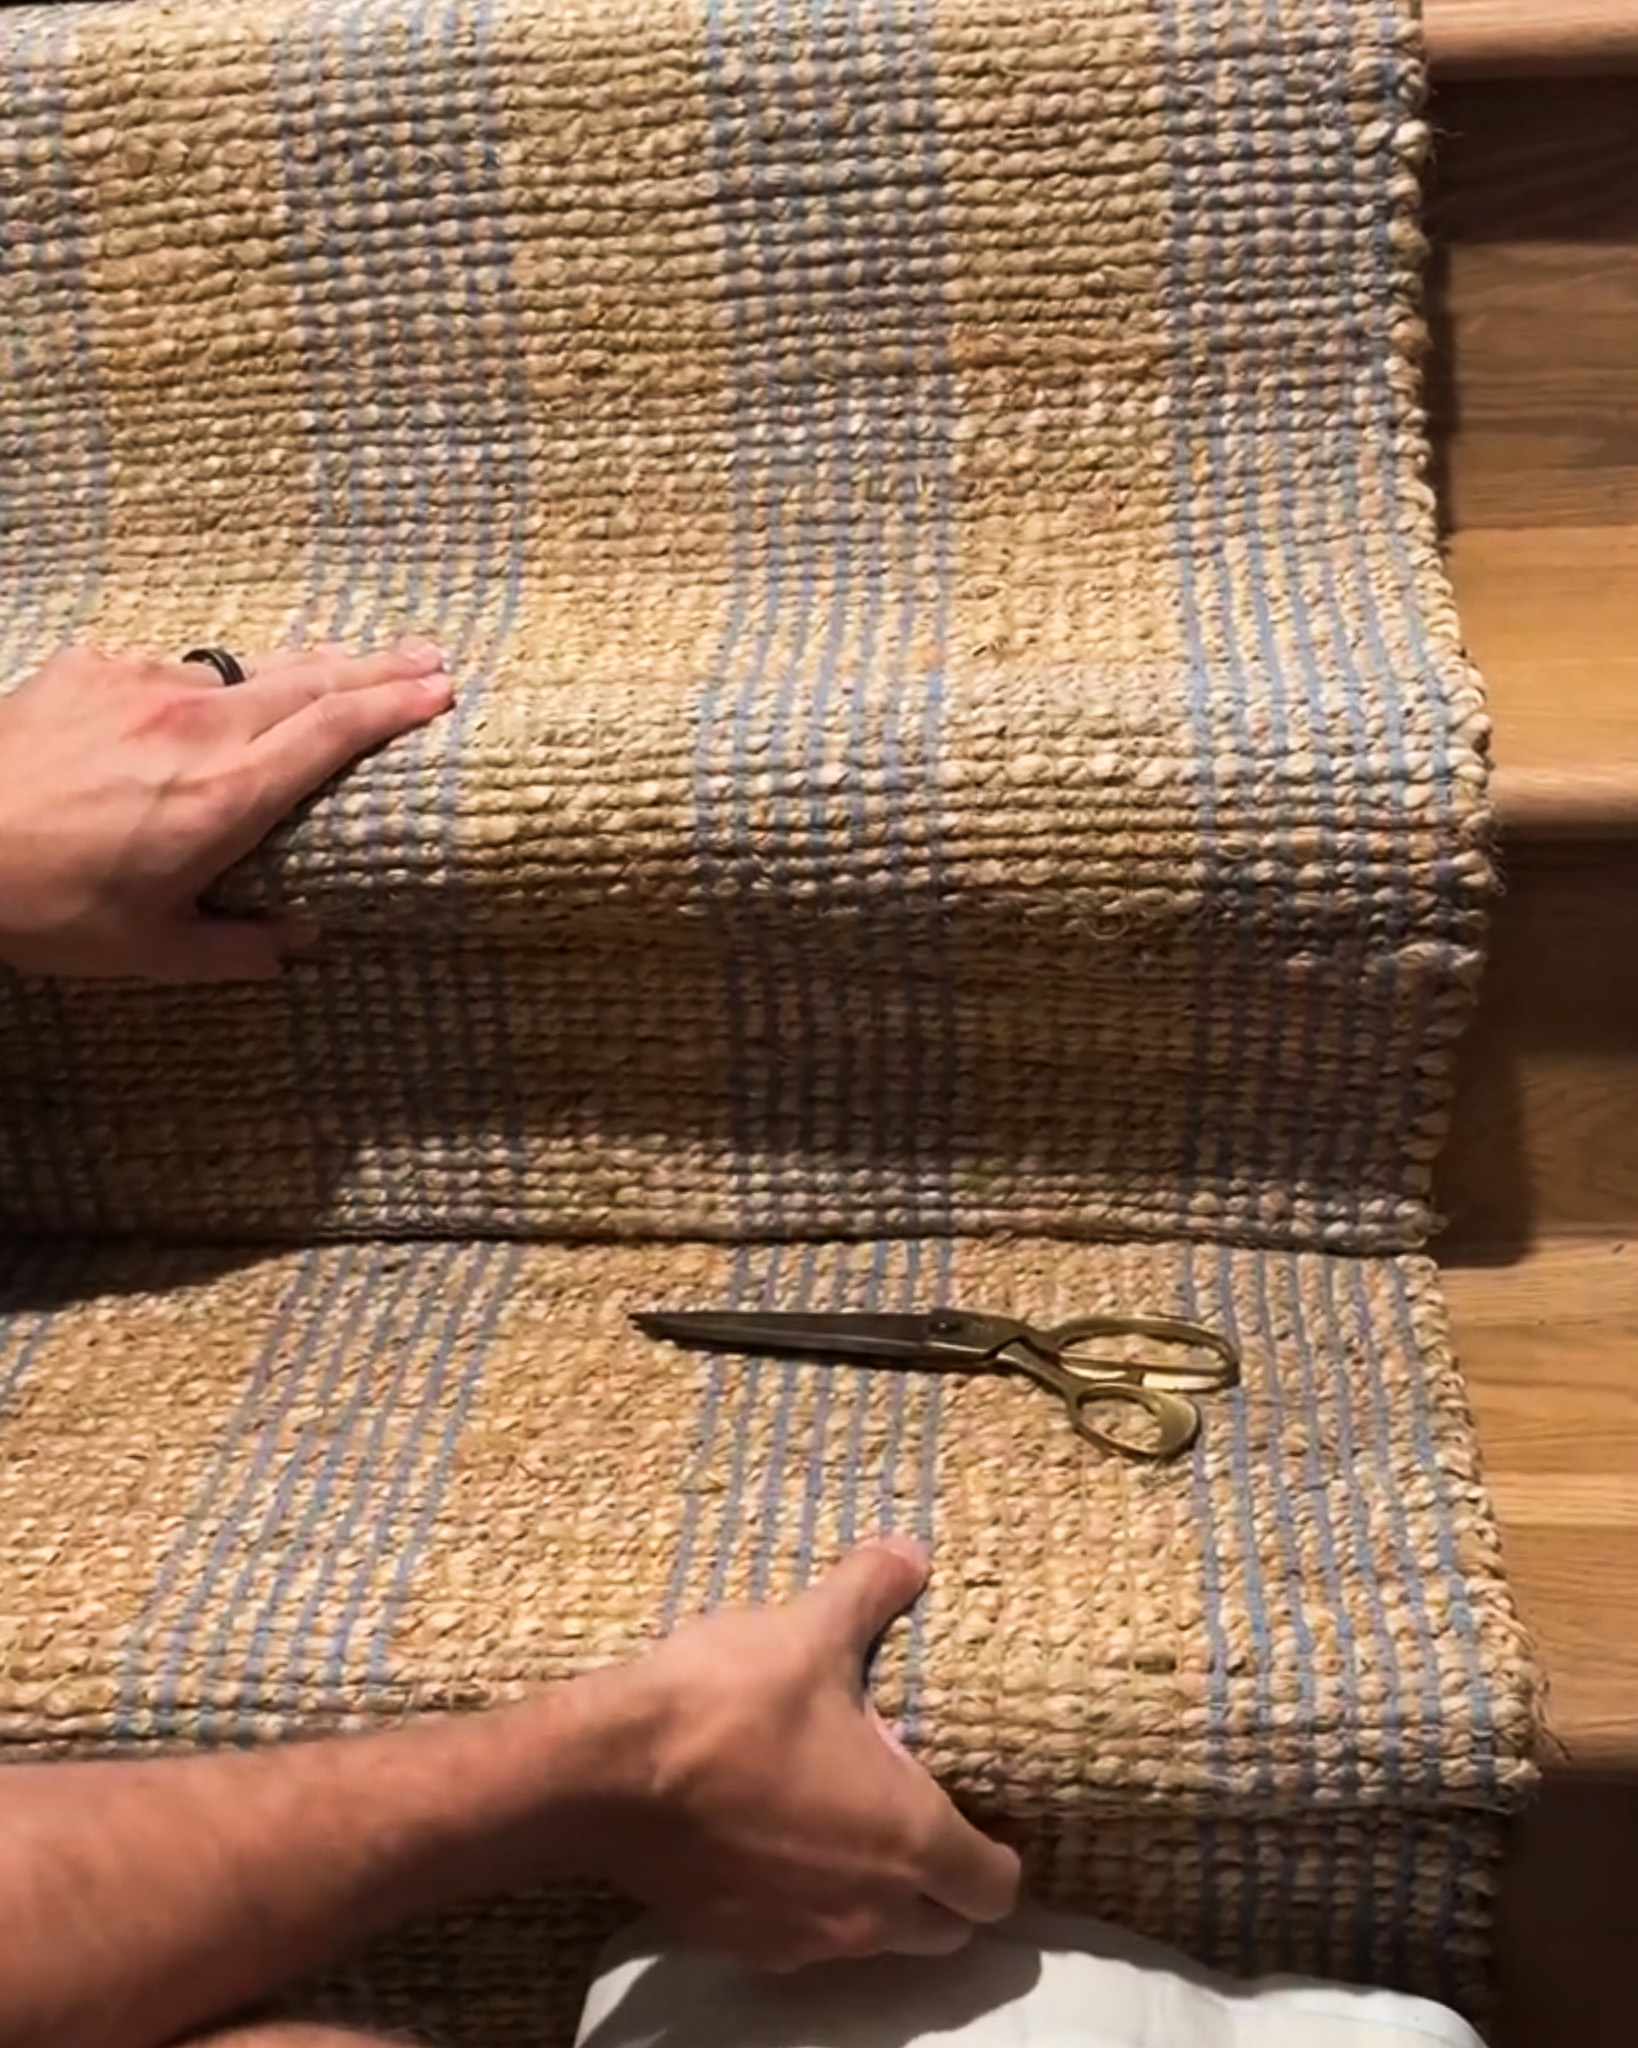
We had to talk this part out: What would be the best placement for when one stair runner, well, runs out? I don’t want it to fray or come loose! Our solution was to run the runner (that's redundant) up the riser into the bullnose, and cut it there. We then started the next runner at the bottom of that riser, overlapping the last section of the previous runner (adding more carpet tape between the two). Since the plan was to also add stair rods, we knew any possible imperfections in the transition would be a little hidden, and the overlap would hide any fraying that took place.
Then Chris stapled every few inches, starting in the center, then jumping from the left side to right, working his way out, pulling the rug taut as he went to line up the stripes. The stripe pattern was both helpful and also an issue if you’re off slightly, because you will notice it more during installation. But also if you mess up, those nails aren’t coming out easily!
How to Finish the Runner at the Top of the Stairway
When we were about 6 steps from the top stair, we started thinking about how we wanted the runner to “end” at the top of the staircase. Since we didn't want a frayed end at the top of the stairway where it would be most noticeable, we decided to start the final runner at the top and work our way down to meet the one below.
The final transition was the hardest, because no matter which side overlapped, we would need to cut that edge, leaving an unsecured, fraying side of jute (which will just unravel endlessly if not secured correctly). What we ended up doing was using a previously trimmed end piece and cutting it to match the height of the riser. We cut the rug below at the bottom of the riser, ran the top runner down to that point and cut it in the same place (putting carpet tape on the back side of each rug before making the cut, so that the tape helped hold the jute material together), then ran the trimmed end piece over top so the finished edge was tucked in the corner, hiding the cuts, and the cut of that piece was tucked up under the stair nose (with carpet tape on the back holding it together and sticking it in place). We then stapled the heck out of it, aiming for the stitching in between the jute layers instead of stapling the jute itself (if you staple the jute, your staple points will be more obvious).
Install the Stair Rods

CLJ x Loloi Judy Natural/Sky Runner | Polished Brass Stair Rods
The stair runners, rug pads and tape were so inexpensive and made a huge difference underfoot that I decided I could splurge a little and get stair rods to complete the look!
I originally ordered some stair rods that were touted as "aged brass" and they came in and welp, they were way too short. But the color was also really brown, which would have been great with a navy runner but it was blending too much with the jute. Yes, you can order a custom length of rod, but it's double the expense. And I was looking at inspiration photos that had longer rods, so I decided, let's just do 36-inch rods in brass, and they'll be a little long. It's ok! You can get really ornate with the finials but I settled on something in the middle.
Once the new rods were ordered and here, we removed the finials at each end and Chris marked where to put the rods centered over the runner. This was more important to be centered since the finials were so close to the wall, so Chris mostly eyeballed it (leaving about 1/2 in on each end). He then installed the finials using the provided screws, after pre-drilling each hole with a very small drill bit.
Final Thoughts
I'm happy we did it ourselves, and it was pretty easy once you get going. We got into a rhythm and I would cut lengths of tape and Chris would come up and staple it. I'll give one disclaimer: We went up and down the stairs so many times, our legs were SO sore! Jute rugs are the type of rug that would potentially fray the most, so we were really sensitive to whether this would fray. And it's been a few weeks now, and we haven't had any issues! As for cleaning, I plan to vacuum and spot clean if needed like we recommend in our rug care 101 post.
Total labor: Approximately 8 hours
Price breakdown:
- Stair runners: 4 at $79 per runner = $316
- Rug pads: 3 at $35 each = $105
- Rug tape: 5 rolls at $21 each = $105
- Stair rods: 16 rods at $60 each = $960
Total materials cost = $1,486
The new runner feels so luxurious underfoot and adds such a great, custom look to the staircase. We love it!
Leave a Reply


WE'RE CHRIS + JULIA

Portfolio
Projects


What would you do if there was a landing in the middle of the stair case
With a curved landing situation where any cuts you make are going to be stepped on over and over, it’s best to hire someone to make the stair runner because they can attach it together to make it stronger.