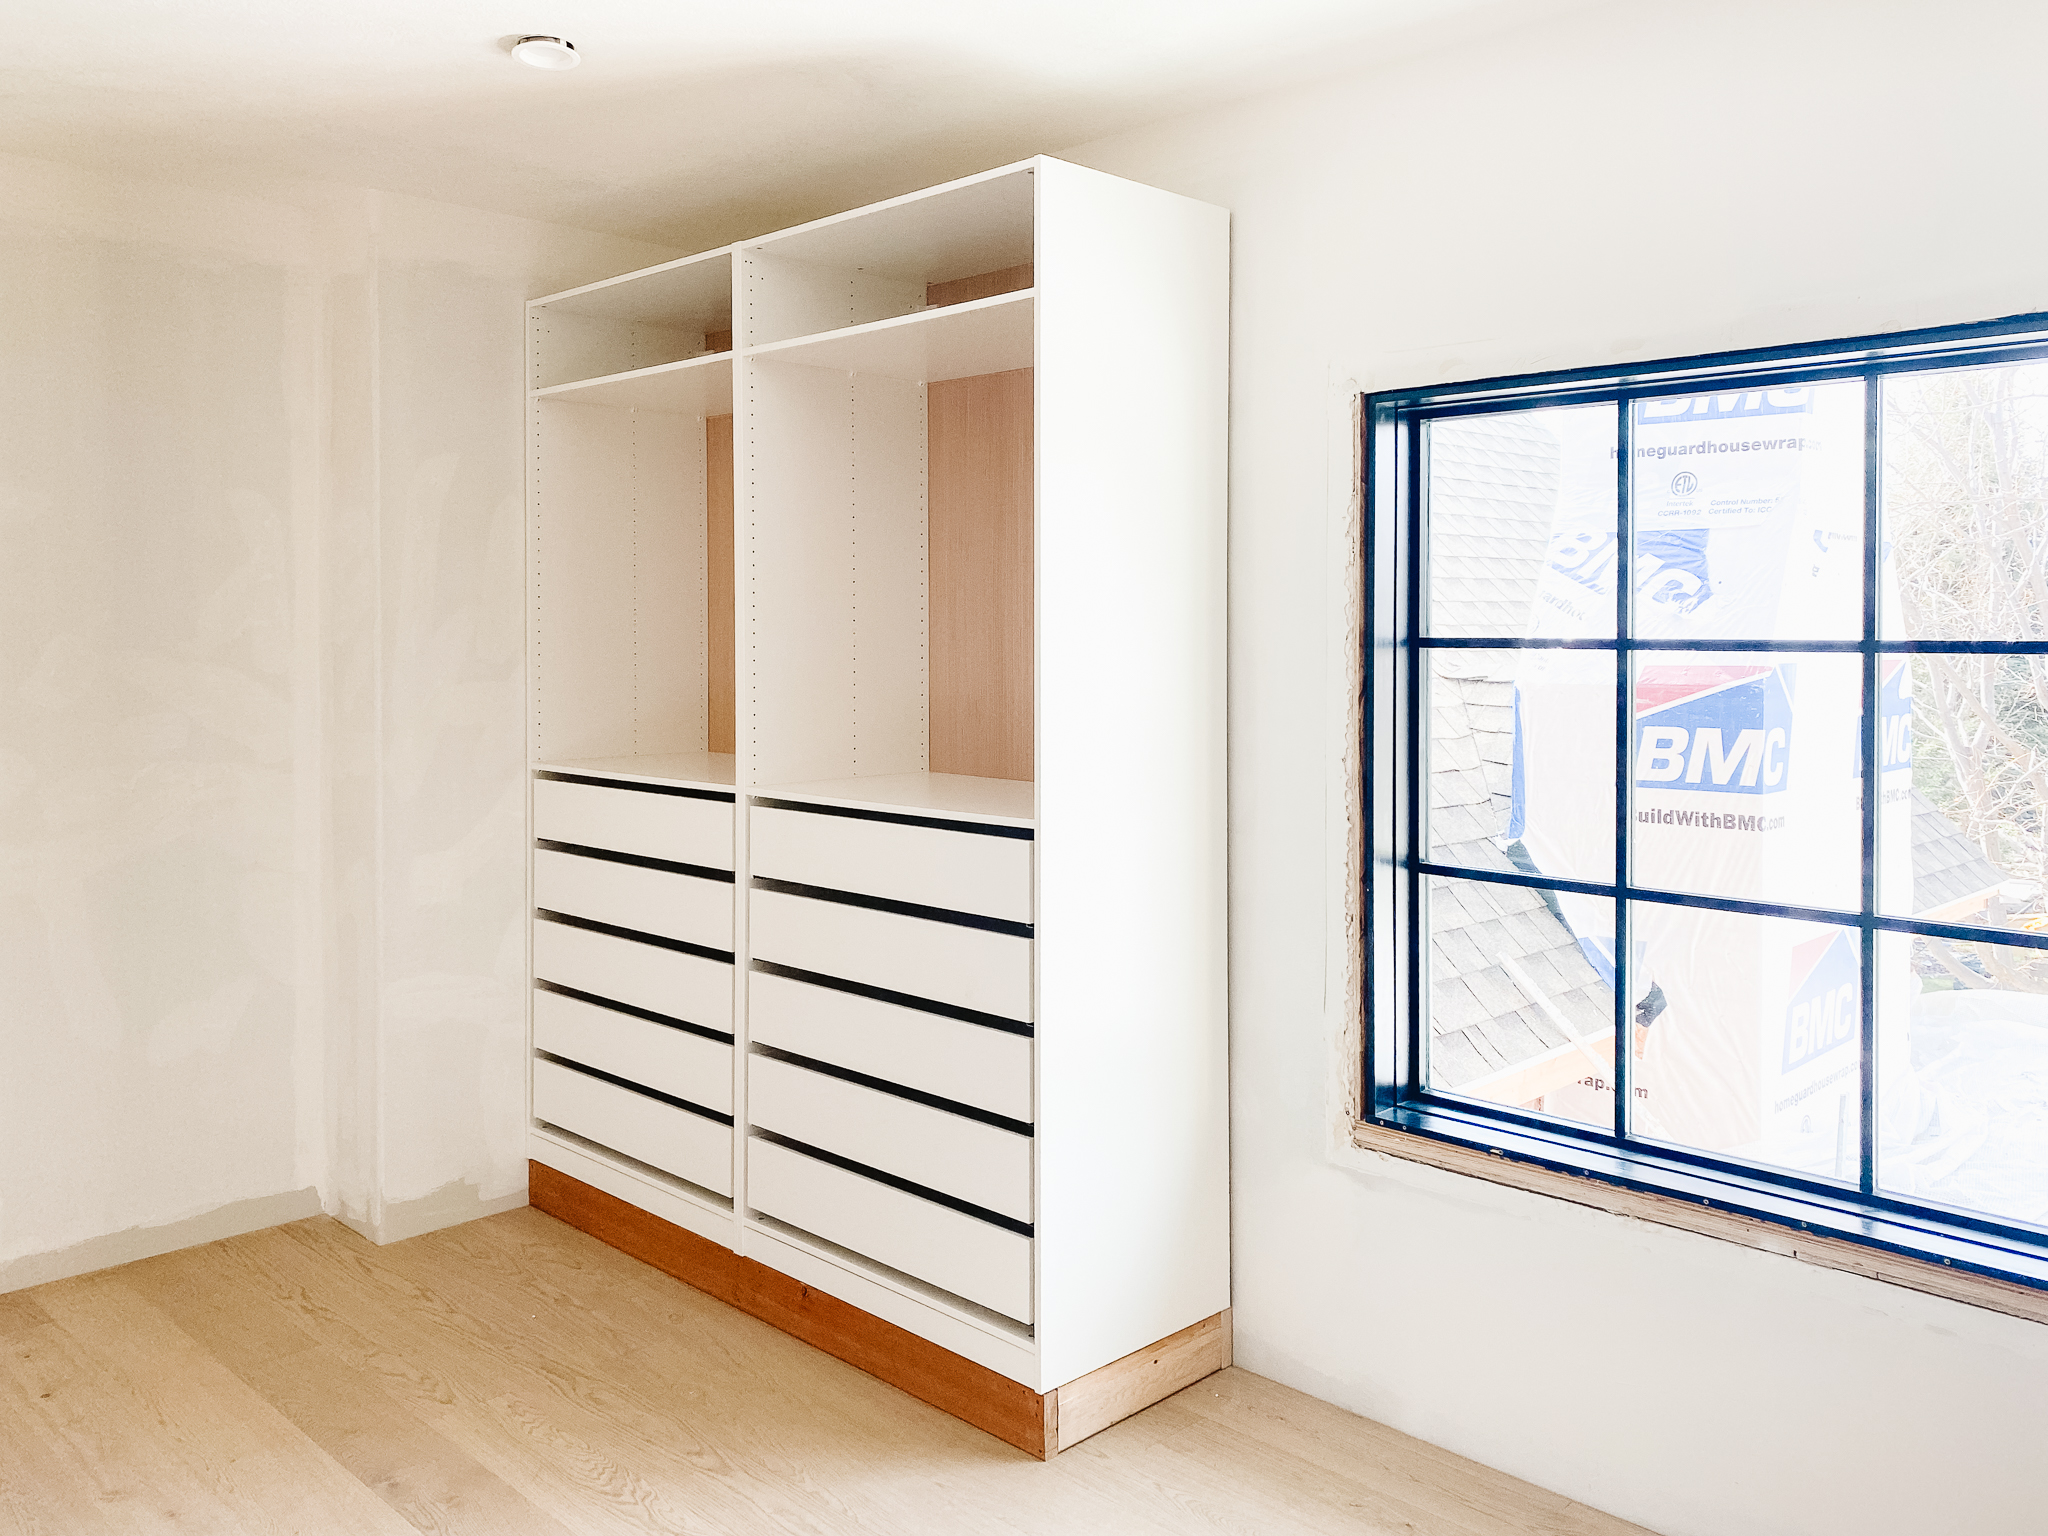
It's time for another check-in in the master closet! In case you missed it, we made a double story space (that the previous owners used as a dining room) into our closet by adding a ceiling/floor to the room right off of our bedroom.
We loved our last Ikea Pax closet so much, we're doing it again, except this time, we're going allllll in on the customization. You can see our inspiration here, how we planned it here, and a big mirror update here.
And here's how it looks and what we did this week:
This week, we made and installed bases for the wardrobes to raise them up. This will allow us to carry the 8" baseboard we have around the rest of the room/house into the closet for a true built-in look.

Instead of the white cardboard, folded backs that come with the Ikea Pax system, we swapped in 1/4" plywood backs (cut to size and nailed in like the other backs would). We will be painting the closets so we really wanted the backs to be seamless.
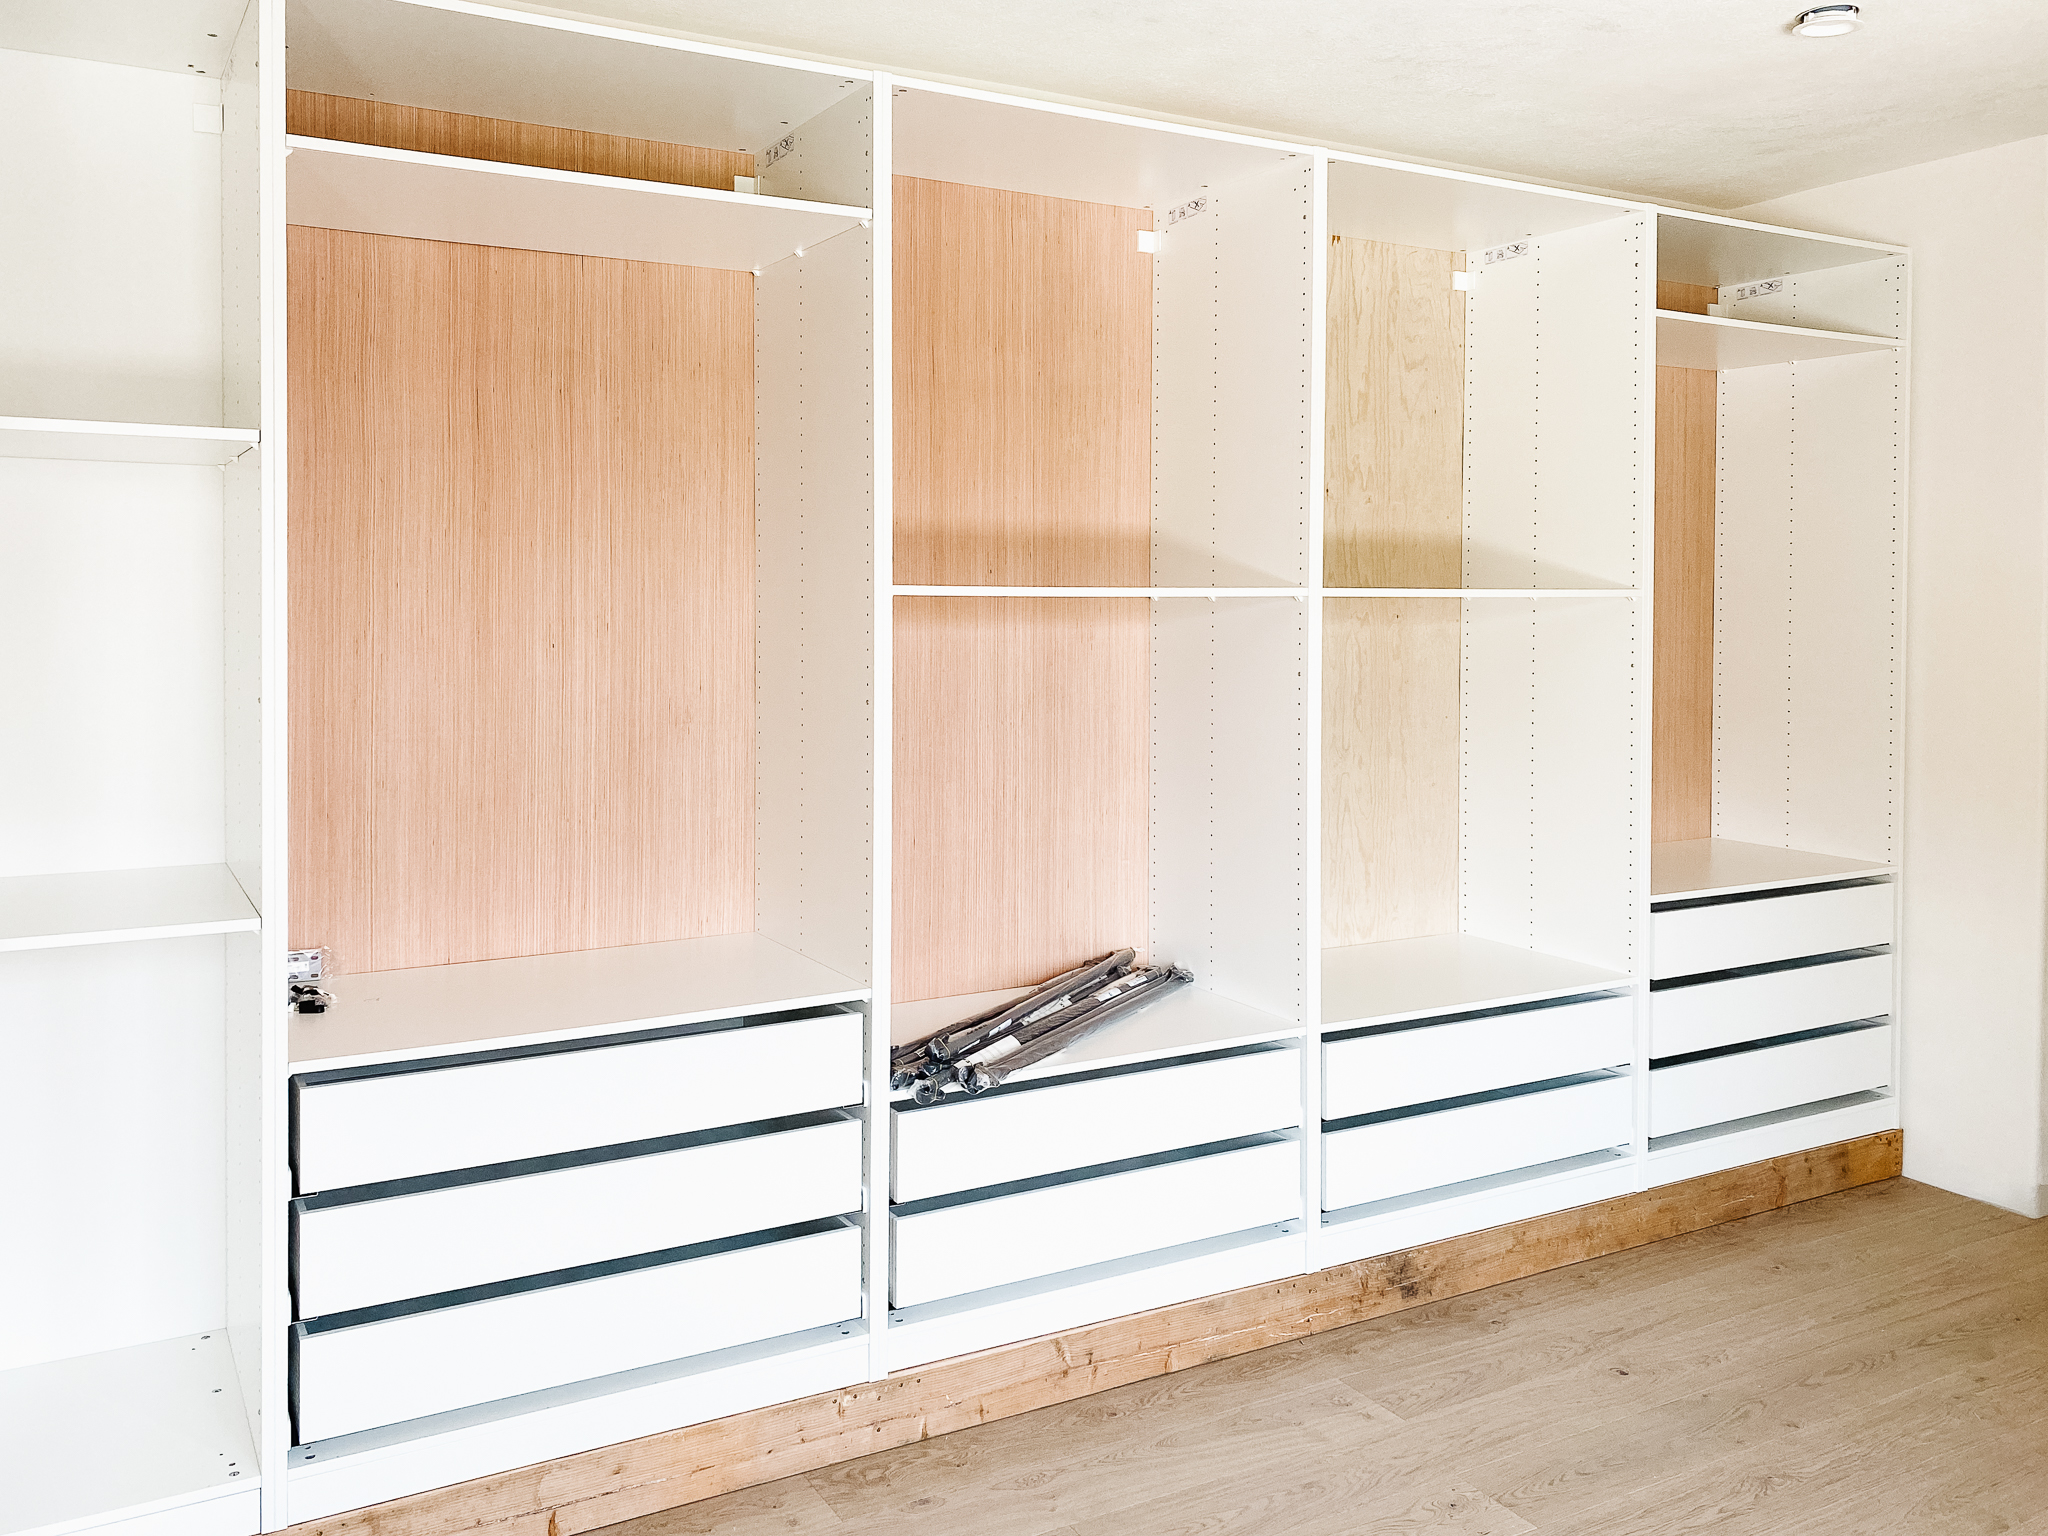
We also added the interior fittings so that we can start filling the holes that aren't being used in preparation for paint. We'll be making and adding drawer fronts, too. But I think we'll paint the drawer fronts separately from spraying everything else.
Chris and I each designed our sides of the closet. Above is Chris's side. He has 2 39" sections and he opted for mostly drawers. In fact, you can see mine below I have 4 sections with the same amount of drawers as Chris and a lot more hanging space. I prefer to hang my jeans straight (to keep them as long as possible). The smaller section below will be for laundry and suitcase storage. It will be the only section with a full door. The drawers will have fronts but the hanging spaces we'll leave open. However, the closet itself will have two pocket doors on it.
I used the wide lens below so you can see it better.


We still have a lot of trim work to do. Adding baseboards. Adding trim to all the fronts so it's flush with the drawer fronts when we add those. Adding side panels. And trim to the tops of the cabinets so they extend to the ceiling. We were going to add crown molding, but decided to add just straight trim instead and chunky beams running the width of the room.
Here's a little digital mock-up to give you an idea of what's still to come...
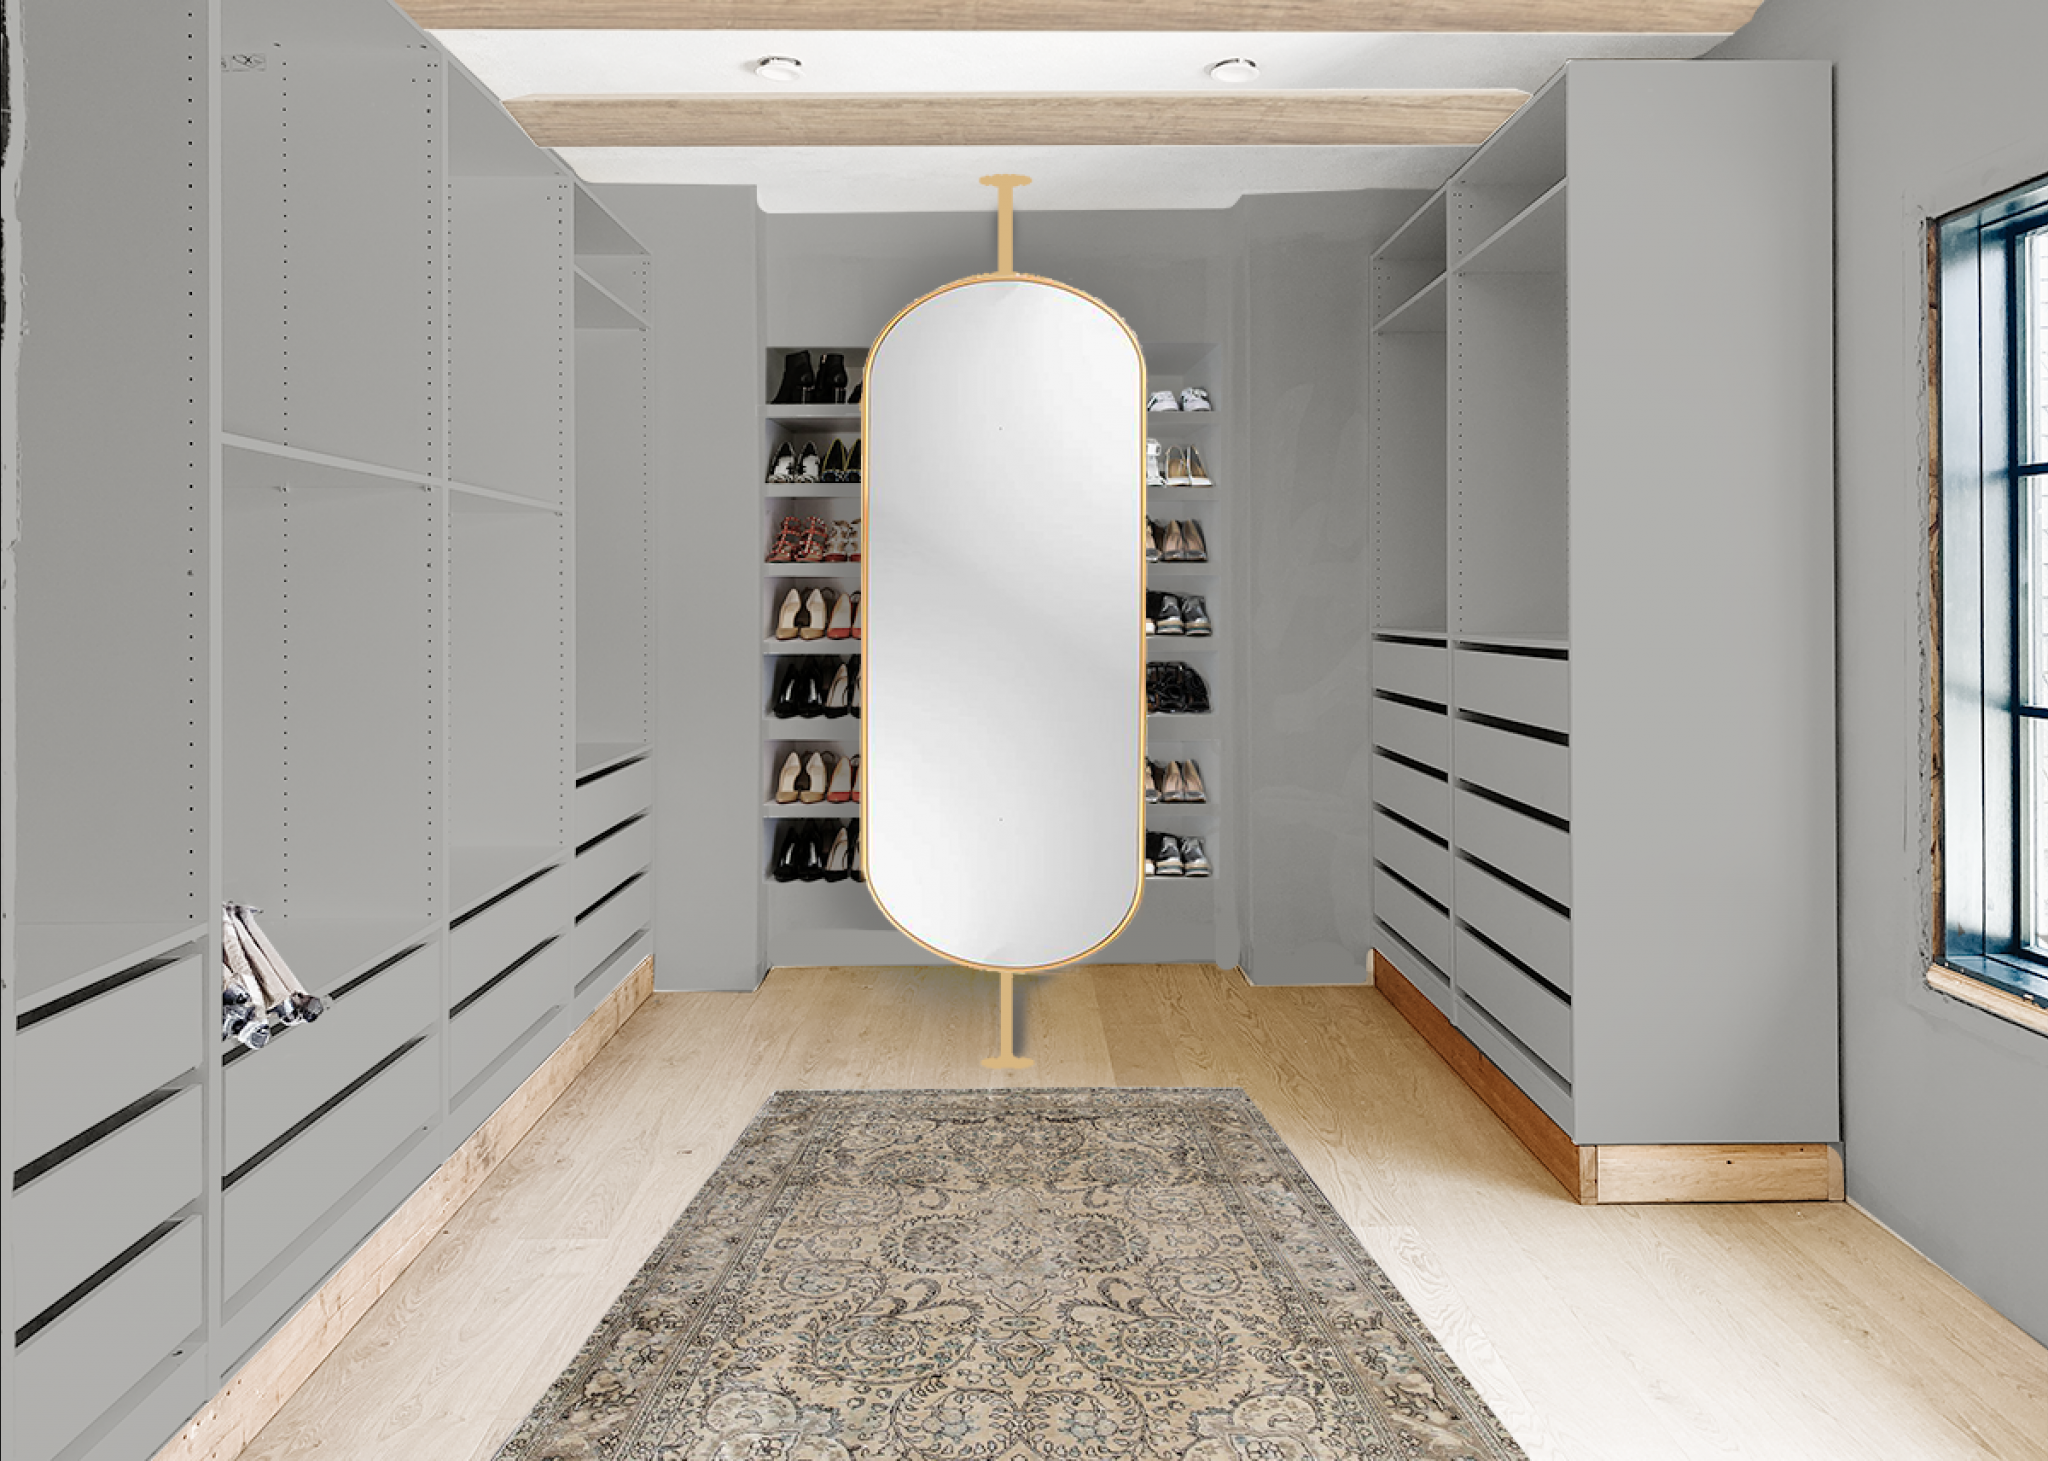
Of course this is just a quick photoshop rendering, but the cabinetry will go all the way to the ceiling, there will be beams. In the recessed portion in the back of the space, we will be building floating shoe shelves (we'll have it go to the ceiling) and everything painted the same color--Farrow and Ball Lamp Room Gray.
There will be a large pivoting mirror in front of the shoes. About 17" in front so we can still reach back and grab what we want, or even pivot it if we want access to all of them. We commissioned Handmade Industries to manufacture the mirror of our dreams and I can't wait to see it in person.
We're sharing live closet updates on Instagram stories and I shared them all to a highlight in case you want to reference any part of the process!! We'll see you over there! ;)
Leave a Reply


WE'RE CHRIS + JULIA

Portfolio
Projects


Hi Julia,
Have you shared what flooring you used anywhere?
Ingrid by Stuga Studio!
Beautiful! I was wondering what would go on the back wall! Where will your long items go? Doesn’t look like you have any full length hanging space, like for evening gowns or maxi dresses. Do you have a secondary closet for items like that?
So the back wall will have our shoes and a mirror — in case you mean the wall from which we're taking these photos? That's our bedroom door.
And good news! We customized both sides to have spaces long enough to hang our pants. I actually only have one dress that doesn't fit, and it's a bridesmaid dress from my sister's wedding. Which brings up a great question: How long are we supposed to keep those? :)
Wow! looks like a Kardashian closet!
I'm inspired by your closet color choice and it seems like it will really transform the space into something special. We are going to do a PAX wardrobe and I have always been curious about painting it. Hope you do a more in depth post about that specifically when the time comes.
That mirror solution is genius.
I'm a medical student on a budget--as in, so so far away from ever being able to do something like this--but am so in love with all these house updates!! The master closet one has definitely been a fave of mine to watch unfold on stories--so good! I have only been following for a handful of months so not sure what your (and Chris') background is, but I just love how creative you two get and also your style is amazing (the teal-ish colored wall in the office is a dream). Can't wait to see this come together! And SO excited to see that mirror... it's going to be gorgeous.
Hi Julia,
I have been following all your instagram stories about building this closet and I LOVE WHAT YOU'VE DONE SO FAR. I'm working on redo our closet and will use ikea pax too. I will need to build a base and then use a large baseboard. May I asked the height of the base that Chris built?
Thank you so much.
The base that he built is about 5”
You have used this color in other parts of your home, correct? Can you please point me to where? I’d love to see more examples of this color!
Hi Chris & Julia! This looks gorgeous. How do you plan to finish the drawers so they are flush? Curious if you will be cutting MDF/Ply/etc. to size? Also, would you recommend these IKEA units for a reach in type closet? I typically see these used in a free standing application. Thanks!
Love the rug in your mock up, is it gray and tan? can you provide source?
Are you going to install any cabinet lighting? That mirror reference photo from your April 8th post is amazing!
There will be lighting on the shoe shelves, but everything else is very well lit.
Sorry if I missed this somewhere else, but are the frames 92" height or the 78" height option? I'm guessing 92"? I'm about to start planning my closet soon (!!!) and just helps to visualize :)
Please come design my closet!!!
This is going to look sooo great!! Just curious - there’s a lot of open space under the windows and looks maybe a tad empty since everything else is so built in. Any ideas what you’ll do with that area? Did you consider building a window seat to mirror/extend the built-ins through the room? You for sure don’t need more storage but just wondering what will go there!
We actually got a really cool desk for there that will be used as a vanity! I really wanted a furniture piece in here so I'm excited to see that element come into play, too!
OMFG THIS IS PURE PERFECTION AS ALWAYS! Marcums, you are truly my style icon. Can I be you when I grow up?!!?!
Totally not content-related but trigeminal is pronounced TRI (as in try) GEM (as in pretty gem) I-NAL. :) So long I and soft g :)
I've heard. haha
Seriously, Suzi?
Gorge!????
Thank you for the eye candy! As you guys continue to demonstrate ....it’s all in the details! I am curious as to where you plan to house your accessories such as jewelry and sunglasses!?
I'll store jewelry and sunglasses in the vanity/desk that will be in front of the window.
Watching the build videos, and considering how much customization you are added. I couldn't help but wonder if you considered just building the whole thing? Like, is Ikea really saving you much in time or money? I guess the drawer units are for sure, but the basic boxes and hanging rods are pretty simple. Or does that laminate finish feel more luxe than painted wood would be? Or am I wayyy out of touch with the cost of wood?
Ikea bases are so fast and inexpensive to put together and we've actually been so impressed with the quality and customization options. They come standard with soft close drawers and all the boxes and drawers were built in hours, not days. I think if you're a great wood craftsman, maybe from scratch would be for you, but we only spent about $2000 on all the Ikea wardrobes and drawers and parts and the time investment was even less which is probably where they really got us.
But can I just advocate one more time for a wallpaper ceiling? Of course it's going to look SO good regardless. But I mean....what better place to wallpaper a ceiling! :)
OMG yes!!!! It might get lost with the beams... but overall, wallpaper ceiling gets 2 thumbs up from me!!
The beams feel a little forced in this space, as opposed to in a large, open room where they might have been used structurally and not just decoratively. I adore ceiling wallpaper and 100% echo that sentiment.
Hi Chris and Julia! Love the process and progress you are sharing of your closet thus far! We are looking to do ours soon and plan on using IKEA as well. Question- Are you using a specific type of paint on the cabinets so it adheres well and does not chip or peel? Just curious as I believe they come pre-finished...? Thanks so much and super excited to see how the mirror turns out:)
We are going to be using a bonding primer first which will really help and then an enamel paint I think. We'll definitely share exactly what we use!