Our home office is done (for now) and we’re excited to share the transformation, some details and a few tips and tricks with you today, along with so many photos! The room has actually been 95% there for quite awhile now, but because we were working on it in the very early stages of my pregnancy, when the nausea hit hard around 7 weeks, the room as a whole became a horrible trigger for me. A few days ago, we were able to reopen the door to the room and I felt so excited to finally finish it and start using the space as we intended.

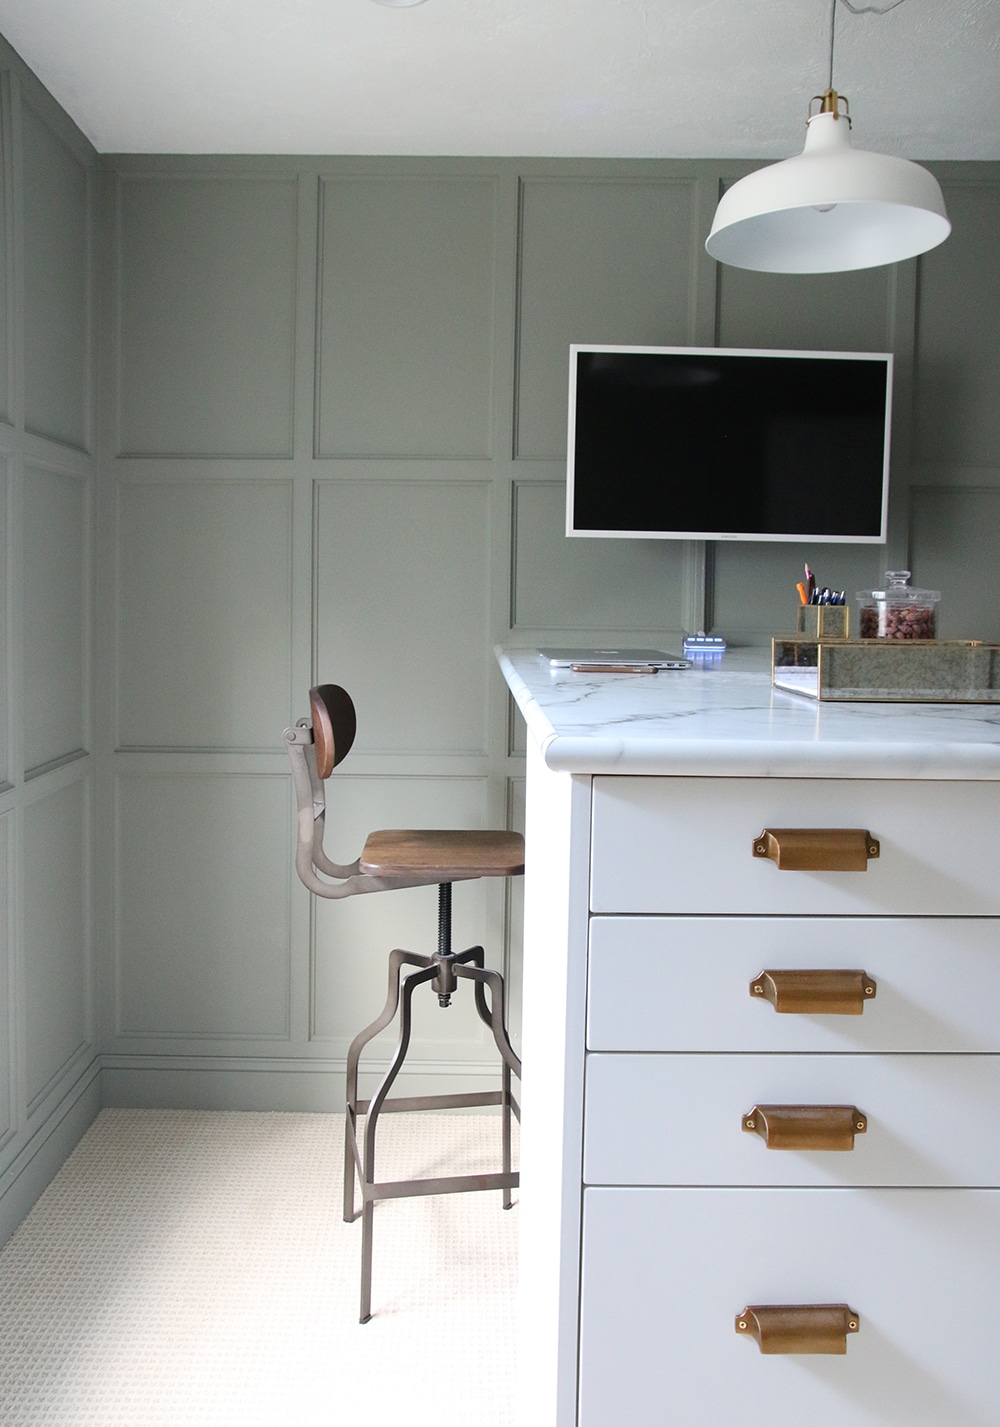
We DIYed the wall paneling ourselves (read more about that here) and painted the walls and trim Farrow & Ball’s Pigeon–a warm, light green with a lot of neutral gray undertones. It was really important to both of us, for this room to actually function and work, as well as look nice. That meant having building a standing desk with seating options, having easy access to our printer, putting into place real live charging stations for our phones and laptops (you will see cords in this post, but we minimized them in a cool way!), mounting a large monitor so we can pull double duty with our laptops, having open storage for a lot of decor items we swap out around the house, and plenty of storage in drawers for art and office supplies, wrapping paper, etc..

The desk we DIYed, topped with marble Formica (!!) has a space for me and Chris on each side and the monitor (we purchased this white Samsung one–drool) in the center, we mounted using this wall mount that can pull out and swivel depending on who is using it.

You can see below how we used zip ties to keep the cords close to the mount so they wouldn’t be visible on the wall. We picked up white, paintable cable channel (I painted the same color as the wall) to run the cords from the monitor through the hole we cut in the top the desk.


They all feed underneath to a mounted surge protector that allows us to easily plug in all of our electronics, sight unseen, as well as our Mac mini computer. We attached a simple, slim letter sorter underneath to hold it and it works like a charm!


The setup keeps our desk a true workhorse without the mess of a bunch of cords hanging everywhere. To the left of our desk, we removed the closet doors and rods that used to be in there and put 3 of these bookcases to serve as decor overflow. We stashed all of our frames, textiles, spare pillows and lamps, paint swatches, camera equipment and decor books in here and it’s so nice to see everything in one place.


Across from our desk, we put a simple cube bookcase to hold our printer. We are constantly printing out coloring pages for the girls so we wanted to make sure it was at a height they could comfortably reach. In the bins below, we keep extra paper and print cartridges. Above, is a beautiful abstract by Angela Simeone.


I’ve never had a “wrapping station” but this drawer is the closest thing we’ll probably ever get. We also have a drawer for office supplies (post its, stapler, tape, highlighters, pens, etc), art supplies (all my paints and brushes), this wrapping drawer and the other two are empty for now.
As I mentioned before, the countertop we used is actually a marble laminate by Formica. We love the look and you can’t beat the price!

A standing desk was kind of the starting point of the entire room, due to Chris’s back issues and the fact that they say, sitting is the smoking. But we knew we still needed tall chairs that we could spend time in while working up to standing for long periods. To be honest, Chris is a lot better at standing than I am. I’ll stand for 10 minutes (when my watch reminds me to) once an hour and Chris probably sits for 10 minutes total every hour. These stools are adjustable to a very tall height, so I can have mine a little higher and Chris keeps his lower so he can actually completely tuck it under the desk when not in use.

We’re so thrilled to have a place, in our home, where we can both work every day. It’s a dream! Here’s a few before and afters, followed by the sources:


SOURCES
Paint Color: Farrow & Ball Pigeon
Carpet: Stainmaster Medford line in Fizz
Desk: Ikea kitchen cabinets (see DIY here) with Semihandmade cover panels and drawer fronts in Supermatte White
Desktop: Formica Calacatta Marble Laminate (provided by Formica)
Drawer Hardware: Pottery Barn
White Pendant Light: Ikea
Desk Stools: Wayfair
32″ White Computer Monitor: Amazon
Monitor Wall Mount: Amazon
Mac Mini Computer: Apple
Mirrored Desk Accessories: West Elm
Roman Shade: Blindster
Closet Bookcases: Target
Cube Bookcase: Target
Brass and Marble Task Lamp: Target
Wall Clock: Rejuvenation
Abstract Art: Angela Simeone
Agate bookends: West Elm
Faux Fiddle Leaf Fig: Target
Planter basket: Target


I love love love love this office and I am finally (!) ready to start on mine in a couple weeks!! I have a dresser that I think I will use instead of putting the cabinets together as you did but I love the toe kick you did, I will try adding a small frame to the bottom of my dresser that is slightly less wide and deep than the dresser – do you think that would look okay? Also, should I just attach a bracing piece to the wall for the counter to rest on? I’m a little nervous about figuring out how to secure the counter to the dresser and wall even after reading your post just about the desk.
Anyway your office is super inspiring and I hope I can pull off a similar effect! I think it will be such a perfect solution for long days/nights working and a cutting table for weekend sewing. Thank you so much for the awesome ideas! <3!
We love the standing desk. The look, the functionality, etc! Thank you for the step by step tutorial as we are looking tonre-create this in our master bedroom office nook area (would love fornit to be somewhere else but don’t have He specs in our current home). The only piece that would stop us from this conversion is a filing system. Do the bottom large drawers have the capability of inserting file holders?? Or a filing system of some kind so that we can move the paperwork we have in a filing cabinet into the large drawer or drawers at the bottom??
That’s such a good idea!! It’s definitely deep enough. And now we may do the same
1- Love your blog and podcast- even the horribly fantastic Can’t you outta my mind jingle :)
2. The cabinet is resting on the carpet with the counter top secured to it and what appears to be a board (made into a ledge) on the wall. My question is whether or not there was or is any give in the counter as the cabinet “sinks” into the carpet? Did you compensate by pushing down while leveling with the wall? If you didn’t do that can you explain with a little more detail that portion of the assembly process? I’d like to do a similar thing but keep at desk height in my front room so that I can also have a couple of lounge chairs and use the TV/monitor for viewing (through apple TV) as well as work stuff. I wish I could attach a picture to comments to explain better but alas that is a wish unfulfilled.
We built the cabinet and had it in place for probably 2 weeks before adding the countertop. This allowed the cabinet to sink into the flooring a bit, and we haven’t had any wiggling or anything since adding the countertop on. Our carpet also has a pretty low pile, so settling is minimal anyway.
I hope this helps!
I do not know if it’s just me or if perhaps everybody else encountering problems with your website. It seems like some of the written text on your content are running off the screen. Can somebody else please comment and let me know if this is happening to them too? This might be a problem with my web browser because I’ve had this happen before. Many thanks
Hi Chris and Julia,
I love the look of the counter/desk.
Do you think it would hold up in a kitchen setting? We desperately need to update our counters on a minimal budget.
ps- more podcasts please!
Formica is most often used in kitchens, and it holds up really well. I think it’s at least worth a look, especially on a minimal budget.