This weekend, with the help of a few friends, we started laying our faux-wood tile floors and made some real progress, extending from the entry into the nursery, half bath and starting in the master bedroom.

The process is slow, but exciting! Now that we can see the actual end product, our spirits are definitely higher. Although we just started laying the floors, we researched for months before deciding on this type of flooring (read more about that here) and have spent many weeks looking at lots of examples of not only other wood tile looks in other homes, but also actual wood floors. We really wanted ours to look as close to the real thing as possible, while still having all the durability that made us go with tile in the first place. Here are a few tips that we’ve discovered and are implementing to help us get the realest look out of our faux wood tile.

1. Choose a tile printed using an ink jet. This means the variation and repeating pattern is greater than older roto-print type printing applications. It’s the most realistic you will get because they are based on actual digitial pictures of wood flooring. The tile we decided on, Nordic Brown from The Tile Shop, was printed this way and has more than 9 different print variations, which gives it a nice realistic look. When laying the tiles, we are being conscious of where the different patterns are laid–just like real hardwood flooring–making sure there are lots of different wood grains in each area.

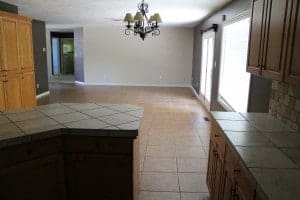
2. Lay the wood tile in a random pattern. There are lots of examples of faux wood tile floors out there, and the pattern everyone uses is completely subjective. Because we wanted our tile to look as close to real wood as possible, after looking at tile patterns for weeks, we realized it would be best for us to actually look at wood flooring patterns instead. Through this we decided to go with a random pattern. We measured and cut the first piece of each row, eyeballing it to make sure the seams between planks were separated enough. In the above photo from the nursery you can see this in action.

3. Go for the smallest spacer recommended. In our case, we are using 1/16″ spacers (the planks are 6″x24″). Actual wood floors are butted up against each other, but obviously still have noticeable lines between each plank. Faux tile floors still need to be grouted like normal tile, but by opting for the smallest spacer and grout line possible, it looks closest to the real thing.

4. Speaking of grout–we still need to do that (we’re gonna do it in one big sweep at the end), but opting for a grout color a shade darker than our tile will keep things looking more natural. Again, totally subjective. That’s just what we’re doing, but we’ll cover that when it goes down.

As you can see, we still have quite a bit of work ahead of us, but we couldn’t be happier with how things are shaping up. In the above photo you can see Chris has the cuts and pattern laid out for the master and will hopefully get that mostly done tonight. The plan is to move all the furniture back upstairs on the 29th–which feels so close…yet unimaginable. Haha!


I am thinking of this tile too! What color grout did you go with? And, does the tile look warm but not orangey? Pictures are gorgeous!
I like your staggered pattern. But what about tile length? Should I be using different lengths to increase its real wood look? Wood planks come in different lengths… then again I have never seen wood tile offered in different lengths of the same style so maybe this isn’t possible anyway ?
Nowadays, they make longer lengths that look even more realistic! Go for it.
Did you guys run into finding your tile different widths? We bought a similar tile to yours from a seemingly reputable tile store and the widths can be off by 1/8 of an inch! Just curious.
Oh man, we didn’t. So sorry to hear that.
I am seeing so many mixed reviews on people purchasing unsanded grout for their wood tile and it turning out completely white when it should be a dark shade of brown. Is there a particular brand or color you used and were happy with?
Our grout color didn’t turn out the way we hoped either! We ended up having to dye it.
I’m about to start laying wood tile myself but I do not think they are rectified tile and the case box recommends 3/16″ spacing. I would want to use something smaller either 1/8 or 1/16 to have more of a natural look. What problems would there be if i go shorter?
The real issue with tile spacing is that tile is not forgiving at all, and as you lay them they can be out of line with one another. Even when using spacers, it’s difficult to have the tiles 100% square. The smaller the spacers, the more exact you HAVE to be, because a tile just won’t fit if the hole isn’t bigger than the tile. That sounds obvious, but with some floorings like wood or laminate, you can use a rubber mallet and get it to fit if you’re dealing with 1/32 of an inch. Tile doesn’t allow this – not even for 1/32 of an inch. If you try to force a tile in, it shatters.
Getting spacing perfect is darn near impossible with any tile, but unrectified tile especially because they have not been made uniform. So you really have no idea how the tiles will fit together, and you may lay one line of tile, and by the time you come back around to that part of the room the new tiles don’t match up. Thus the 3/16 space recommendation. You may think to just trim the tiles with a tile saw so they’ll fit, but the cut edges won’t match the curve of the others, and it could end up making the floor look pretty bad.
In short, going smaller is a risk. Manufacturers are always going to recommend what is safest, and sometimes you can get away with something a little more tight if you take your time and mark your rows with a chalk line and keep everything squared, but I for sure would not go smaller than 1/8, and if I were in your position I’d probably stick with 3/16. If you get the right grout color – something that matches pretty closely to the tile, maybe one shade darker – then the grout lines are pretty minimal and won’t look as thick as 3/16 sounds. I hope this helps, Anthony! Best of luck.