We’re diving head first into updating our current kitchen!! After we recently finished the floors, our cabinets are looking more orange than ever and we left a disposable table cloth on our island in place of a countertop. Eeeks. Although we are planning a full kitchen remodel next year (??), painting our cabinets is an easy and cheap way to happily wait out a full-on remodel and we came up with this simple DIY faux soapstone countertop for our island this weekend!
Ace Hardware is celebrating their 90th anniversary this year, and being part of their blogger panel, they challenged us to do a project with just $90. We’re happy to report, this project came in under the bill!
When we reconfigured our island, we put this piece of cheap leftover 3/4″ plywood on top and covered it with a tablecloth.

While this cheap plywood served as a great base, it was full of knots and was extremely rough. So the first step was to top it with a cabinet-grade plywood which is a lot smoother and higher quality. We decided to go with 3/4″ again, so the finished countertop would be a beefy (okay, pretty standard) 1 1/2″.


To adhere the two pieces together, we used construction adhesive first and then drove 26–1″ screws through the bottom.

No matter how well you measure and cut, chances are the two pieces won’t be exactly the same size–at least that was the case with us.

Chris used a manual planer we picked up for $13 at our local Ace to quickly even up the edges of the sheets of plywood so they were flush with one another.

With the edges flush, we didn’t have to spend too much time sanding but we still decided to do a once over and slightly round the edges, too.


A lot of imperfections showed up after the planing and sanding–mostly in the cheaper sheet of plywood–but it was nothing a little wood filler and one more round of sanding couldn’t fix.


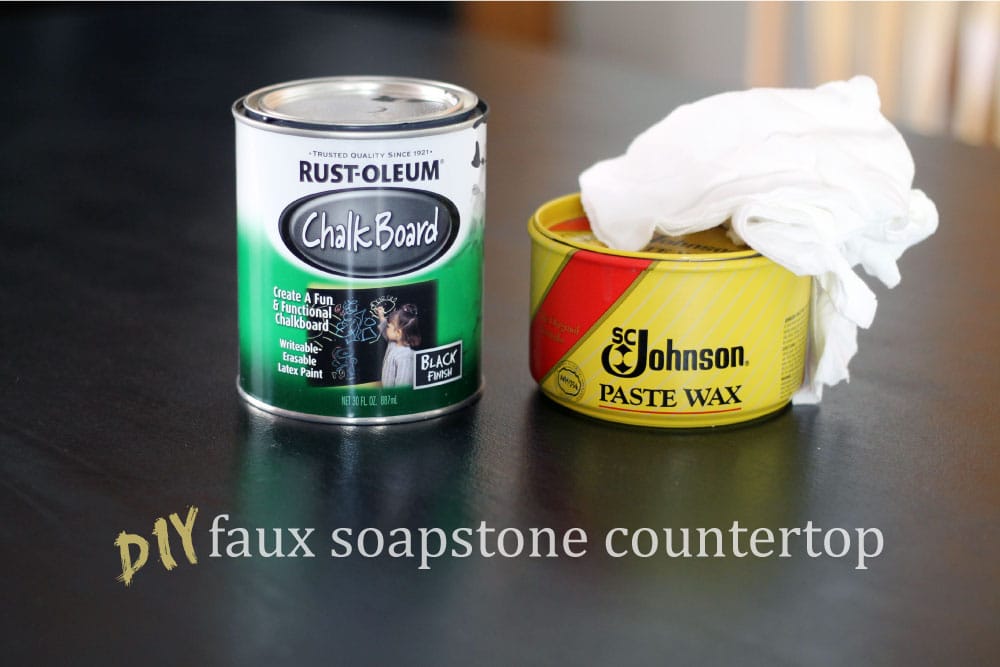
At this point, we had a smooth 1 1/2″ countertop ready for the faux soapstone treatment using rustoleum chalkboard paint and paste wax. I layered on 4 coats of chalkboard paint with a small foam roller, waiting a few hours in between each coat.

After the paint set up for 24 hours, we lightly sanded the whole surface with a fine-grit sanding block to keep it nice and smooth. I actually drew some fine lines, a la soapstone, with gray chalk on the surface but as soon as we applied to paste wax to seal the countertop, those lines disappeared. Ha! We’re happy with the results just the same.

We followed the instructions on the paste wax, and applied the wax in even strokes with a t-shirt cloth with the grain and let it dry into a haze before buffing it out.


In the photo above, you can see it buffing to a shine on the left, while the right side is still coated in the wax. We opted to do a second coat of wax, which made it even smoother. We’re really happy with the results:

The chalkboard paint provides a good varied charcoal black like soapstone for a minute fraction of the price. But more than anything, it’s nice to have a durable work surface finally.


We can’t wait to start painting cabinets and update those stools and a few other quick-fixes to make this space less of an eyesore–this faux soapstone countertop was the perfect springboard and for less than $90? Icing on the cake.

We’re excited to be collaborating with Ace Hardware as a part of their Ace Blogger Panel this year. Ace has provided us with compensation and a $90 Ace Hardware Gift Card to complete this project (and celebrate their anniversary!) but all ideas, opinions and sweat are our own.


What an amazing idea! I have a vintage sew cabinet Id like to turn into a bar cart- now I know how to finish the top!
are you able to prepare food on the faux soapstone countertops?
We did – we just kept up the paste wax coat.
I am currently pretty set on doing my countertops with the chalkboard paint for the soapstone look…was wondering how the wax finish alone has held up as I have seen similar techniques published only finished with polyacrylic as opposed to wax. Yours look beautiful!
This was just a temporary fix for us. We swapped out the countertops 3 years ago for white concrete, which we love.
Wondering how you think this would hold up as a short term bathroom countertop. Thinking a year or two until we totally redo our bathroom. Would the wax protect it from water damage?
That’s a bit riskier, but butcher block is used around kitchen sinks and works well as long as you keep it protected and wipe up any wetness pretty quick. You’d definitely want to wax it often if you do decide to try it.
You should be a part of a contest for one of the
best blogs on the net. I’m going to highly recommend this blog!