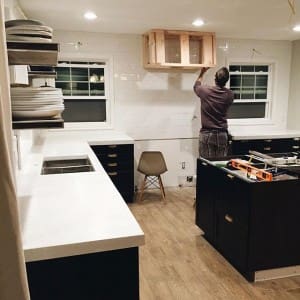
The backsplash is in! Last week, after we put the girls to bed, Chris and I tiled the whole back wall of the kitchen and a little bit on the left sink wall. It took us about 8 hours total over a few nights, including grouting which is nothing compared to the 20+ hours it took us for our last kitchen. Next to the missing cover panels (some are still not installed–oy), that raw back wall was probably the biggest eyesore in the room.

The tile was one of the last things we decided on in the whole kitchen. I wanted something fresh and classic, but not trendy. A 3×6 subway tile didn’t feel like enough, a square tile felt too…square. Then, a couple months ago, I saw an article on Apartment Therapy about Mission Stone & Tile. I think it was the color scheme that caught my eye first–whites, mink, greenish-gray, “mist”–it was so me. I loved the look of their subtle textured tile and ordered a few samples from their Essentials Collection (so good!) right away.

When they arrived, I knew I loved the 4×5 shape! It was just different enough, it felt fresh–it felt like finding the missing puzzle piece. I was sold. Chris was sold. We knew pretty quickly that we wanted to do white, just because we already had black cabinets and warm greenish-gray walls. I tried to get him on board with pin-stripe white and he tried to convince me that a honeycomb texture was the way to go. Within a week, we ordered whisper white glossy tile in a smooth finish. Although I still think a subtle striping could have been cool, we’re so in love with the shape–no regrets.

All of the tiles are handmade so there are some slight variations in thicknesses and shape, but I think it adds a casual, charming look to the tiled wall, which can otherwise come off as rigid and cold.

I don’t have many progress shots–it is pretty hard to take photos when you’re elbow deep in mortar–but we got into a pretty good groove where I would lay all the full-sized tile while Chris would make all the cuts and lay those. Once all the tile was in place, we waited a full day before grouting. Which meant I had a full 24 hours to go back and forth on grout colors.

(Ta-Da!) We settled on a PolyBlend grout color from Home Depot called Snow White. It’s a very very light warm gray that shows off the tile just enough without making things feel busy.


On the sink wall, we opted to lay just three rows of tile with coordinating bullnose tile bordering the tops and side to finish it off.

As you can see, as soon as we were done with the tiling, we started gearing up the hang the open shelves which we had to do before sealing the countertops (so no dust or debris would get on them while they cured). We’ll have that project for you later this week!


Looks great. Can I ask which tile cutter you used?
Gorgeous! I love that have the tile going all the way to the top above the stove.
YOWZA! Man, that before to after grout photo made my jaw unhinge from falling so fast. GOOD WORK. Super impressed with your tile laying skillz :)
Beautiful! I am loving this kitchen reno. Great job guys!
Loving these updates and watching it all come together, but it’s dangerous because now I’m starting to think I can tackle my own kitchen!