
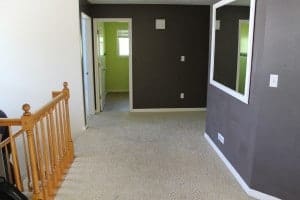
Last week we showed you our entry that got a little makeover, but is still very much in progress. We have baseboards to install, grout to fix, a light switch and doorbell to move, art to add above the hooks–but we’re getting there. And it really is a drastic change in a week’s time, both visually and the way it has been working for our family–wonderfully!
When we showed you the new space, there were a few concerns about the bench. Was it sturdy? Are you sure? Is it wide enough? And the one that really got us thinking, proposed that maybe the bench was not up to par with the fancy hooks we splurged on. Hmm. Sometimes you can see something isn’t working right away, sometimes it takes taking a picture and sometimes we post something here and it isn’t until you, our friends and readers, say something that we finally see it. That being said, we’re going back to the drawing board to design and make something a little more chic–maybe upholstered!–for the entry bench. Stay tuned for that.

In the meantime, I did want to share with you how we made this bench because it was incredibly affordable at around just $30 to make and it’s super sturdy and slim. We went the DIY route so that we could make the bench the entire length of this wall and tall enough to be comfortable to sit on. The top is a solid piece of Redwood (2x12x69″–the length of the wall) that cost just under $20. The legs we found in the plumbing section.

They are steel and come in a lot of different sizes. We opted for the 18″ ones which are standard height of a chair which felt the most comfortable for us. With our wood and legs in tow, we went home and filled all the knots in the wood with wood filler, sanded it smooth and drilled the holes for the legs using a 3/4″ bit.

We only needed two legs because the back we attached to the studs in the wall but we’ll get there in a second.

Once the legs were screwed in tightly, Chris measured the exact height (making sure both legs were the same) and got to work placing our wood for the back support into studs while I spray-painted the red caps on the legs black and primed and painted the Redwood white.

For the back support, Chris first measured the height of the legs on the wall and then found the studs so we could secure the wood to them.


Once that was in place, I painted it the same color as the wall and Chris drilled pilot holes for our extra long screws we drove through the bottom of the board to the bench.


After the paint on the bench and caps had time to cure, we secured the legs back to the bench and the whole thing to the wall.

It really is a great little bench–and we love that it is the right height and the full length of the wall. Although we definitely see now it might be a little too casual for our front entry, for $30, we don’t feel too bad rewinding and trying again.


Did you get that duvet yet?? I love it for myself too but I’m wondering how it feels/quality.
I love the overall look, the hooks are mwahhh! Soooo, I liked the bench until you said maybe it’s too small, too narrow… It may be cost prohibitive but what if you replaced the legs on the bench you had there before with something in the brass color. And then, make a slip covered top in a super fun fabric that uou can change with seasons or just because. Not sure if it would slide around on the leather though. Wouldn’t it be great if you could make some fabric on spoon flower from one of your paintings…swoon!
I like everything about it, but it looks too shallow. It’s the bins. If they didn’t stick out beyond the bench, the proportions probably would look fine. I agree that painting the legs to match the hooks would probably look great
But either deeper bench, or different bins.
When I saw your bench and your rug, and read you were rethinking the new bench, this bench came to mind from homemade-modern.com. It is awesome and has your style written all over it and wouldn’t be too far of a departure from what you have, but it definitely ties in more with the traditional modern vibe you like. Plus, a deeper wood stain would tie in nicely with your shelves in the piano room. I can’t attach a picture for some reason, but check out the link. It has the feel of an upholstered bench in a more modern way. Anyway, good luck on your barn door!
http://homemade-modern.com/ep28-wood-wool-bench/
I totally thought of the same bench from Homemade Modern! I actually didn’t mind the bench as-is until you posted this, Julia. I can see what you’re going for though :) excited to see the evolution!
i actually think the bench is a great starting point. maybe wood legs…upholstered cushion on top? but, i have a feeling you have something new and amazing planned!