This post is sponsored by Lowe’s Home Improvement
I’ve loved ceiling beams on vaulted ceilings for a long time. We added them to our last house, the Modern Cottage, and it added so much warmth and architectural interest in an otherwise very open living space. Ever since we moved into our Modern Colonial house several years ago, I pictured ceiling beams across our living room and dining room ceilings, as the roofline there is slanted. Adding those details was a key part of this renovation project from the beginning, and fortunately, we found everything we needed at Lowe’s.

Corbels | Tongue and Groove Planks | MDF Boards (for beams)
The Planks & Beams: Getting the Right Look and Material
I know ceiling beams have appeared in a lot of farmhouse design lately, but I was really inspired by older, historic homes. Traditional homes’ ceilings have so many details on them — from trim work and paneling to beams and corbels. I love how these accents draw the eye up, adding character and a sense of grandeur to a space.
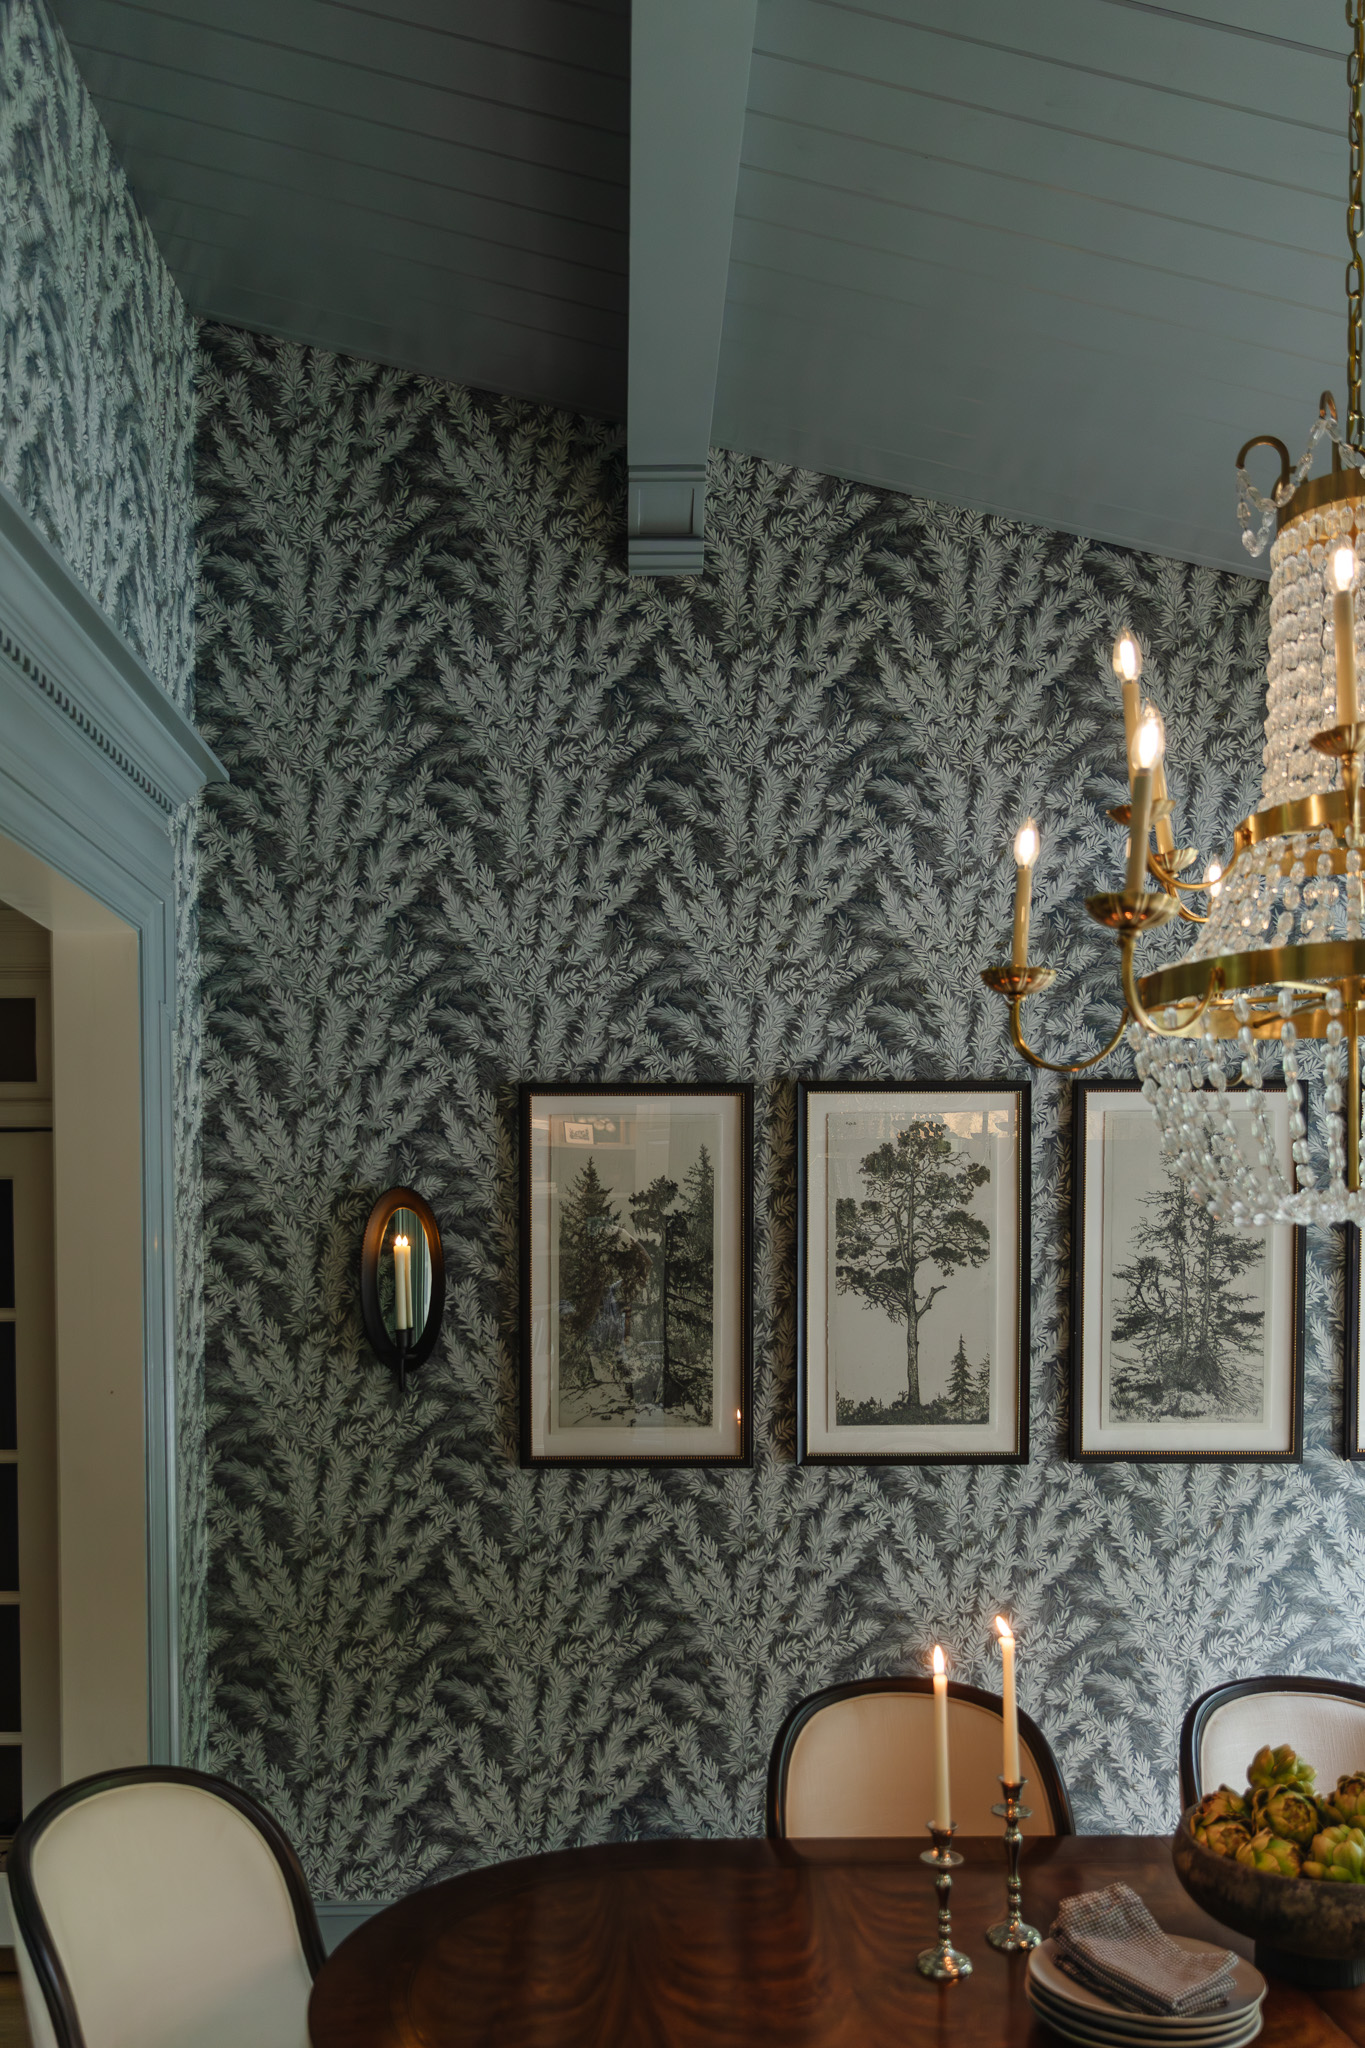
For our dining room and living room ceilings, we started by adding 5″ tongue-and-groove planks. This material is not only beautiful but also easy to find — our contractors picked it up at Lowe’s. (If you feel like you’ve seen this look before, you have: We used a similar, slightly thinner product for the surround of our pantry.) This already made a massive impact on the look and feel!
Natural Beams vs. Painted Beams
When we were deciding on beams for our living and dining rooms, I knew I wanted the living room beams to be a natural wood tone. Because it’s a more relaxed space, I wanted it to feel more traditional.

However, for the dining room, I took a different approach. My vision for these beams was to create a different feel from the main living area. While I wanted the living room beams to be a focal point, the dining room beams were intended to be a more subtle, complementary feature. More polished, and slightly more modern.
I decided I wanted to paint those beams, which was music to our contractor’s ears! Painting beams means they can be made from MDF, a material that’s easier to work with than wood because you don’t have to worry about matching wood tone, grain, or stain color. MDF beams are also hollow, making them lighter and easier to install.
Choosing Which Direction to Install Beams

I’ve been getting a lot of questions about why I chose to orient the dining room beams the way I did. The decision was purely for aesthetics and sightlines. When you’re standing in either the dining room or the living room, the beams simply look better running across the ceiling. This room is also longer than it is wide, and this orientation makes the room feel wider, since your eye is drawn across that direction.
The Corbels: Adding a Traditional Touch
I’ve always been drawn to traditional design, so I started looking for ways to give the beams a more classic feel. I found a ton of inspiration at the Biltmore Estate, where so many of the ceilings featured ornate corbels at the ends of the beams. That’s when I knew I had to add them to our design, but with my own slightly more modern spin on things.
The corbels were the perfect detail to dress up the painted beams and differentiate them from the living room. Since the corbels were going to be painted the same color as our trim, they were easy to source. We actually found a great modern-traditional option at Lowe’s, and there are so many other beautiful options to choose from!
A Key Thing to Note when Installing Corbels on an Angle
Then came a tricky part: The installation of the corbels was more complicated because our ceiling is slanted. If our contractors had simply made a standard rectangular box for the beams, the corbels would have been slanted as well. To solve this and make them parallel to the floor, they had to make the sides of the ceiling beam box different heights so that the bottom of the beam facing the floor was flat. This allowed the corbels to hang perfectly vertical, retaining that classic look we were after. (You can see this in the photo above!)
Pop Corbel Quiz: Which Side Is Up?

You can get creative with how you use corbels. Depending on the style, you can install them so they appear to be part of the ceiling or so they function like a crown molding separator, with trim added to the bottom. While some people have a definitive take that the “heavier” looking side of the corbel should be toward the top of wall or ceiling, I think that it’s less black-and-white and more about the effect you want to create. We could have installed the corbels with either decorative orientation up, depending on the look we were going for.
The Overall Effect of Adding Ceiling Beams & Corbels

Shop The Dining Room Ceiling Project
I love how polished and refined the painted beams look in the dining room, and how the natural wood beams look more traditional and cozy in the living room. It reflects the use of those rooms and differentiates them so they can both shine! The corbels we got from Lowe’s for the dining room are just the cherry on top!


Just saw the new side table addition to your DR in Instagram – what a great functional piece. It looks fabulous too. What was the source for it? I did not see it your LTK. Love how the room keep evolving. Many thanks.
We love it so much! It’s from Chairish here.
Love the dining room chandelier. What company make it?
It’s from Visual Comfort (link here!)
I just love that ceiling and paint color and wall paper, well; pretty much all of it. You have such a gift.
Everything is absolutely beautiful down to the last detail? OM gosh!
Love the color of blue you selected, please share. The wallpaper and the tree sketches are stunning.
We love the wallpaper and trees! The trim and ceiling are Benjamin Moore Gibraltar Cliffs.