
This post is sponsored by Zabitat.
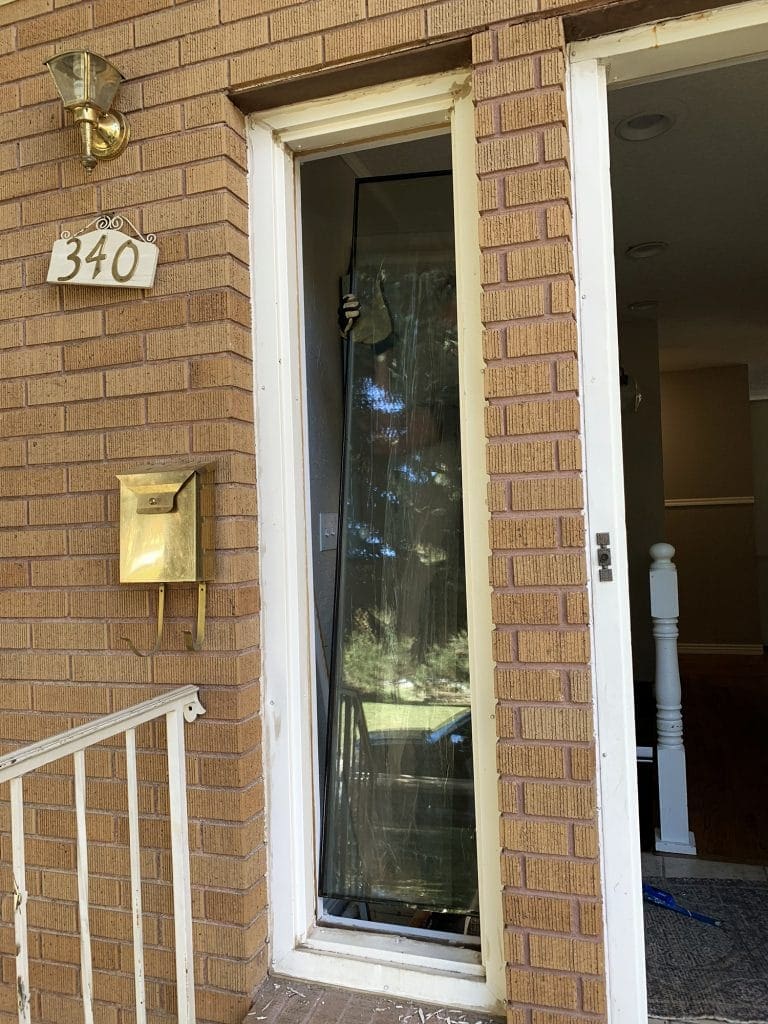
Our friends were struggling with the exterior entry to their house. They weren’t crazy about painting the brick (this is actually his childhood home), but they are also young and hip and they were wanting their home to reflect that a little more, while keeping the brick in its natural state. We were 100% up for the challenge and over the course of a few hours, we were able to take their front porch from this:

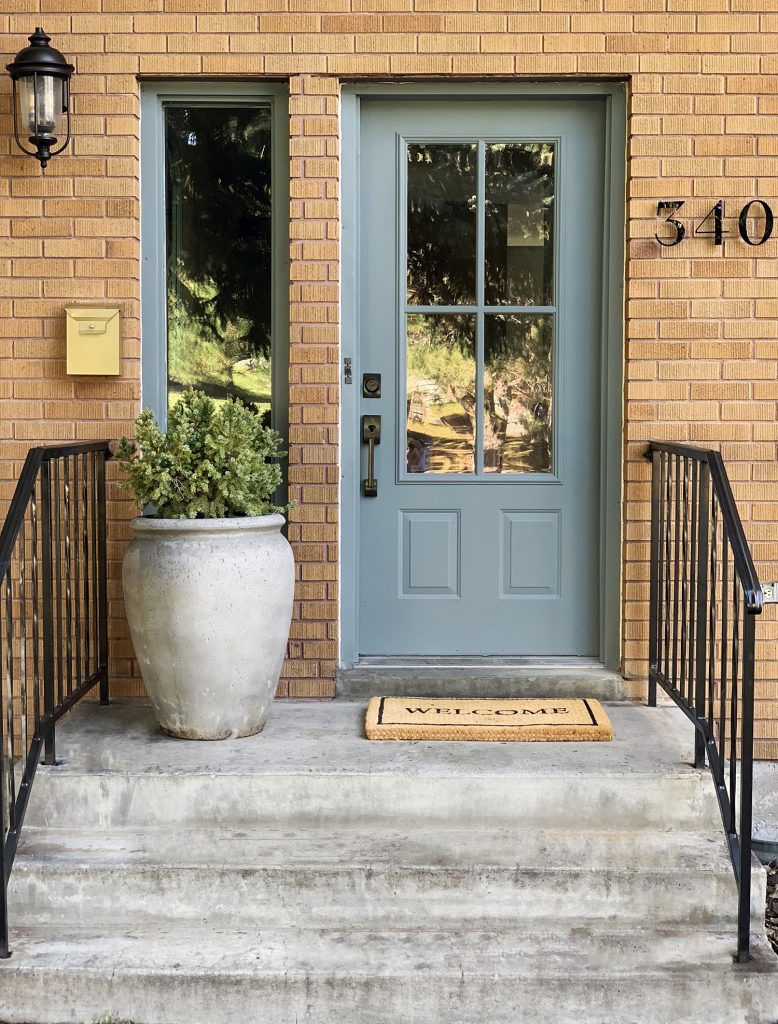
TO THIS!!
Here’s a before and after gif to save you a scroll up and down.

It looks completely different, right?! But the truth is, it was just a lot of easy, budget-friendly changes despite the wish list being long: door, railing, mailbox, house numbers, light! Here’s how we tackled each one.
Updating the Existing Door
The homeowner loved the door(s) in this inspiration photo (via) below and I agreed that ditching the ornate oval glass would do wonders for their facade.

A brand new 4 light grille door like this is drool-worthy, but also costs thousands. We were able to create the same look, using their existing fiberglass door with an insert from Zabitat. Have you heard of them? It’s honestly a life-changing product. They sell really beautiful and affordable door inserts–in EVERY STYLE, including dozens of decorative door glass options!–for updating your existing door. After measuring how big we’d ideally like the window to be, we found this 24×50 4-light frame kit on Zabitat for $297! (Here’s a 24×38 for $188)

We knew that the thinner trim and 4 tall windows would give their door the same high-end look of the inspiration photo. Chris removed their front door from the hinges and marked off the dimensions of the insert–Zabitat tells you exactly what size hole you’ll need–and cut it out using a circular saw.

The insert comes in three pieces. The interior frame (meaning the frame that will be on the inside of your home), the glass, and exterior frame. Installation is easy, but it’s nice to have two people since the door needs to be upright to install the insert.


Set the interior frame, then the glass into it. Then the exterior frame and screw them all together from the interior side. They also send caps to cover the screw holes so they’ll be invisible. The whole process took us 30 minutes. It was painless!
Chris re-hung the door and I got to painting. My goal when choosing a paint color was to enhance and complement the color of their brick. If the brick is here to stay, then work with it! Make it look its best! It had orange-red undertones, so I looked for something in the blue family since blue and orange are complementary colors. I decided on a beautiful muddy blue-green gray–Benjamin Moore’s Templeton Gray in Exterior Matte. It’s a similar value to the brick, meaning although they are different colors, they have a similar lightness to them or low contrast, so it creates a really serene look.

While we were at it, we replaced their sidelight with a clear pane, also from Zabitat, so everything was clean and fresh. (Note: Zabitat is happy to do custom sized inserts if your door or sidelight requires it!)


Railing and Mailbox, Minus the Curly Cues
Ornamental curly cues on a metal railing, a rusting metal railing, will kill a modern vibe faster than you can say “grandma’s house.” But that doesn’t have to mean a whole new railing! Chris took an angle grinder with a metal cutting blade to the embellishments and cut them right off!

![]()
I followed up with Rustoleum’s Carbon Mist spray paint to give the railings an iron look and they were good as better than new!
The mailbox also had some curly cues, although they generally hold newspapers. Or used to, when this home received the paper. I asked them if they used it, before removing the screws holding the two bent out of shape paper holders. With its new, cleaner profile, I gave the mailbox a few coats of Rustoleum’s Metallic Pure Gold spray paint and it modernized the 80s brass in no time.

Custom House Numbers
Remember the house numbers before? Probably not–they were pretty unmemorable. House numbers can make a house. For this house, we knew we wanted something that kind of connected the old to the new.
This home holds so many memories and traditions for this young family, and we didn’t want to strip the house of that in this makeover. So we really wanted numbers that felt classic and traditional with a modern spin. Our friends started the brilliant company, Dropcap Studio and they make custom house numbers and letters. In any font, size, material, color you can think of! They even mocked up a few different options that they would suggest (so helpful!!) and we decided on their Valuta numbers in a glossy acrylic that has a lifetime guarantee!

It comes with an easy-to-use template that shows you exactly where to drill holes. Chris used a hammer drill with a masonry bit to drill the holes about an inch or so deep. We put a drop of silicon in each hole and stuck the numbers in. They float off the brick (swoon) and nearly steal the show.
High Light
Their previous light was high and tiny. There wasn’t much we could do about the location, but choosing a larger fixture that was more bottom-heavy really helped balance out the height, not to mention illuminate the whole area a lot better.

A fresh doormat, handleset and spruce (in the prettiest cement planter they had!!) were all the finishing touches this space needed.
Here’s one last before and after. You can see that pretty cement planter they had in the bottom right of this photo.


My favorite part of this whole makeover was seeing how excited the homeowners were about their house now–even, and maybe especially, the brick! And also how we were able to do it on a dime. (Budget breakdown below!)

Does your exterior look more like the before? A makeover may be in reach for you! Here’s how this quick makeover breaks down cost-wise:
Zabitat 4-Light Low-E Insert $297
Zabitat Clear Glass Side Light $133
1 Quart Templeton Gray Paint $20
3 cans of Carbon Mist Spray Paint for the Railings $21
1 can of Pure Gold Spray Paint for the Mailbox $7
3 House Numbers $83
Doormat $34
Spruce $15
New Handleset $167
Exterior Light (purchased at a local lighting store) $45
TOTAL $822
For a third of the cost of the drool-worthy 4 Grid doors the homeowners were originally eyeing, we were able to give the whole area a makeover! Let us know if you try something similar at your home and be sure to check out Zabitat’s awesome door insert and sidelight options.


Wow
What a great post with sponsored content that will be incredibly useful to so many people looking for a budget-friendly way to boost curb-appeal!! Good job, you guys!!
Oh my goodness! Incredible article dude! Many thanks, However
I am having issues with your RSS. I don’t know the reason why I am unable to join it.
Is there anybody else getting the same RSS problems? Anybody who knows the answer will you kindly respond?
Thanks!!
Really enjoyed this post! The sponsorship was seamless and very fitting, I’ll keep them in mind for future projects!
Quick-ish question for you. We’re looking to put in a door where a window is now. We found a reasonable mostly glass door but getting one with a sidelight is way more expensive. Would it make sense to have our contractor frame in a space for us to insert a Zabitat sidelight panel? I’m having trouble figuring out how that would work.
Totally!