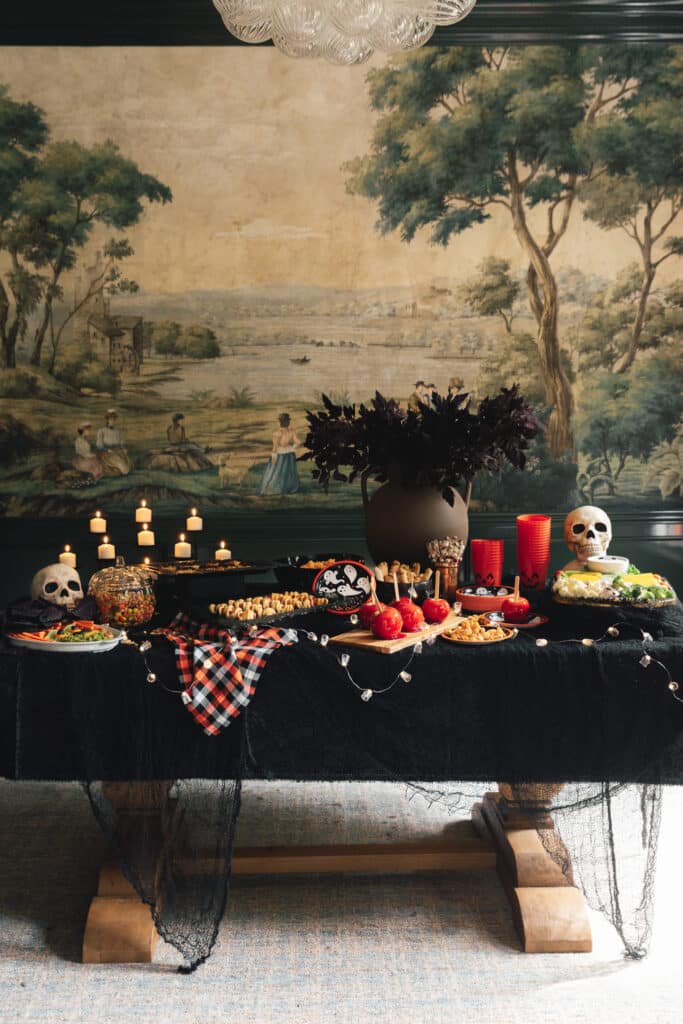
We had our 5th annual costume party this weekend and, somehow, each year it manages to be even more fun. Most of our friends and family go all out with their costumes and some we even barely recognize when they show up. It’s a complete riot and we are so grateful all of our different circles get along so well and everyone seemed to have a great time.
For the party, we transformed Faye’s nursery into a make-shift “photo booth” with a backdrop and some photo lights and my camera all set up and ready to capture everyone’s costumes–it’s a crowd pleaser, and we just love giving our guests the memory of their wonderful costumes. We’ve done it for five years and there’s no end in sight. Although next year, I’ll probably hire someone to man the camera because it was a little chaotic for me to keep running back and forth with so many guests.
We did a few new things with decorations this year. These Harry Potter-inspired hanging candles were a DIY and I promised to share the tutorial when I gave a sneak peek on instagram last week.

I loved the idea of hanging candles, but battery operated candle sticks are $$ and real candle sticks are, well, a fire hazard. But I discovered these flickering LED tea lights were a minute fraction of the cost and I knew with a little bit of DIY (and a little help from some friends! craft night!), we could make them work.

You’ll Need:
• Empty Paper Towel Rolls (I started collecting them, but I wanted to hang 100, so I ended up buying a lot of 80 empty industrial paper towel rolls off of ebay for $27–worth it!)
• White craft paint and brush
• Fishing Line
• White mini muffin liners
• Glue gun that holds full-sized sticks and the hot glue sticks (stay away from the skinnier mini ones–not the same effect, we tried)
• Scotch tape
• Flickering LED tea lights
• A drill or large quilting needle
1. With a large quilting needle or small drill bit, make a hole through both sides of the paper towel roll about 1/2″ down and thread fishing line through. This will not only be used to hold your tea lights in place, but to hang the candles, so vary the length of the fishing line accordingly.

2. Paint the empty rolls with white craft paint and allow to dry.
3. With your hot glue gun, make wax-like drips. We discovered this is most effective with the regular-sized hot glue as opposed to the mini sticks. I put on big globs and allowed them to drip and layered on more. The sloppier, the better.

4. Once the glue is cooled, paint over them again with white craft paint. We almost didn’t do this step, but it only took a few seconds for each candle and it made a beautiful difference.
5. Lastly, we taped a white mini muffin liner inside the bottom to make it look like a solid candle and not a hollow tube.

We attached each to the ceiling with clear thumb tacks in a concentrated area (the living room), so they would really pack a punch. It was truly breath taking in person.
For other decorations, I focus my efforts on places where people gather most. So, I tend to skip the bathrooms, for example, but I love transforming the shelves in the study into something a little more haunting.

Outside the front door, where all of our guests enter, we set up a mini pumpkin patch with a variety of gourds and little crows (from the dollar store) perched on a few.

Right outside the front door, I hollowed out a couple pumpkins and planted some mums. The wire stand is actually a waste basket from Lowe’s turned upside down.

Last year, the weather was unseasonably warm and so many of our guests ended up at back and we weren’t prepared for that at all. So, when we saw the weather was going to be nice again (maybe no so unseasonable anymore?) we picked up 6 more straw bales for $2 a pop at a local pumpkin patch and set them around the yard with a blanket tossed over each. We also picked up a burn barrel for the center of the yard and lit a fire in case it did get chilly–hopefully next year we’ll have a legit fireplace out here.

For the finishing touch, we strung a few strands of outdoor lights (these) and they made the scene. There were people everywhere in the house (upstairs, downstairs, everywhere!), but the majority seemed to gather out here and in the kitchen (naturally :).

Most of the kitchen area was decked out with food (soups, sliders, a caramel apple bar, dry ice root beer, and mulled apple cider), but I did hang a few of these bats from the dollar store–30 minutes before the party started!–around the island pendants for a last minute fun touch.


And then we threw on our costumes (Run, Forrest, Run!!!!) and partied hard all night. It’s the perfect holiday kick-off for us and there will definitely be a 6th annual next year. ;)


How long are these paper towel rolls? Standard 11″ or are they the shorter 8″ industrial tubes?
They’re standard.
So I’m probably missing something obvious but how does the fishing line connect to the thumbtack to get the candles to stay up? Is it tied around the needle part?
I just wrap it around the pin part.
How much do I love this!?!? The farmhouse my husband and I just started to work on (and the acreage around it) would be an amazing spot for a legit creepy Halloween party. Maybe we can throw one together!?!?
https://downalonglane.wordpress.com/house-tour/
Fun!
Everything looks so amazing! I love the candlesticks and your backyard! Did the thumbtacks in the ceiling leave tiny little holes afterwards?
The tiniest, but our ceilings have some sort of swoop texture on them, so they really aren’t detectable.
I love your floating candles! A harry potter fan’s dreams come true. Quick Q: How did you get the flickering tea light to sit at the top? Did you secure with glue or tape or anything or did it sit pretty easily on top?
It just sits right on top of the fishing line, which is good because we can easily pop them out to turn them on and off.