This post is sponsored by HANDy Paint Products.

While the entire side yard just went through a major transformation, there was one small area that still needed a makeover desperately before we deemed this part of the yard complete. The entrance into the garage has always looked rough since we moved in, but it only took us an afternoon to turn it around. Here’s the before, complete with peeling paint and a fist-sized light fixture.

While prior to painting, all the door just required was some light sanding and washing, the trim’s peeling paint was coming off in sheets and it seemed like it needed a completely fresh start. We absolutely could’ve sanded it (for days), but Chris pulled out our pressure washer and the peeling paint was all gone in less than 20 minutes.


Ahhh, bare trim, a dirty-looking door that’s actually just scratched up, our old dryer vent that we also needed to cover and…an excellent light fixture. Ha! Chris installed our new light fixture from Rejuvenation (isn’t that copper interior amazing?! It’s on sale right here) before painting. Sometimes you just need a little something pretty to keep your motivation up–I get it.
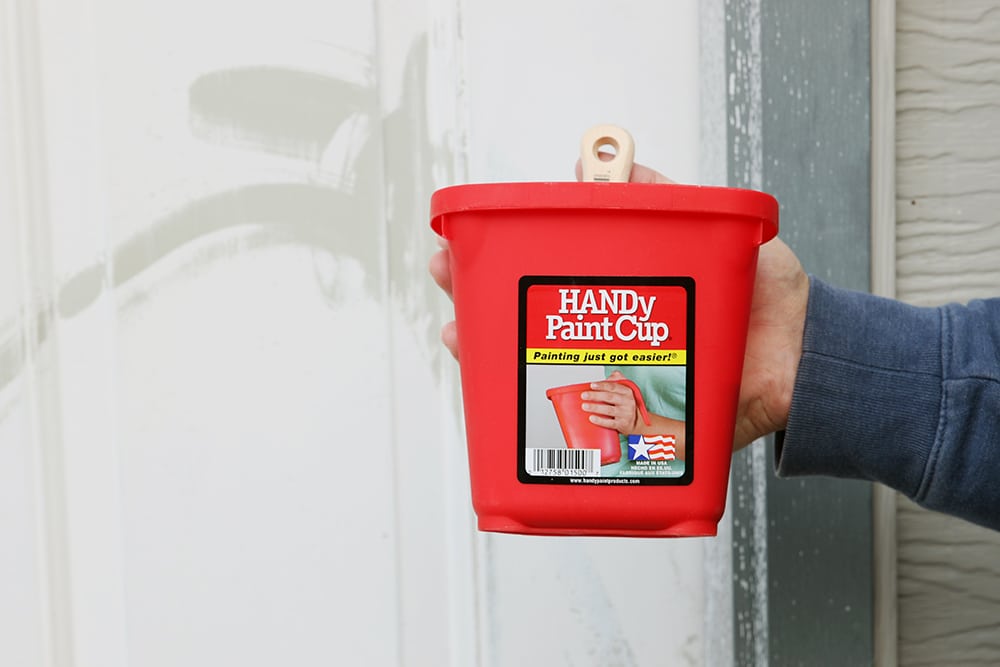
Speaking of little, for small painting projects like trim work, the HANDy Paint Cup is our favorite. Its solvent resistant and holds up to a pint of paint or stain. But maybe my favorite part is the built-in magnetic brush holder–life-saver! And a comfortable handle that means no hand cramps.
We poured in some paint+primer satin exterior off-the-shelf white paint that’s ultra-durable to weather and got to work.

The trim and door only took a coat and a half before it was looking brand new again.


We considered painting the door black but decided a coat of white paint, like the trim, would probably go a lot further in making the area look fresh.

To finish it off, we capped the old dryer vent chute with a dummy cover, laid down our favorite wooden doormat, added a potted boxwood and, well, the light you’ve seen.


It’s easy to look at a small area like this and think, “Ooo! We have to replace the trim and the door is so beat up.” And continue to push it off…like we did for so long. But, we learned that even less than a quart of paint has a lot of power.
Any small, but mighty, paint projects happening at your place?


How did that doormat hold up??
good! Still out there.
Great update! That kind of thing is often hard to get to, but is always very satisfying and impactful.
Would you mind sharing where you got your black booties? They’re super cute! ;)
TJ Maxx! They are Tommy Hilfiger
Thanks!
I really like that pail! I bought one a few months back when I was getting ready to paint a bunch of rooms in advance of our second child. I was reluctant to even get/use a pail, much less pay the extra three bucks for the “model” with disposable liners and the magnet but I am SO glad I did. It makes the whole process cleaner and smoother. (I’m generally a pretty sloppy person)
I just wanted to take a minute and say that I love your posts sponsored or not. I feel you do a fantastic job of being genuine even in your sponsored posts and I can happily say I have the upmost confidence that you would not post about something you genuinely didn’t like or found useful. Also, I love LOVE your podcast with Preston, so much so I wish it was weekly. *hint* ;)
Thank you so much, Amanda! We love doing the podcast!
I have a door just like yours that also has a cat door (my door leads from the hallway to the basement). Can you please tell me how you sealed around the edges of dog door? There is a nice gap between the edges of the cat door and my door and I think it looks awful.
Thanks!
There are a few little gaps on ours, because of the carve-out areas of the door, but we just tried to position the dog door so that it was flush in the most places possible.