
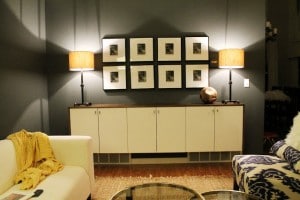
Two weeks ago, we shared part one of our new “fauxdenza” in the living room made of 3 Akrum wall cabinets from Ikea floating a few inches above the floor. It was a great solution to a large credenza for hundreds (in some cases, thousands) less.

But the white cabinets alone, left a lot to be desired. For instance, the top of the cabinets–which normally aren’t visible because they are so high–were very visible here. So, over the past two weeks, among other projects, we tracked down wood to cover the sides and top and also hardware to finish the look.

Now she’s done! And she’s a beaut, not to mention a storage goddess. Getting to this after point wasn’t too hard, but it did take some brainstorming on our part. Lumber yards are seriously hard to come by around here. We were after one, solid piece of wood that was around 91 inches long, and here’s the kicker–just over 13 inches wide–the width is what killed it.


Wah. Waahhh. So, we headed back to Home Depot (where we started and found nothing wider than 12 inches) with a new plan of attaching smaller planks together to create one large piece. It wasn’t what I had originally wanted, but if it was the best we could do–then so be it. That’s DIY for ya. We had to buy the lumber, wood glue and clamps and we were right around $100. Not terrible, but more than I was hoping to spend. I kept insisting there had to be something we were missing. Then, when we were headed to check out, we saw huge sheets of pine cabinet grade plywood. They were 96 inches by 63 inches (more than enough for the entire credenza) and get this…$34. We looked. We smiled. We put everything back that we had picked up and took our big piece of plywood to the back to get cut into the exact sizes we needed. Woot.
This past weekend, Chris attached veneer to the exposed edges and stained all of the pieces with Minwax Dark Walnut we had on hand and I sealed them all with water-based Polycrylic.

We actually love the look of the plywood. We were worried it would look so cheap, because it was. But it looks quite the opposite. Especially after the whole thing was sealed, it took on this incredibly rich tone. We attached the three parts (one on either side and one board for the top) with 1 inch screws through the inside of the cabinets and into the wood.

As for the edges, we didn’t worry about mitering or angles, we just laid the top on top to square the edges, and attached it.

We are so glad we didn’t settle for Ikea hardware. Not that there is anything wrong with Ikea hardware, or that we weren’t tempted, we just wanted the whole piece to feel a little higher end than Ikea. We tracked down these Liberty Hardware pulls at Home Depot and la-hoved them. Both of us. Immediately.

Apparently, Greta wasn’t completely satisfied until she saw every other option. That’s my girl.

The end result is just as we hoped it would be. It’s clean and slim and purty and has lots of storage. And since the wood and hardware wrap up this project. How about a budget breakdown in case you are considering doing something similar in your own home?

From Ikea:
3 Akurum Wall Cabinets (30×24)
6 Applad Doors
12 Hinges
6 Hinge Dampers (Soft close. OOoooo)
2 Akurum Suspension Rails–but we only used one

Today, we’re filling that bare wall above it and styling the whole she-bang and we’ll hopefully be back with all those photos tomorrow. Last night I realized, we finally have a surface to decorate for the holidays that’s almost like a mantle. Which doesn’t for a second mean I’m about to get all crafty with it, but seriously bring on the garland, candlesticks and cloches.

love this fauxdenza, so thankful for all the details you share making all your projects more approachable for others! miss the podcast!
Deep thought! Thanks for cogrtibutinn.
[…] to have one of those, right?) and most recently the credenza, err fauxdenza (see how we made ours here), which holds most of the girls’ toys. We first introduced our toy storage system back in […]
[…] Chris Loves Julia also made a version of the fauxdenza that looks amazing. […]
This is gorgeous. I love the stain and pulls you guys used to accent everything. Great job! :)