We often share first looks and sneak peaks to our Love Letter subscribers (sign up here to get on the list) and last week we shared the first 3 projects we want to work on in our house. At the top of that list? The powder bathroom on the main floor. When we first bought the house, it was operable and looked like this:

The cherry floors that were throughout the first floor, extended into this small powder room and when they were removed, the floor, sink and toilet all came out of here, too. Which to be honest, was probably going to happen anyway. It wasn’t until we had my family over for Polly’s birthday party two weeks ago that we realized our guests currently have to walk through our bedroom, and closet and into our bathroom to get to a toilet. Or they can go upstairs or the guest house–there’s nothing convenient! So we put the powder bath at the top of our list.
Here’s what the poor bathroom looks like today. The salmon plaster you know, (I actually LOVE the mirror so much) but the rest of it looks rough.


Okay, spider webs, we get it! We haven’t used this bathroom!


The ceiling is the last photo and I just had to include it because they included the most beautiful stacked crown in this tiny powder room with 10 foot ceilings! Thank you!!!
This is the first project that we’re doing from start to finish in this house and I’m really craving that “one-room transformation” feeling. The thing I love about doing a small room first is you can really set the tone for the whole house in a small space–almost like a mock-up of what the rest of the house will be. It’s also just fun because you can take a small space like a powder bath from start to finish in a shorter amount of time, with a smaller budget, than say–a living room renovation.
Just like any room in our house, I really wanted this room to feel like a mix of historic and traditional, with some modern touches. I want every room in our home to be thoughtful, even down to this little pocket of a room. Here’s a mood board to show you what I’m thinking.
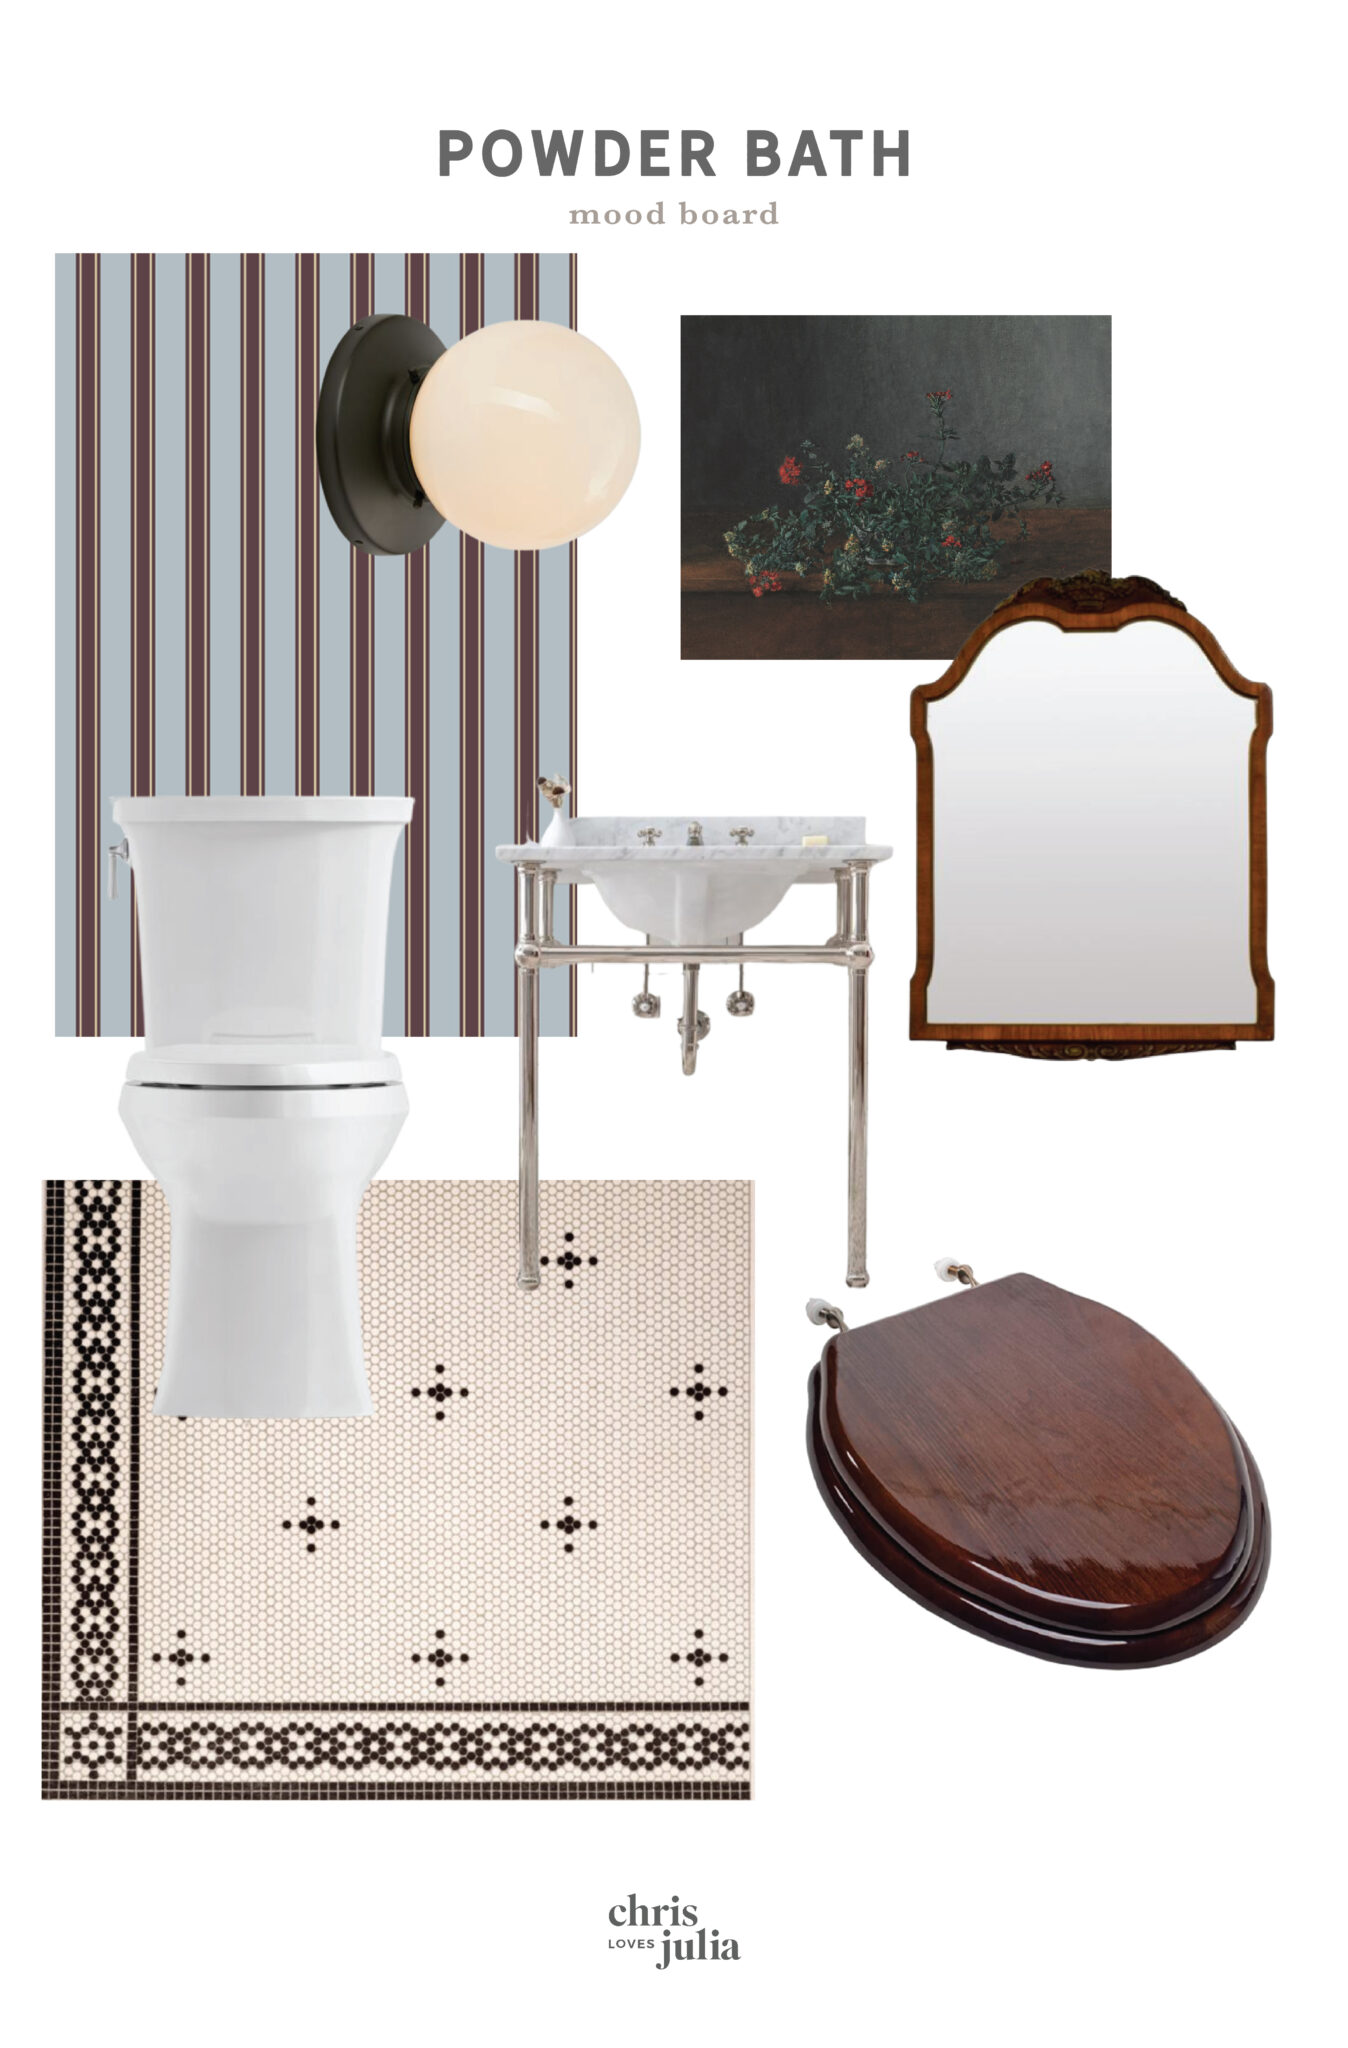
Sources:
Wallpaper in 752, Wall Sconce, Watercolor Floral Art, Mirror (I’ll probably just keep the mirror that’s in there), Vanity, Toilet, Wooden Toilet Seat, Penny Tile Inspiration (white, black)
When I’m designing a room, I like to start with one must-have, and in this room it’s the wallpaper. I wanted more of a geometric, graphic wallpaper–something to show off the height of the room (10ft tall ceilings anyone?) so stripes were the obvious way to go for me. In a room nearby, I actually have some plans to have more of a dramatic wallpaper installed. You might already know what I have up my sleeve if you read this post here. Hint hint.
The room was missing some warmth with the cool toned wallpaper and the tile floors, so I took a note from House of Brinson and thought that swapping out the toilet seat for a wooden one would be the perfect way to add some warmth to the space.

We already have the tile here and we’re popping out penny rounds to make a cool design just for this space. We hope to finish the whole thing this month! So by the end of August, we’ll be prepared to offer a better restroom experience–just don’t look in the kitchen! ha!


I love it all, especially the penny tile floor. The strip wall paper might be too busy for my eyes at my age.
Wow! Strikingly beautiful, just like a Maggiano’s Little Italy bathroom
I love it already Julia! Something about this space makes it feel like an elevated version of the toilet closet from your last house. Bringing the “feels” but with a little added something. I am excited for this one!
Julia! It’s going to be amazing. I just saw this sink and thought how amazing it would be in your powder room.
https://www.google.com/shopping/product/1?q=black+marble+console+sink&num=100&client=safari&hl=en-us&biw=414&bih=829&tbs=vw:l,ss:44&prmd=sinv&sxsrf=ALeKk00QVj-pAp43NrK7WAjKmX-2jHr2tw:1628726435217&prds=num:1,of:1,eto:10194575567818517886_0,prmr:1,pid:10194575567818517886,cs:1
Hi Julia! Will you have a professional install the floor tile or will you and Chris tackle this yourself? A lot of the time I see hex tile laid without a border. The border is so beautiful but adds a whole level to the installation that my brain can’t comprehend. If you do happen to DIY, I would love a post on how you figure this out.
We’re doing it!! We’ll definitely do a tutorial