
This project is in partnership with FrogTape®. They allowed us to choose any space to makeover and provided us with painting supplies and $1000 to execute our vision.
Last week we showed you our plans for this little nook, then showed you how they changed with the discovery that the ceiling in the nook was actually a drop ceiling. But after adjusting the plan and building out the ceiling to really show off some of the architecture of our cabin, we still needed paint in order to create the right vibe.
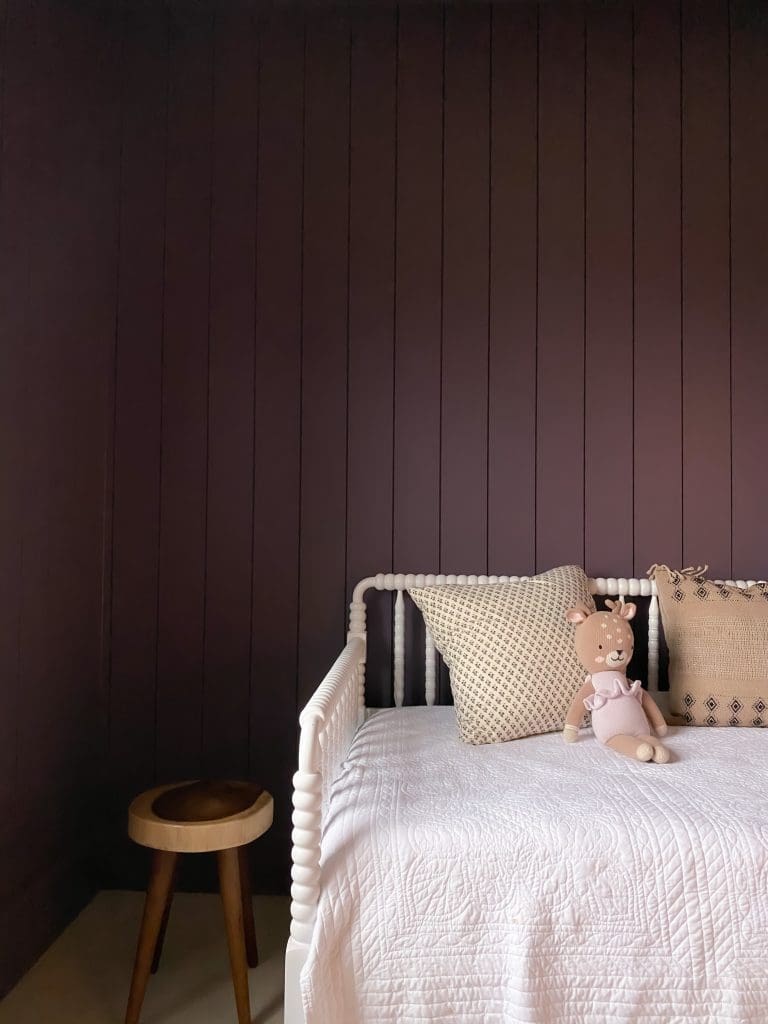
We had originally planned to go a little lighter with the nook, but after discovering the drop ceiling we decided to highlight the wood and have it be the lighter element. That meant darkening the walls and keeping the contrast with crisp paint lines.


To get the cleanest lines, and ensure none of the pine became stained by the paint, we taped off all of the wood baseboards and trim that were going to remain wood. That’s right–the cabin is keeping the wood trim all over. When applying FrogTape®, I like to pull it taut in a long, continuous piece and then rub my fingers over the edge where it meets where the paint like will be. This will help you get the straightest, sharpest lines.

For this part, we used FrogTape® Multisurface, brushed on two coats, and removed the tape before before the paint dried. I always cut in all the edges while Chris rolls. (He’s always done first.) The color we chose is Valspar’s Victorian Tapestry. It’s a beautiful green-blue with lots of neutral gray undertones.


We also knew we wanted to add book shelves to this wall, and we love using FrogTape® for visualizing elements we plan to add to a space. Since the walls were freshly painted, we used FrogTape® Delicate Surface to layout our shelves and gauge where we wanted them to fall. Even though we just painted, less than an hour earlier!, it didn’t ruin any part of our paint job and we were able to easily lift and move the tape until we were content with the shelving layout.


When we were happy with the spacing, (we ended up hanging them 15.5″ apart with the first shelf being 18″ up), we took measurements and added 1×2 supports along the back and side walls, nailing directly into the studs.

Then we quickly brushed the supports with paint and added the shelves we had painted previously.


We attached the shelves to the supports using 1 5/8 inch brads to minimize their appearance.
Of course, once this was done we couldn’t wait to load them up, but you’re going to have to wait to see that next week with the reveal. But how much do you love this color? With so much paneling and deep, contrasting colors, there’s always a risk of a space feeling too “busy,” but by painting the shelves the same color as the walls and simplifying some of the finishes, this little nook feels calm, comfortable and cozy–just how we hoped the cabin would.
SaveSave


I see you provided measurements from the bottom but I love the spacing from the top. Would you mind sharing the distance from the trim to the top of the highest shelf? I’ve got a similar nook I’m working on and the shelf placement is giving me a headache! Thank you.
I had exact same problem! And this stuff ls expensive and my husband and daughter worked hard getting it done and then have to redo it.
What is the name of the paint color that I sued? It’s so pretty!!
Victorian Tapestry by Valspar.
Do you have any advice for laying the tape in super straight lines, for instance between the window trim and wall? I have so much trouble with this and always end up placing it at a slight angle, so it gets slightly further and further from the wall as I go. Is it better to use shorter or longer pieces?
We actually talk about this in the beginning of the post! I love to pull it tight with one hand while holding the tape down with the other and prefer as long of a strip as I can handle.
I’m so glad you’re doing this challenge bc I’ve been really missing seeing actual makeovers and diy on your site. I love the lifestyle stuff but I come here for the diy