We got word that our sectional will be here next Tuesday! That mixed with finishing the built-ins this past weekend has us just about ready to stick a fork in our downstairs family room. It’s hard (for even me!) to believe that the last time we showed you our built-ins downstairs they looked like this:

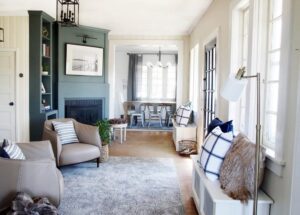
You can catch the tutorial up to that point right here. Since then, we added carpet, cabinets, baseboard, speakers, a tv, shelves and a whole bunch of decor and now it looks like this, all finished!:

Let’s rewind, and I’ll take you through the process of getting to this point. Before the carpet was installed, we added baseboards. If you look at the first photo, you’ll see Chris took extra care to make the bottom “shiplap” board taller, so when we added baseboard, it would shorten that bottom board to a width that looked similar to the other boards. Then we added our cabinets in the middle.

We actually plucked the Ikea cabinets from our fauxdenza. Since they held mostly toys upstairs, it made sense to bring it downstairs. These particular cabinets are from Ikea’s last Akrum cabinet line, but they have similar cabinets, with flat fronts in the new Sektion line. The built-ins were designed from these cabinets, so I’m not sure why I was so surprised there was just 1/8″ clearing on either side when we put them in place. Chris is just that good and I’m impressed by his skills every time. I upgraded the old hardware with these antiqued brass latches–kind of a splurge, but worth it!

We mounted a piece of MDF on top (painted in Clark + Kensington’s Chalk ) to match the cabinets and rest of the built-ins. We originally painted the built-ins the same color as the walls, Benjamin Moore’s Simply White, but while it looked beautiful on the walls, it got too yellow-green with all the shadows in the built-ins, so we course-corrected with Chalk and it’s so much better.
The last step was mounting the wood shelves in place. We got the 1.5″ Douglas Fir boards from a local lumbar yard. (The same place we got the shelves in our kitchen and in our reading room.) We love getting them local because we were able to specify things like thickness, squared edges and it’s usually pretty affordable, too. These cost us $25 per 8 ft length and Chris cut them down to size here at home.

We really wanted to keep the boards light in color, and almost kept them raw, but the boards had a bit of a pink undertone to them, so I stained them lightly with Minwax’s Classic Gray stain and the end result was just what I had envisioned.

To attach the boards we drilled holes in the shiplap and used two of these brackets on each side.

I snapped this photo before we drove a screw through the bottom of each of the brackets to make sure they don’t go anywhere in case, heaven forbid, one of the girls attempts to climb these suckers, but they’re pretty sturdy before that step too.
And then it was time to load them up! These are strictly decorative shelves–meaning, they were never intended for books. And decorative they are. I ordered most of the stuff from my go-to, Wayfair, but everything is linked below.
The bottom compartments were specified for an amp and subwoofer, so I deconstructed baskets (I picked up at Ross for $12 each) trying to disguise those a little bit. The amp on the left, I had to cut out the back so the shorter wires could still feed to the power sources Chris added directly to the built-ins. The subwoofer on the right, I had to cut out the bottom because apparently a subwoofer needs to sit directly on a solid surface. I’m learning so much! Chris is working on a post right now detailing all of his electronic choices for the room because I honestly didn’t even know we needed anything but a television–and even that he made a pros and cons list before deciding on this Vizio one. Like I said, that post is coming!


I definitely have a color scheme throughout the house, so it probably doesn’t come as a huge surprise that the decor is a mix of natural elements, neutrals, textural elements, greens, blues, gold and modern blacks. It’s my formula. Here’s how you can get the same look.

1. Dwell Studio Black Pyramids 2. Kai Samuels Davis “The Beginning” 3. Black and Copper Figurine-Wayfair 4. Nubby Vase 5. Small vases-Wayfair 6. Cement vase with lid-Target 7. Kai Samuels Davis “After The Storm” 8. Shallow Baskets-Wayfair 9. Faux banana leaf plant-Target 10. Glass box-Wayfair 11. White Urchin– Wayfair 12. Brass Geometric Object-Target 13. Faux succulent
With the built-ins officially done, we’re turning our attention to fine-tuning the rest of this room before we stick a fork in it. Art and furnishings are on their way. And I just realized I haven’t even began to think about window treatments–too much time staring at these built-ins I guess.
Catch the first post about the built-ins right here and all the family room posts here.


We are planning on using the same method to do our open shelving..Just wondering if the brackets are really strong enough? What tool did you use to make a hole for the pin side?
Hi! New reader here, weird question–was the basement finished in 2014? I started reading your posts on renovations from the beginning (big fan!) and a post from 2014 has pictures of the completed basement with the built-ins, carpet, and the engineer prints. Just curious about the timeline! xoxo thanks!
Hi! Could you please tell me the depth of the cabinetry and bookshelves? Thank you so much!! This is stunning!
about 15″ on the shelves i think?
What sheen did you use for the paint on the built ins?
Eggshell
Hi, could you please let me know the size of your tv and the overall size of the cabinet? I am struggling to find a proportion to mine. Thank you
The TV is 70in, and the cabinet I believe is around 120in wide and 8ft tall.