Good news! We have officially broke ground on our next project–the girls’ bathroom downstairs!–and to be honest, I’ve never been more intimidated for the start of a project. We’ve never really done a full bathroom gut job including moving plumbing and reconfiguring a layout. And before we dove in, I knew hardly anything about what it takes to do those things, or did you know that often times you have to buy the back end of a shower faucet (the part in the wall) separately than the part you see? There’s a lot of things we’ve researched and will figure out as we go. So I thought, for this renovation, we could do a more in-depth documentation of what goes into a full bathroom renovation of anyone that’s in our position, doing a full bathroom renovation for the first time.

Months ago, the planning began just by starting a Pinterest board dedicated to your project. I started out by pinning any bathroom that inspired me. Maybe it was the color choices or the tile or the hardware. But eventually, it’s a good idea to look for bathrooms that look like yours. Pinning a palatial sized bathroom, when yours is more closet-sized isn’t going to help you in the long run. This bathroom has no windows and so, no natural light, which is easy to get caught up on when looking at pretty pictures. Fortunately, I was able to find many outstanding bathrooms with no windows as well. I also started pinning spaces that could inspire solutions to problems that we were facing. Which brings me to our next before-the-reno-starts point.

Measure the room and graph it out on paper (or an online program like floorplanner.com if you don’t want to lose that piece of paper over and over and over #everytime). We were surprised at how much room we would have once the weird corner shower, back to back vanities and divider wall was out. But our biggest obstacle was definitely going to be the soffit (filled with duct work). It had to stay, but luckily, a 60″ bathtub/shower combination could fit to the right of it on the back wall, which naturally placed a double vanity under the soffit. But what about the dead space where the vanity and tub would meet? I started pinning shelving and cabinet inspiration to fill that corner, which puts the toilet opposite the vanity.

Here’s the current layout:

The left side of the room has a large vanity, with only one sink (even though it could have definitely fit two!) with a toilet in the corner and barely any distance for legs and knees between it and the shower wall.
Then there was a corner shower and opposite the sink vanity, there was a counter vanity tucked behind the door. My friends always joked it was our home’s changing table (haha), in reality, it has held our wireless printer for the past 3 years. No idea how that happened.

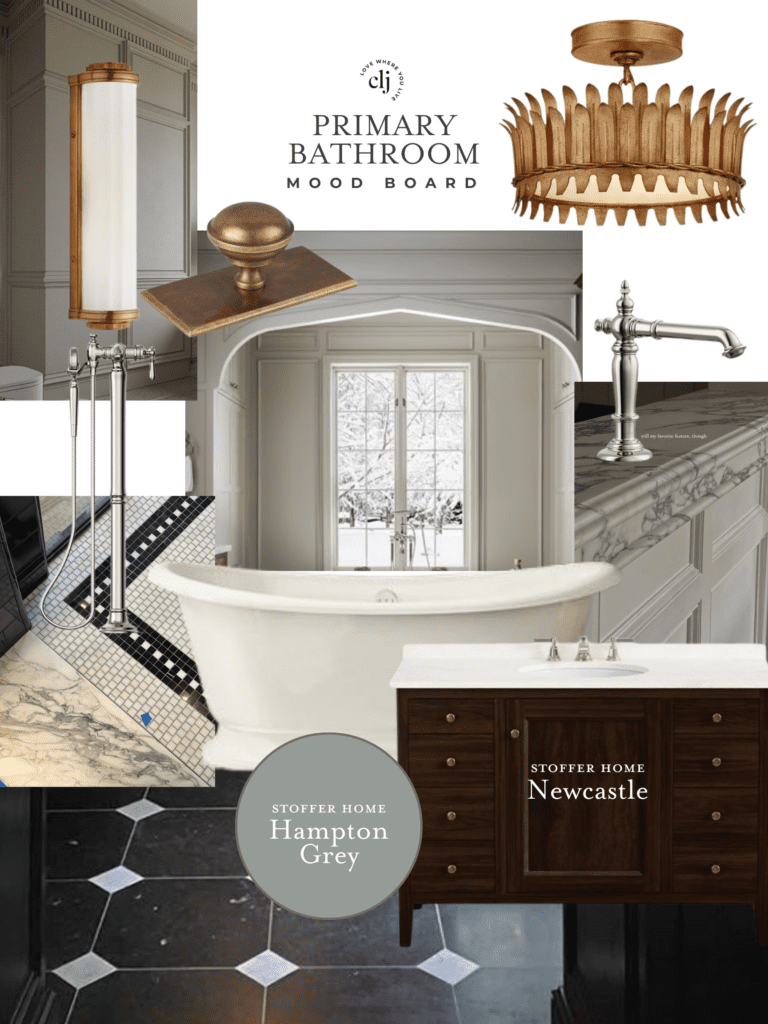
With our new layout nailed down and a few big finishes ordered (we’ll get into the mood board next time!), we felt confident getting started on the demo. Last Thursday, we brought in our handyman, Francisco, to help us demo it down to the studs (in some places) and remove the outdated tile floors (that used to cover our entire first floor!) so we were left with just concrete. Thanks to an extra set of hands, we were able to knock it out in about 6 hours–admittedly, I did nothing but take some photos. We realized, for us, it’s worth it to bring in someone to help get us to a blank slate so we’re not burnt out before the renovation really begins. We know a lot of people that feel just the opposite, and would rather do the demo themselves and then hire out tiling or some finish work. To each their own, truly! For me, seeing a room come back together is so motivating and rewarding, I could stay up all night tiling. :)

Over the next month, we plan to completely reconfigure and transform the room and come out on the other side and are excited to share with you how we do it along the way–especially those first time projects like heated flooring. If you have any specific questions or something you’d like us to include in the series, let us know in the comments below.


I’m not sure if you guys investigated the bulk head. We did a basement bathroom renovation and when we opened up the bulkhead we discovered it was ridiculously oversized for the ducting. We couldn’t remove the bulkhead completely but we were able to gain a significant amount of headspace making the room feel more open.
Lucky you! Ours is very full of duct work.
i couldn’t help but notice that you said there was only one sink in there even though there was room for two. maybe it’s too late for this, but have you considered just keeping the ONE sink? we have three girls (just like you are going to have! yay!) and when we had their bathroom redone a year ago, we had the space to put in two sinks just like you do, but we purposely decided to leave the one sink because i really feel that girls (and specifically tween/teen girls) will appreciate countertop space and storage much more than they would having two sinks. my girls have already started into the curling and straightening and a little makeup and then there are the manicures. . . and all that to say that we never have wished we had two sinks and are SO grateful for the extra countertop space when they are all in there! and then of course you can have more storage underneath when you only have one set of plumbing instead of two and extra storage is always welcome with girls! we have two big banks of drawers on each side of the sink. washing your face and brushing your teeth is such a small percentage of time compared to all the time you are doing things where you need more counter space. Just something for you to think about! your inspiration pictures are fab and your bathroom is gonna be amazing just like everything you have done in your house!
We are just wrapping up a bathroom remodel and after turning on our beautiful new shower for the first time, we realized American Standard has a surprising feature in some of their showerheads. There are three spray settings on the showerhead. One of the spray settings is optimal for our kids because it doesn’t spray them in the face. After you turn on the shower, we turn it to the spray setting they like – but the bad part is, when you turn off the water, it automatically defaults to a low flow spray setting! So every single time the kids take a shower, I have to turn on the shower, adjust the spray setting for them (hello wet sleeves!!). The shower head is too tall for the kids to reach, so they essentially can never shower without our help. Really frustrating and even after talking to American Standard there is no way around this feature. It was not advertised anywhere that this feature existed on the showerhead. So maybe check for this when purchasing your bath/shower fixtures!
Random Question – where do you plan to hang towels? Back of the door?
I think above the toilet so they are accessible from the bath/shower.
I’m sitting over here on pins and needles, I can’t wait to see the finished result. It’s going to look so amazing! Thanks for sharing your whole process.