This post is sponsored by Minwax®.
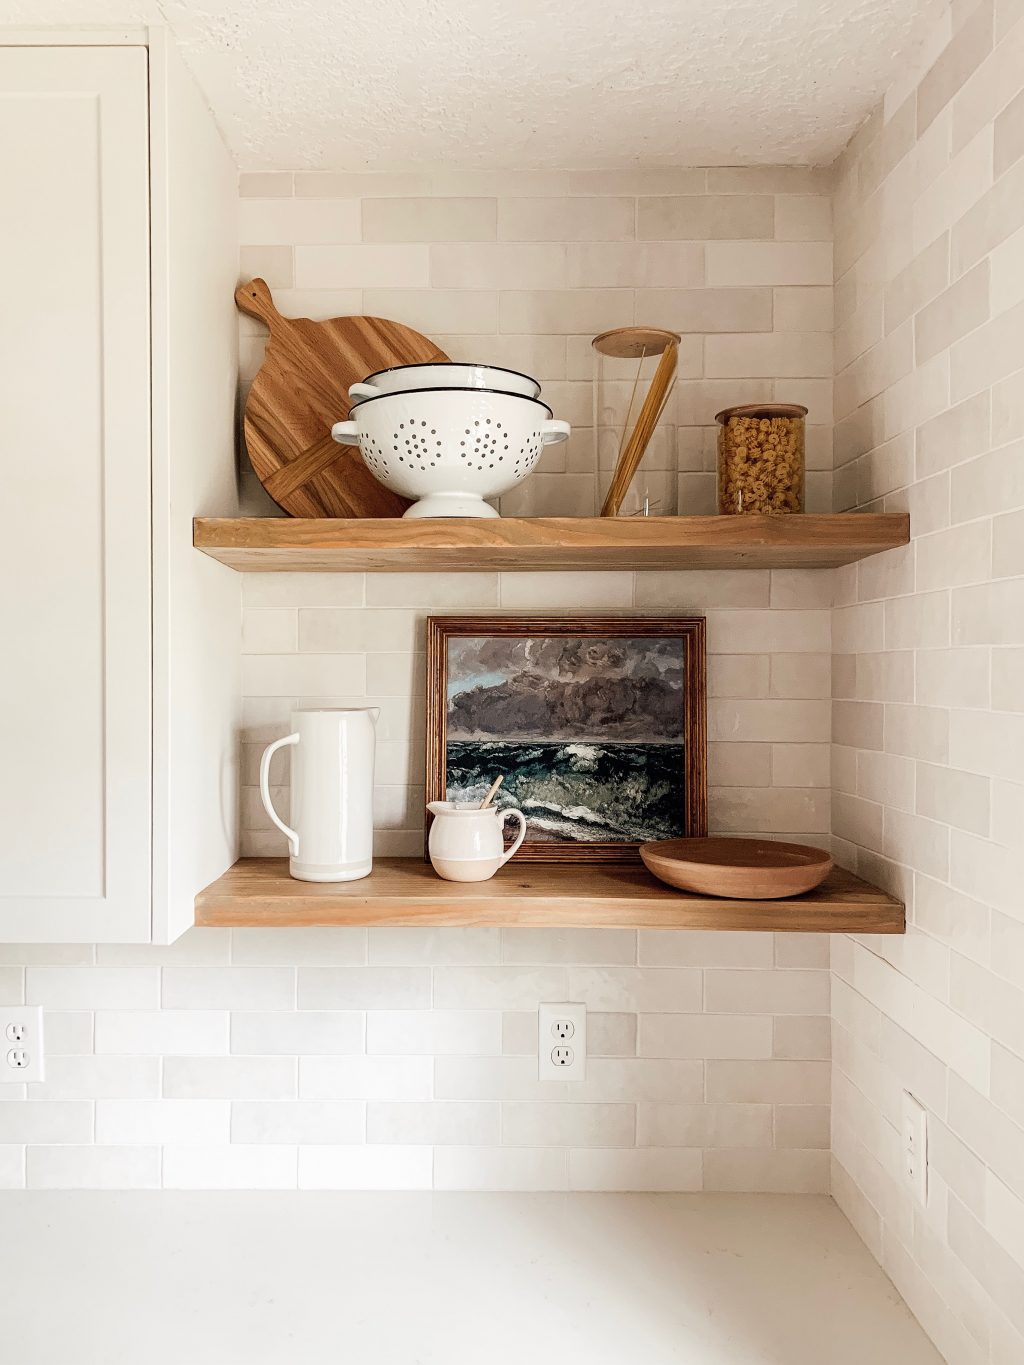
The Fullmers really wanted some open shelving in their kitchen mixed with closed upper cabinets. This is a great solution for most people who don’t necessarily want to worry about every dish looking beautiful all the time, but still want to add some decor and character to their kitchen. We DIYed these floating shelves inexpensively and they completely solved a corner problem where another cabinet wouldn’t fit perfectly and added a whole lot of warmth and beauty and we were able to stain them to tie into their wood-toned cabinets!

Minwax Simply White | Minwax Driftwood | Minwax Matte Finish Polycrylic
Here’s how we did it!
Drill Holes for Mounting Rods
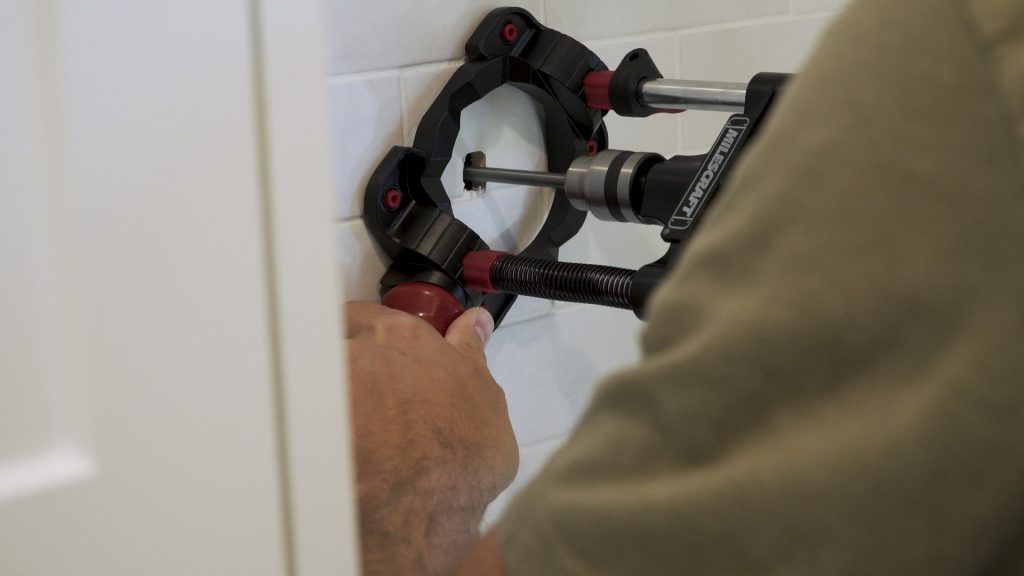
Drill into the studs along the area where the shelf will be. Use a drill guide to keep the bit straight and level. If you don’t use a drill guide the rods likely won’t be even with each other and it will be difficult to get the shelves to slide on. You can wrap a piece of painter’s tape around your bit as a guide to drill about 3 inches into each stud where the shelf will sit. Use a drill bit the same size as the rods you’ve chosen. For these shelves we used 5/8 threaded rods for the edges and 1/4 threaded rods for the center.
Install Mounting Rods Into Wall

Put some epoxy glue into the holes in the wall. Not so much that it squeezes out everywhere when you put the rods in, but enough so the threads are surrounded by it. Add the rods and use small pieces of wood shim to level the rods. Allow the epoxy to cure the rods in place for the recommended time on the label (24 hours is usually safe).
Cut and Drill the Shelf Boards

For these shelves we just used one 2×12 board cut to length. Run the shelves through the table saw to shave off the curved edges, ending with squared edges and a shelf that’s 10.75in from front edge to back.

Hold the shelves against the front of the mounted rods (after they have finished curing), level the shelf, and tap on the front of the board with the palm of your hand. This will create indents on the back of the boards where the rods are, so you know where to drill. Use the drill guide to drill into the boards about 9.5 inches. You can clamp boards on either side of the shelf to widen it for the drill guide.
Sand and Stain the Shelf Boards

Using an orbital sander, sand the boards down smooth starting with 80 grit sandpaper, then moving to 120 and finishing with 160. Stain the shelf with your preferred color of Minwax® stain using a foam brush. Wipe off excess stain and allow to dry. Coat with Minwax Matte Finish Polycrylic and allow to dry.

To get the right color, we recommend cutting spare scraps of your shelf wood, sanding it down the same way, and testing your colors. Keep in mind that when using multiple colors, the order in which you apply the stains will change the look. For these shelves we did a coat of Minwax Simply White, wiped it off, then added a coat of Minwax Driftwood and allowed it to dry for 15 minutes before wiping off.

Dry Fit and Mount the Shelves
Put the shelves in place to ensure they will go on properly. Be careful not to get the shelf stuck – there’s a chance the shelf will need to be tapped into place, so dry fitting should just be a loose fit to ensure the rods match up with the holes.

Add some of the epoxy glue into the shelf holes (again, not too much, but enough to create a firm bond) and slide the shelves in place. If tapping is necessary, place a block along the front of the shelf and tap the block with the hammer, so you don’t damage the shelf.
If you’re more of a visual person, we put together an easy-to-follow video below!

Don’t forget to allow the shelves to cure into place overnight before loading them up. And then by all means–LOAD. THEM. UP!
Stain: Minwax Simply White | Minwax Driftwood | Minwax Polycrylic Clear Matte
Cutting Board | Colander | Lidded Canisters | Pitcher | Creamer | Painting | Terracotta Bowl
Can’t wait to see your own versions of this easy DIY!! Be sure to tag us if you try it.


Love your work! Didn’t know lvt wasn’t meant to be under cabinets. Just used some in my own home-never thought I would use a “fake” or laminate floor. So much easier to lay, warmer, softer, easier on old legs. Clean up is ridiculously easy! Swiffer, damp mop on occasion. Ours looks like slate. Goes well in a mid century modern with huge windows and matte marble floors. Lots of compliments-especially from men. Was white carpet-is a change!
Wonderful tutorial! How did you cut the holes in the tiles before drilling into studs?
did you use pre-stain wood conditioner for this project?
Yes we did!
Beautiful shelves!! I’m curious if you used a special type of drill bit? Also, do you think this method could be used in drywall with a special anchor ? Thanks!
If anyone wants to know where to source the rods just read almost any other comment on this post.????