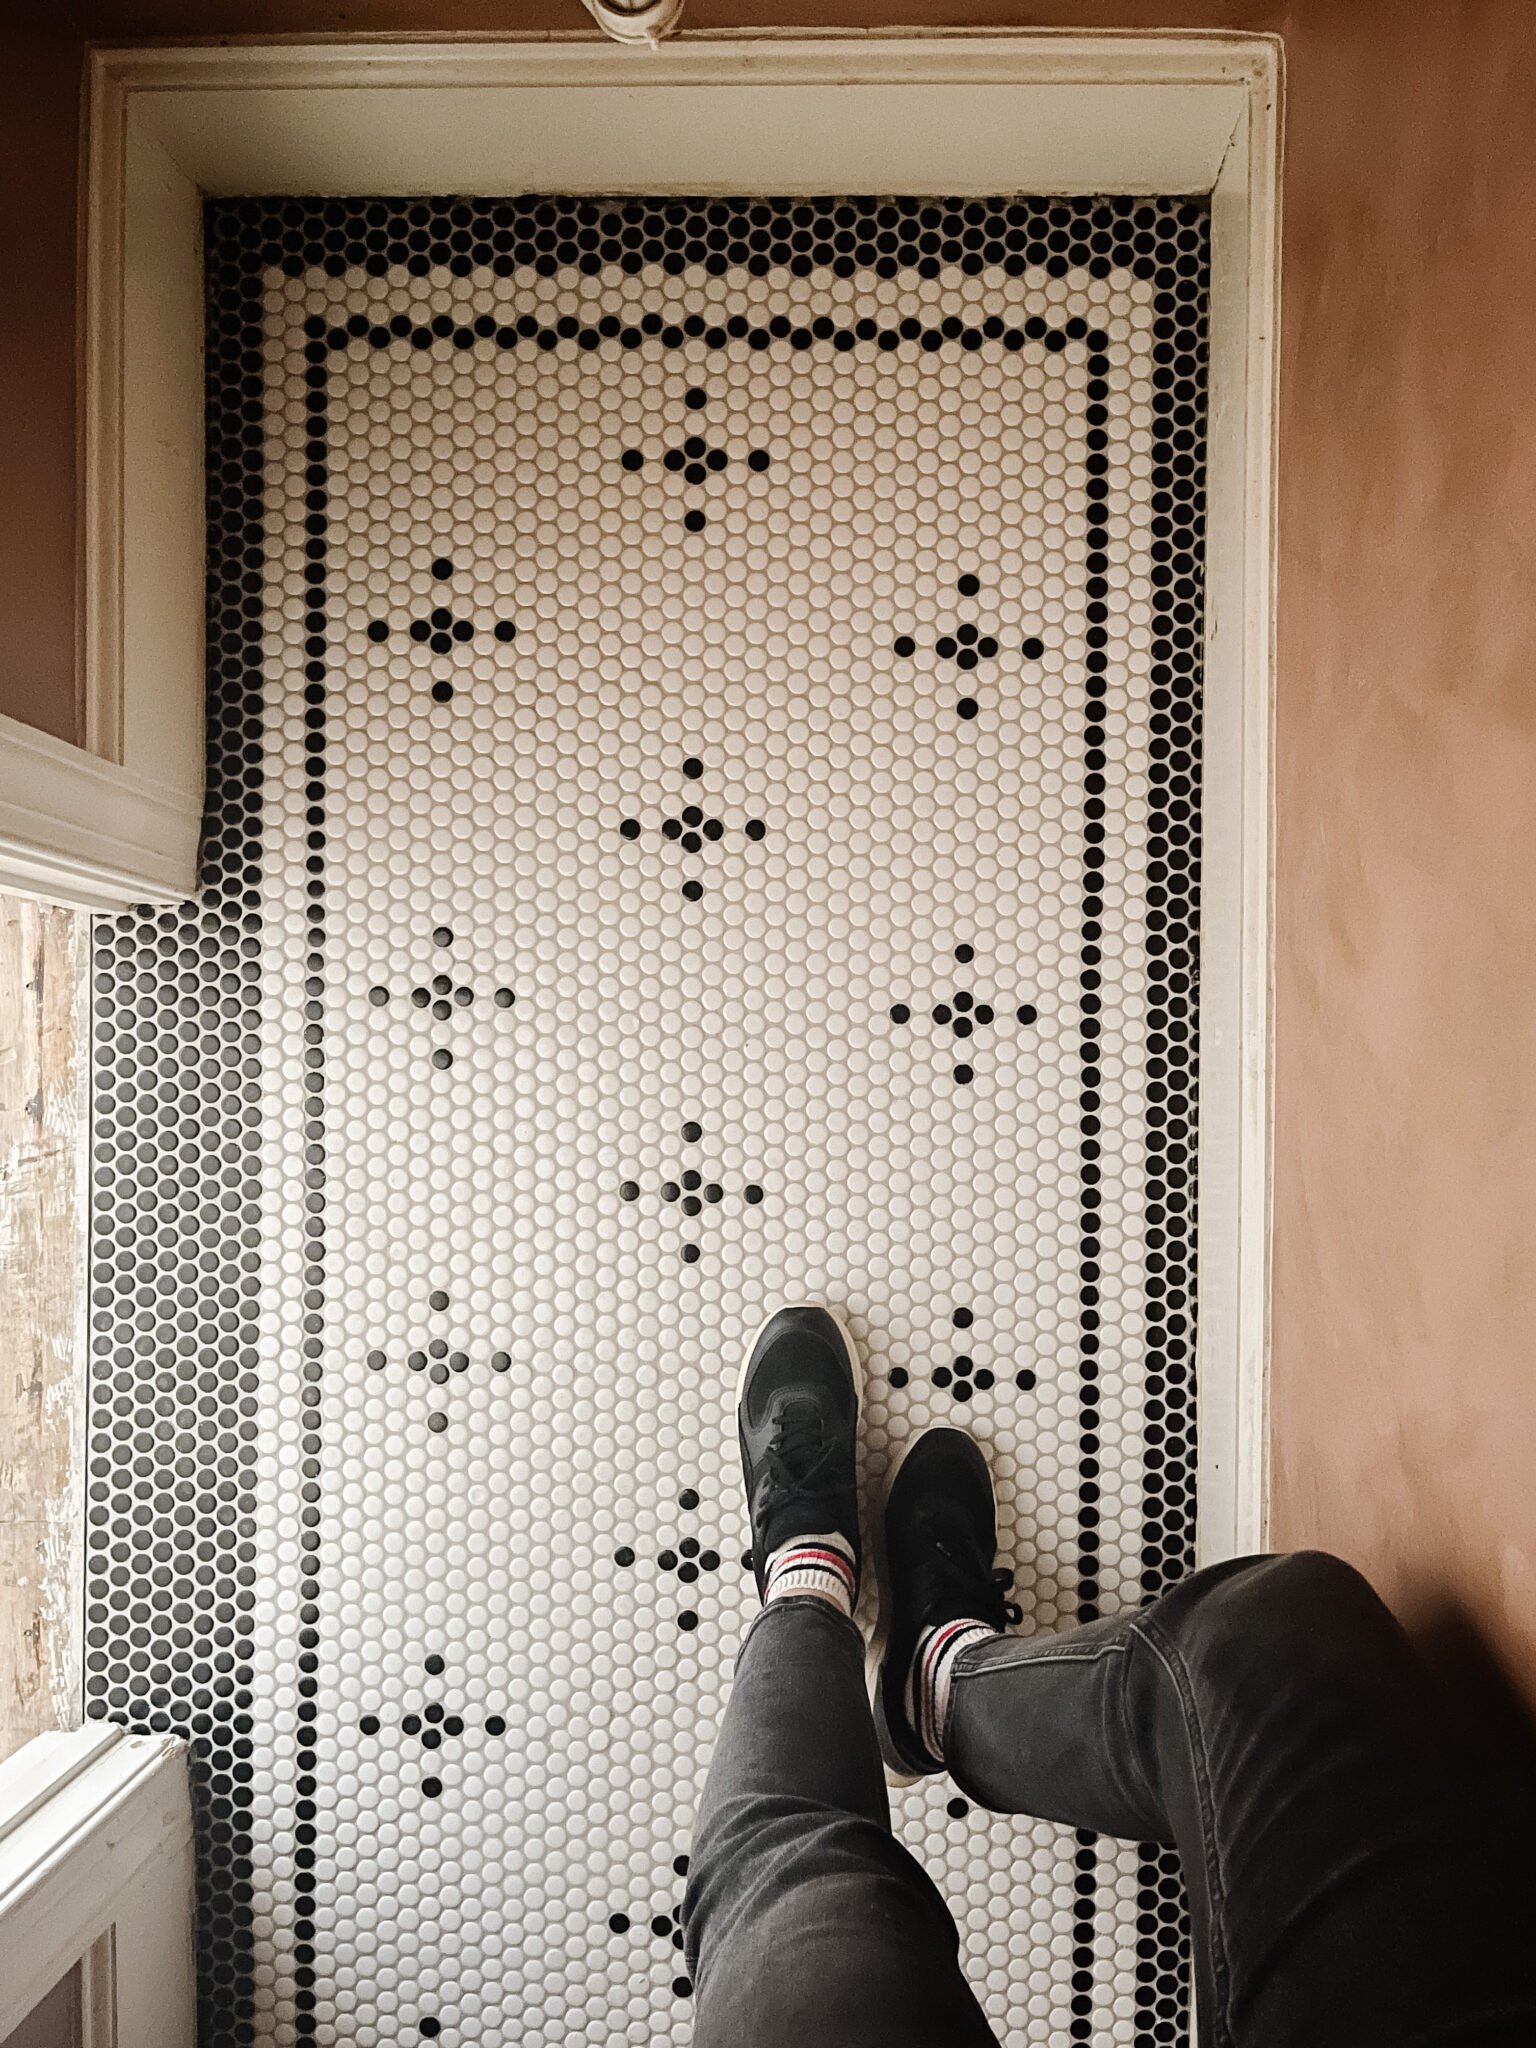
I’m so excited to share with you our powder bathroom floor today! We’ve been working on laying a cute little pattern in penny rounds over the last week and we’re so happy with how it turned out! The powder room is really squared off: At 22 square feet, it’s small, so the angles feel especially sharp, and the room seems especially rectangular. Also, the wallpaper we chose is striped (see all the plans here). Tiny round tiles felt like the perfect, soft, charming touch.
We got all of the supplies we needed for this project at our local Tile Shop. Which is, actually, SURREAL to say because we have been working with The Tile Shop since 2012 in our VERY first kitchen. (see that marble backsplash here!) and then again for our wood tile floors in our rambler, and we most recently used all of their pretty limestone in the primary bathroom in our Modern Cottage–and we never stepped foot in one of their showrooms until this project. It honestly felt like Disneyland. The associates were really helpful and knowledgeable and it was a one stop shop for everything we needed for this project. And more. Meaning…I already started eyeing tile for future projects. :)
Here’s everything we needed for this project!
Hardie Backer Board
Trowel for Hardie Board
Gloss White Penny Round Tile
Matte Black Penny Round Tile
Trowel for Tile
Mortar
Grout Float
Scrubbing Sponge
Neutral Cleaner
Grout Sealer
The Tile Shop actually had some really cool ready-made mosaic options for penny rounds and beyond, but since it was such a small room, it felt like a good time to try something creative and try my hand at my at a custom pattern. I printed out a white sheet of paper with true-to-life sized penny tile, and I started coloring in different blocks. This was such a great first DIY project in our new home because it’s really not a heavy lift. There’s no power tools or tile cutting involved. You can easily cut the mesh backing of tile sheets with sheers to whatever size you need, all the way up to the border of your room.
First things first!
- Lay down a subfloor

Our contractors removed the wood flooring that was in the powder room previously, and we started with a plywood subfloor. You can’t lay tile on plywood because wood is a living material, and it “breathes” through the seasons, causing tiles to crack and break away from the floor. So we installed 1/4-inch Hardie board. It’s so easy to cut, you don’t even need a saw. Just score it with a razorblade knife and snap it. Using a 1/4-inch trowel, apply mortar to the plywood and then secure the Hardie board. For additional security, screw down the board every 12 inches. Apply mesh tape to all of the seams and, using a spackle knife, run an extra layer of mortar on top of that. Smooth it out, and let this dry for at least eight hours, or overnight.
- Plan your border
When you’re ready to lay your tile, dry-lay your border, and play with the white tile sheets on the interior (or inverse it if you’re feeling spunky!). One thing to note: There’s a straight side of penny tile, where the pieces align perfectly, and then there’s an offset side, where a “straight” line is more …toothy. Don’t fight it! Once I embraced how the tile lays and fits into each other, the pattern-making got really fun and easy. We applied the straight border on the long side of the room and the offset border on the short side of the room.
Practice with the placement of the “straight” side of the penny tile mats and the offset side until the corners are sharp and the border is exactly how you want it. Hold off designing your interior pattern for now…if you can. I should note here: –we finished the edge of the tile where it meets with the hallway, with a black Shluter edge that will meet our wood floors going down in the hall this week!

- Mortar the tile in place
Working in sections, remove a portion of the tile. Apply a thin layer of mortar using a narrow-tooth trowel. (The smaller the individual tile, the smaller the teeth on the trowel.) To ensure you’re not applying too much mortar, make sure the trowel teeth scrape on the floor. Lay the tile border and sheets in sections, pressing each piece into the mortar. Allow to dry for at least eight hours.

- Design your interior pattern
After all the tile is laid and has dried, you are ready to start laying the pattern inside. Pop a few black tiles out from the mesh sheets, and begin placing them (dry) over the mortared-in-place white penny tile. Place all of the black tiles, planning the entire pattern and its spacing to make sure you’re happy with where it starts and finishes. Use a dry erase marker to mark the location of black tiles, if you wish. When the pattern is exactly the way you want it and the spacing is right, use a screwdriver to pop out the mortared white tiles, replacing them with black tiles. We used a plastic bag with a tiny hole in one corner (like a pastry bag!) to apply a tiny dollop of mortar on the back of the black tiles. I call this the pop-and-place method :) Let the black tiles dry/set overnight.

Below is before grout.


- Grout your tile
We decided to go with a warm gray grout.
Using a grout float, skim a layer of grout over the tile. Hit your grout lines at every angle — pushing and pulling the grout backwards and forward until grout is tightly around every circular tile. Scrape off any excess. Using a sponge and warm water, continue to wipe the tiles clean of grout. Important: Work in five-minute sections. The grout dries over the tile quickly, making it hazy.

- Acid wash the tile
Even if you work quickly, you’ll likely have SOME grout haze over the tile. Let the grout dry overnight, and then, wearing gloves and using the abrasive side of your sponge, scrub the tile with an acid cleaner (a mix of vinegar and water also works). Pro tip: Don’t use the acid cleaner on anything but ceramic tile – it’s too abrasive for natural stone materials.
The end result is a double black border around the perimeter of the room and then 17 black “diamonds” arranged in the interior. — They’re not really diamonds. They’re… asterisks?


Such an easy and impactful DIY. If you have a small space, I hope you try your hand at designing your own custom pattern. It’s really the most fun you can have with penny tile.
I’m honestly so in love with how it turned out and think it’s going to be the perfect little bathroom for all of our guests to freshen up in over the coming years. And with such a small space, the extra work required to make it happen was definitely worth it.
Next up! Paint and wallpaper!
Check out the finished powder bathroom here :)
Sources
Hardie Backer Board
Trowel for Hardie Board
Gloss White Penny Round Tile
Matte Black Penny Round Tile
Trowel for Tile
Mortar
Grout Float
Scrubbing Sponge
Neutral Cleaner
Grout Sealer
Special thanks to The Tile Shop for sponsoring this project!


Love this pattern and used it in our laundry room with black appliances. Thanks!
I am doing this with marble penny tile, Carrara for the white and Nero Marquina for the black. I am so excited for the final look!
Hello! The link the the tiles no longer works. Did you use the matte or the gloss? Thank you!
Just updated the tile links! These are the matte black tiles and these are the gloss white tiles.
The link for the tiles isn’t working anymore. Can you tell me if you used matte or glossy? I prefer the glossy look but contractor says we should use matte due to it being slippery.
We did a mix! The black tiles are matte and the white tiles are glossy. No issues with them being slippery—especially in a powder room.
I love the pattern and am going to try it in our bathroom that has a clawfoot tub. Is there a reason that you mixed the finish on your tiles, i.e., white is glossy and black is matte? I am thinking of going with gloss on both. What are your thoughts? Thanks for your response.
Hi! The links to the penny tile no longer work. Are the black tiles matte and the white tiles gloss? Thanks!
Correct! Just updated those tile links.