
This is a guest post by Andrea Ahedo, our Visual Media Producer/Head Photographer. See her bio at the end of the post.

“I want to re-shoot the kitchen.”
Julia raised her eyebrows with a smile and said, “Okay!”
I started working for Chris Loves Julia during a jam-packed-big-deal week. We were filming and photographing a Thanksgiving campaign for World Market on my third day, and it was Phase 1 Kitchen Reveal Week! I was eager to jump right in and get well-acquainted with what my new main subject would be: interiors. For the past six years I had built a successful commercial photography career, loving and wearing every hat of the creative process: from art director to photographer to retoucher. I had published in magazines, shot fashion campaigns, photographed entire catalogues, styled food and product, and hosted styling and staging workshops. I was more than qualified for the job and confident that I could shoot interiors, applying my wealth of experience. But I swallowed hard behind my camera lens that first week. Photographing a room is unlike photographing anything else! They say it takes 10,000 hours to master something. And my new job at CLJ was going to be the ultimate interior photography master class. For kicks, let’s compare same angle shots from six months ago, and this week. Bare with me guys; I’m laying it all out.


These photos were taken with the same camera, and no, they haven’t repainted their cabinets! It’s just *face palm* white balance principles! And for heaven’s sake: Shoot on a tripod no matter what — OK, I’m getting ahead of myself. Let’s break down my top tips for shooting interiors. Andi-Tested-and-Approved!
- Use a tripod. No matter what. Your camera needs to be on a tripod.

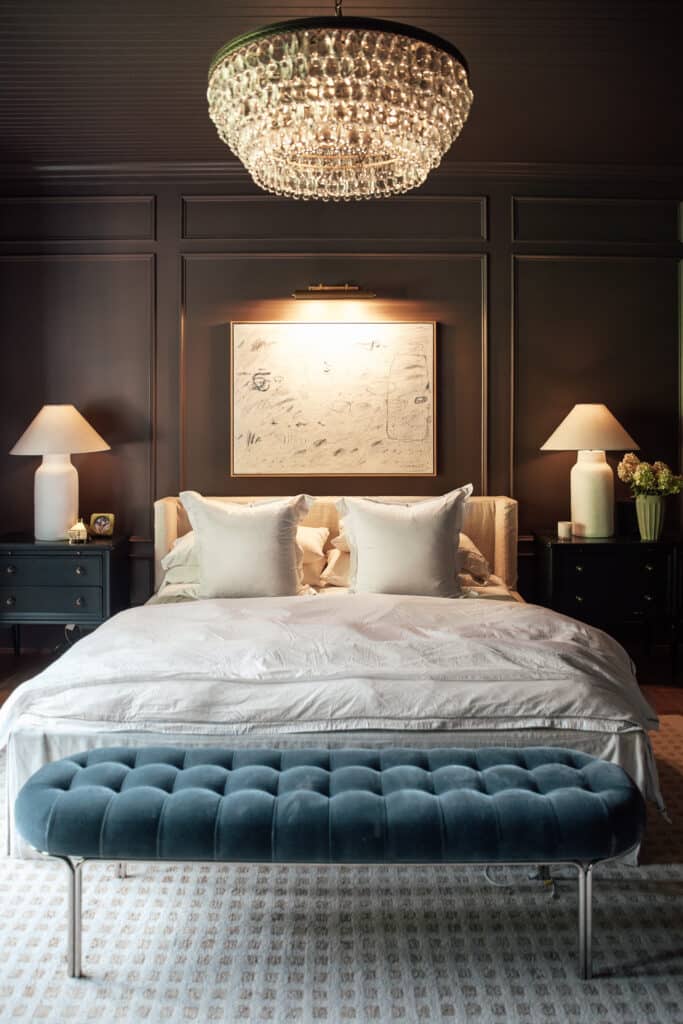
Shooting on a tripod gets your photos tack sharp. Every detail from the rolling pin, to the artichoke, to the soap dispensers can be in focus, and should be! Shooting on a tripod also lets you leave that shutter open as long as you need to get the exposure you want. This photo was shot at f7.1 for 1/6 second at ISO 100. Using a tripod also allows you to shoot at multiple exposures, and then blend them together in Photoshop. I didn’t do that technique here, but I did write a whole blog post about this last year (that includes a video tutorial!), and you should definitely check out.
2. “Vignettes” are a great way to show the room’s character.

The purpose of our previous photo was to show the relationship of space in the kitchen: Where’s the island in reference to the sink? Where are plates stored? How big is the window compared to the sink? But the purpose of the above photo is show the personality of the kitchen, and more of Chris and Julia’s design taste. We call these vignettes. They’re close-up shots that have a story-telling aspect to them. I can see in detail what kind of knives and spices Chris likes to have on hand. I can better appreciate a piece of art, and let a bowl of citrus draw me into this kitchen cottage corner.
3. Adjust your white balance to get your photo as close to what your eye is seeing as possible.

You know how big of a deal it is to choose a paint color. We pour ourselves over walls of paint chips because — are you going with SW Moscow Midnight or SW Rainstorm? There’s a difference! It is crucial while photographing interiors that your shot represents what your eye is seeing. If you painted your cabinets bright white, they can’t look off-white in photos. If you have a new deep navy blue loveseat, it cannot look dark gray in photos. And let’s say it: Chris and Julia’s island wasn’t painted black, as my photo from last August portrays. You have to do the design of the room justice and capture that in camera. So what should you be double checking? First and foremost: your white balance. White balance (WB) is about removing unrealistic color casts, so that the colors you’re seeing in person are rendered in your photo. All cameras have an Auto White Balance (AWB) setting, and then some “light presets” to select depending on what is the light available where you’re shooting. Is it tungsten lighting or are you shooting in the shade? Overcast cloudy lighting? Florescent? They do a pretty good job and are a great place to start. But I know a lot of you guys are in the “Kelvin camp” and would probably feel comfortable even manually dabbing into setting your white balance! Look for the “K” option in White Balance settings, and manually set the color temp for your photo. I recommend turning on your camera’s Live View as you dial so you can see the colors adjusting before your eyes and know when you have a perfect match.
4. Get Low.

I taught Digital Photography and Advanced Photoshop at a private school for five years, and I often told my students. “The best shot is the one you’re physically uncomfortable while taking.” If you always shoot at eye level, from your height’s perspective, you’re robbing yourself of a much more interesting angle if you would just squat a bit or drop a knee! Working on a tripod, I’m typically adjusting its legs and center column for every shot. And you can always turn on your camera’s self timer so if it’s set up low to the ground, you just press the shutter and let it do its thing!
This is just the beginning! My photographer friends out there will also have a lot to say about perspective and lenses. These tips are just to get all of us (myself included!) started. I’ll be sure to bring all of you along as I clock my 10,000 hours, sharing what I’m learning along the way when it comes to interior photography. I know there are a lot of really talented bloggers and photographers out there who are using cell phone photography, and wow — that technology has come a long way! Feel free to share top tips in the comments. While we might be of different opinion and skill sets, maybe we can all agree: Photographing your home is just another way to love where you live.
Sources
Paint Color: Thunderous by Sherwin Williams in a Satin finish
Range Nook
Hardware Knobs
Hardware Pulls
Dinner Bell (old, similar)
Round Wood Footed Tray (old, similar)
Pepper Grinder
Marble Spoon Rest
Marble Utensil Holder
Copper Tea Kettle
Pyramid Cheese Grater
Mortar & Pestle
Mini Copper Cocottes
Large Strainer Stock Pot
White Enamel Dutch Oven
Copper Kitchenaid Stand Mixer
Magnetic Knife Strips
Vertical tongue and groove paneling
Island
Pendants
Bulbs
Over the Counter Wood Cutting Board
Knife
Vase
Eucalyptus
Stools
Cabinet Side
Cream Smeg Toaster
Honey Pot
White Speaker
Long Wood board
Natural White Speckled Melamine Bowls
Marble Rolling Pin
Olivewood Salt and Pepper Mills
Round Pizza Board
Wood Fruit Bowl (similar)
Black Bowl
Art (vintage)
Soap Set
Black and Cream Striped Cotton Rope Baskets (these are the best and affordable!)
Marble Tiered Serving Tray
Round Wood Pedestals
Copper Planters
Faux Stems
Dining Room
Table
Chairs
Light
Stems
Vase (old, similar)
Andrea Bradley de Ahedo is a stylist and commercial photographer who recently moved to Idaho, after living abroad in Monterrey, Mexico, to be the Visual Media Producer for Chris Loves Julia. She loves foraging for unique spoons and bowls for her ever-growing prop collection, and shooting flatlays for days. She feels most at home when she is traveling with her husband and toddler son in tow. You can check her out on Instagram at @andiandreastudio.


Hello! Great post! I was wondering what lens you use?
I love the expodisc for white balance in home photography. You have to stand in the space (as if you were going to be photographed in it) and take an exposure through it -and then you can set a custom white balance based on that image.
Thank you for this. I consider myself an experienced photographer but still find it difficult to successfully photograph my home. So, I am thrilled with your sharing what you are learning with your new subject. Everything that you said makes sense and the Feb 2020 photographs are certainly clearer, sharper and brighter. What you said about making sure you are representing the color correctly is certainly important for me. I loved the color as represented in the original photographs which had a blue undertone and I was seriously considering the color for my cabinets. I also like the color represented in the new photos but what I’m finding with both colors is that neither very closely represents the actual color on the SW website or in my color chip fan. I expected the color chip to be different but the color on the SW website is usually much closer to the actual color. I am finding the value to be somewhere between the two sets of photos and the hue to have less blue than either set. I am not being critical at all. It is only an observation. I would never actually choose a color without doing a sample first. I’m just wondering if you can also see the difference and which is more representative of the actual color you see with your eyes. Thanks!
Hi there, what camera and lens did you use on both?
The expression is “*bear* with me”, not bare. From Grammarly: The verb bare means “to reveal” or “to uncover.” The correct expression, “bear with me,” means “be patient with me.” The speaker asked the audience to bear with her while she searched for the correct graph.