Our bathroom floor is installed, heated, grouted and I’m over-the-moon with the outcome. When we were deciding what we wanted to do for our bathroom floors, once it clicked that our shower shouldn’t be marble (but a beautiful, varied green tile), it was clear our floors should be marble. I really envisioned something large format and polished. I looked all over the web, but found just what we wanted on Wayfair.

This 18×18 polished Calacatta Gold marble floor tile. The product pictures were giving me mixed signals online, but I knew that was the kind of veining and color I was after and the reviews solidified it—this stuff was good. Plus, the description said the tile, although polished, was anti-slip which is pretty important in a wet zone like the bathroom floor. We blindly ordered 200 sq feet (which accounted for 15% extra) with no sample—eek! I generally don’t recommend that, but in our case, shoot, it’s perfect. Calacatta marble is a really high-contrast marble with lots of variance when it comes to veining.
We’re doing a marble-looking quartz for our countertop and when mixing them, we stuck to the same principles that exist when mixing any sort of pattern. Small, medium and large patterns mix best together. Our countertop is a small and subtle pattern and our floors and a large and bold pattern and the wallpaper for the water closet is right in the middle.
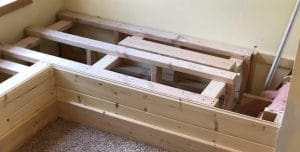
Before the tile could be laid, there were several prep steps, like tearing up the old subfloors (they were almost down to floor joists in this whole room thanks to moving the plumbing all around), laying down concrete board and then installing the heated flooring which laid across this bright orange membrane. He dry fitted the whole thing across our bathroom first and then went back and secured it in place with mortar, washing the floor first with a damp sponge which he said helped adhesion.


The heating coils were threaded throughout the main walkways of the space, including the main vanity area, water closet, shower and clothes closet. And then we were ready for tile. Well, almost.
While I knew large, polished marble tile was the look I wanted, we still had to figure out if we wanted it laid off-set or stacked straight across the floor. We put a few tiles on the floor both ways and actually liked them both. ways! Our viewers on Instagram Stories were less neutral. Some thought straight looked like a cheap hotel. Some said it reminded them of a high-end hotel (I kid you not, we got both references almost back to back. Ha!). Some thought off-set looked busy, while others said off-set was the ONLY way to lay it. In fact, the majority voted to lay it in an off-set pattern when we polled the audience.

One viewer asked if we planned to line up the veining and that sent me diving into more inspiration photos. Did I want to line up the veining? It was about the same time that our friends, @beginninginthemiddle (see above), sent me a photo of a shower they did where they stacked the marble tile in a straight set and, ah ha!, lined up the veining. And when I saw theirs, I knew immediately that’s what I wanted to do, too.
We were taking a mini family vacation that weekend and were going to be gone when Scott, our contractor, was actually going to lay the tile so if we wanted the veining lined up, it was something we were going to have to do before we left. The next morning, we cleared most of the furniture out of the living room and mapped out our entire bathroom and closet on the floor with painter’s tape.

We started right at the entrance to the bathroom since we wanted a full tile, centered right there. We found a few matching veins almost right away which was encouraging, but the whole process felt like a big, giant, beautiful puzzle. The most expensive adult puzzle there ever was. It was mostly, actually, very fun to match up the tiles. Most of them felt like cousins—like they maybe had similar tones or markings and looked great next to each other but didn’t have any traveling veins to match up. Some were definitely siblings though. They were absolutely cut from the same slab and putting them back together almost felt like a family reunion. All in all, the process took us 5 hours. We started out just opening 2 or 3 boxes at a time, but by the end, we had ALL the tile sprawled throughout the living room, leaning up against walls and couches so we could see all of our options.


Fortunately, we left for California the next morning so we could leave it mapped out for our contractor to transfer them easily to the corresponding location in our bathroom. He sent us updates the whole time and it felt like Christmas morning when we got home to this:

Our new vanity installed (!!! more on that in a coming post!) and all the flooring laid out perfectly. It was 100% worth the five hour time investment.

Our next decision, grout color, didn’t take nearly as long but we did put some thought into it. Grout color can drastically change the look of your tile job. Do you want something high contrast or low contrast? In our case, we spent so much time making our tile look like it all came from one large slab, we wanted to keep that look going. So we laid a few grout samples on the floor and chose the one that disappeared the most. In our case, that was Cape Gray by Fusion Pro.

Grout is such a great project finisher–really polishing off the look. Just look at the photo above at what’s been grouted and not. I love the softness and unity it brings. We opted for the color in an epoxy grout (instead of a traditional grout) which dries really hard and is stain resistant and virtually maintenance free.

Scott also worked some serious mathematical magic and made it so our bathroom floor was exactly in line with our bedroom flooring so there was no need for an additional transition. It’s solid and smooth. And the whole thing is absolutely dreamy.
We just got notice that our shower tile has shipped and the anticipation of its arrival….I can barely sleep! We’re officially 5 weeks in to our reno now and as one of our followers on Instagram said, “I no longer have to squint to tell it’s a bathroom.”


Love your marble flooring. We also install marble on our bathroom walls. I was searching how one maintain and clean marble. There are not too many information out there so I was wondering if you would share how you do it.
I was wondering did you share how you clean and maintain your marble floor? Did you seal them? If yes, can you please share? I want to hear your personal journey.
What is the name of marble ? Very beautiful marble flooring for bathroom.5 hrs matching pieces turns out wonderful. Congrats !
Hi – i just put marble floors in the two bathroom renos I did and am wondering how you’re maintaining it? Specifically: what cleaning products are you using, how often, and do you like them? Would appreciate any tips. Thanks!
We bought some stone cleaner from Lowe’s and it works well. It’s usually back in the tile section, as opposed to the cleaning section.
I have questions about the heated floor. How does that work? Is it hooked up to the nearest thermometer and set to work in conjugation with overal temp goals or is it on a switch to turn on at will, like a car seat warmer? Or something else entirely?
It’s on its own thermostat that just measures the heat of the floor, and we can set a schedule for it like any other thermostat. They can also often be set up with regular wall thermostats that measure the temperature of the room if you’re wanting to use in-floor heating as a radiant heat system for your home, but for us we just keep the total temp relatively low so the room itself doesn’t get too hot and the floors just feel nice.
Your bathroom is so beautiful! What size grout line did you all use? I’m not sure if we should do 1/8 or 1/16.
Thanks,
Tiffany
1/8