I knew once we freed up this wall in the dining room by changing the barn door into a pocket door, it would be the perfect place for some family pictures. However, when I mentioned the idea to Chris–especially the part when I described it as a 9 frame grid taking up the wall floor to ceiling–he was a little hesitant, “I don’t want it to look cluttered.” Maybe I should have left out the “floor to ceiling part”–Ha! But his concerns were valid. To the right of this wall, we have a dark accent wall with a large wood-cut print and to the left of this wall are our black kitchen cabinets.

Before starting, we put our heads together and came up with a few must-haves that we both could agree on for this gallery wall. It was important for it to be:
1. Light. Keeping this wall looking non-cluttered and light immediately nixed darker frames, but I wasn’t letting go of a floor-to-ceiling look just yet.
2. Kid Friendly. Because we have small children, having glass-front frames low to the ground immediately puts up a high-alert flag–something we try to keep our home free of when decorating. We’ve seen a few friends swap out the glass in lower hanging frames with acrylic pieces, which sounded like a great option for us. The other problem to solve would be frames constantly being knocked off (or taken off) the wall by little hands or people walking by this high-traffic area of the house.
3. Interchangeable. Lastly, I wanted to be able to easily update the photos. Our family is growing right before my eyes, and since this was going to be a limited grid gallery of nine frames, I really wanted to have the option to swap out photos on a whim.
I’m happy to say that we came up with something that checked off all of our marks and then some! Here’s how that wall looks now:
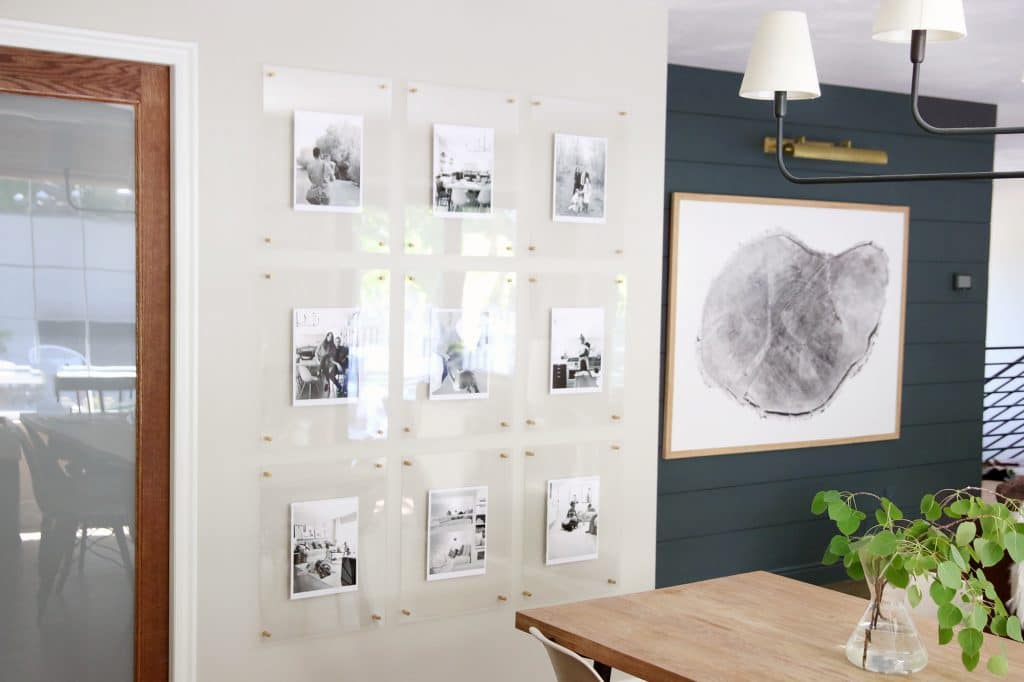
We ordered the 16×20 Acrylic Frames with brass standoffs from an Etsy shop called Highland Hardware. They have a bunch of sizes, thousands of sales and lots of good reviews, which helped us trust the quality of the product, but it ended up being the perfect thing for what we wanted. Each “frame kit” came with two, individually wrapped and coated pieces of pre-drilled acrylic, the hardware for hanging and the brass bolts (you can also choose stainless steel).
While I worked on peeling the protective paper off the front and back of each piece of acrylic, Chris started putting the brass bolts into place on the wall, attaching an anchor first. This may seem like a small thing, but having the back bolts in place first, made me so happy knowing that swapping out the photos would be even easier down the line because they location of each frame will always be lined up and straight!


I sorted through a bunch of candid family photos (and one or two more formal ones–like our last family photo we had taken) and gathered a good group of 9 vertical shots and had them printed in black and white 8x10s at Walgreens. After I picked them up, I mounted them on white, standard-sized cardstock so there was a small border around each one (with a larger border at the bottom like you might see in a printed polaroid) to help them pop off the wall a little bit more since there is no mat with these frames.

Once the bolts were in place and the photos were mounted, it was a breeze to screw the front brass bit, through the acrylic and into the back. I did use a small rolled piece of scotch tape to attach each photo to the back piece of acrylic so they would stay in place while I was hanging each one.


One other thing I was mindful of when laying out the photos was the grayscale. Some black and white photos are mostly gray, some have a lot of white and some have a lot of darks. I tried to make sure each row and column had only of each–or you can just space them out if you aren’t interested in playing photo Sudoku.


We’re so happy with how this project came out! That the frames aren’t going anywhere, that they’re acrylic and not glass, that the whole thing still feels light and airy, but most of all–the pictures of our family make me smile, without fail, every time I walk past.
SOURCES
Acrylic Frames | Dining Table | Plastic Molded Dining Chairs | Dining Room Chandelier (similar) | Black Windsor Dining Chairs | Wall Color-Benjamin Moore Hazy Skies | Large Tree Rings Print | Wood Pocket Door


I have wanted to recreate this in our new home build (where we drew lots of inspo from your blog).. I wasn’t quite sure where to put the frames.. but I’m so glad we waited — i loved the frames, but the large scale was a project we had to save up for to make it feasible.. then BAM! they were just BOGO this past weekend for Labor day! i got 10 FRAMES for only $435!!!! Which means we can do the large wall, and also make use of another one of these in a different location in our home!! thanks so much!
We ordered some acrylic/brass frames just like this and i’m obsessed but my husband is struggling hanging them evenly! Any tips? He has a low tolerance for hanging things and a huge gallery wall with 4 holes/frame is killing us!
Absolutely LOVE!! Did I forget to mention I LOVE it!? :)
What are the dimensions of the wall your frames hang on. I’m just trying to get a feel on spacing and doing something like this on a wall I have. Thank you! I love it SO much, you guys do amazing work and are so kind and personal on our podcast!
8 feet tall and approx 5 feet wide
[…] Modern Kid-Friendly Gallery by Chris Loves Julia […]