Those black walnut countertops we got from
Craft Art are officially done and we can’t wait to share a little bit about the process and a whole lot of photos with you today. First, here’s how our painted countertops looked before we tore them out:
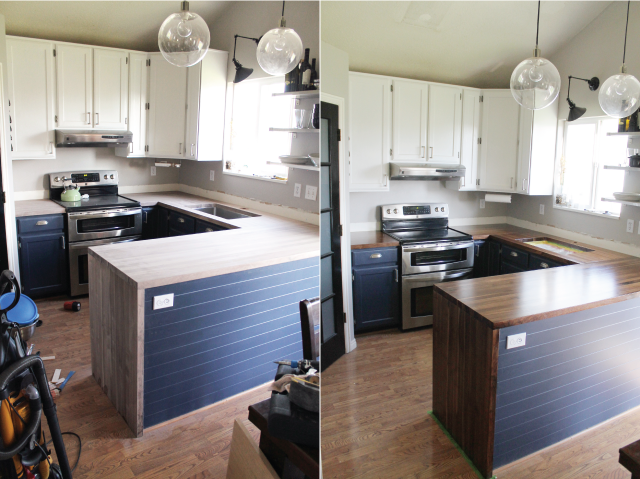
And here’s how the countertops look now:
I’m whistling at them. I am. We removed about eight inches off of the peninsula to give us more room in the dining room (you can see how far the previous countertop extended in the photo below–so annoying) and that alone made a huge difference, but the warmth the walnut adds to the kitchen is our favorite part. When
we left off on Monday, we showed you a little teaser of the first coat of sealant:
The countertops actually arrive with one coal of sealant on them, but it penetrates into the wood pretty well, so multiple coats are recommended. This is how our countertops looked after the second coat of sealant:
We loved it. I was ready to stop there. It was just looking so good. Isn’t that funny? I think there is a life lesson in there about potential. About how we might think something is really good, but that doesn’t mean we should stop trying/working at it/giving it our best–because that good could turn into something even better–that you could have never imagined. That’s life our countertops. There were a few key products we used. For the sealer coats, we used Waterlox Original Sealer/Finish (it came with the countertops). We applied it with a paint pad (shown in the center, picked up at Home Depot) and then buffed it into the grain with an old, clean t-shirt.
Before we started, and in between each coat, we sanded down the tops with 320 grit sandpaper. It is really fine and helped us get the smoothest surface possible. After the sealants, we applied two coats of Waterlox Satin Finish (it also came with the countertops) mixed in a 50/50 ratio with the Sealer/Finish.
For these coats, we didn’t buff it in with a t-shirt, but just put it on thick with the paint pad (we used a new pad for each coat) and then went over it again pulling the pad in a straight line the distance of the tops without lifting it.
The topcoats did a great job at self-leveling and left us with an ultra-smooth satin finish. Purrrrrrr.
We have a few navy paint touch ups to do, and some tape and bags to remove–but we honestly couldn’t be happier with the countertops themselves. They are better than we imagined. When we initially installed them, I wasn’t sure if the color would get rich–(it was so light!), or the wood would ever feel…very smooth. Like, ever. But with each coat, we fell in love more and more.
The timeline for the project went something like this: we received the countertops last Tuesday, cut them down, sanded them, sealed the underside–twice!, installed them, sealed the tops–three times!, and put two top coats on and now, a week and a half later we’re done. Not bad, right? We’re really happy with that timeline and head-over-heals with the results.
And yes, a backsplash is coming. Let’s talk about that and our new sink and faucet next week.
Happy weekend, friends!
Psst. We partnered with Craft Art for this project. All words, opinions and sweat are ours, all ours!


Maybe I missed it, but how has the Waterlox performed as far as protecting the wood from water damage? Have you had to recoat your counters? What do you use to clean them? I am about to put a wooden dresser in as my bathroom vanity, and while I love how Waterlox has held up on wooden floors in a bathroom, I know countertops are going to get wet far more. Thanks for your help! Your countertops are gorgeous and I love the shine without being high gloss.
Can you tell me (if you remember) what kind of black walnut it was? plank style ? edge?
These countertops are the edge grain.
We are also trying to do a waterfall on one side of our cabinets. Since the waterfall and countertop square up, how far over the cabinets did your wood countertop go? One inch or two?
Did it make opening up the drawers or shelves in that corner difficult?
We are also looking at Craft Art as our walnut countertop supplier, which would give us an overhang of almost two inches (with DYI option.)
What I really want to know is what is the name/brand/type of original sealer you used?
We used Waterlox Original Sealer. Is that what you mean?
[…] Chris Loves Julia – Which made me ask why I didn’t take the time to find Walnut butcher block to begin with. […]