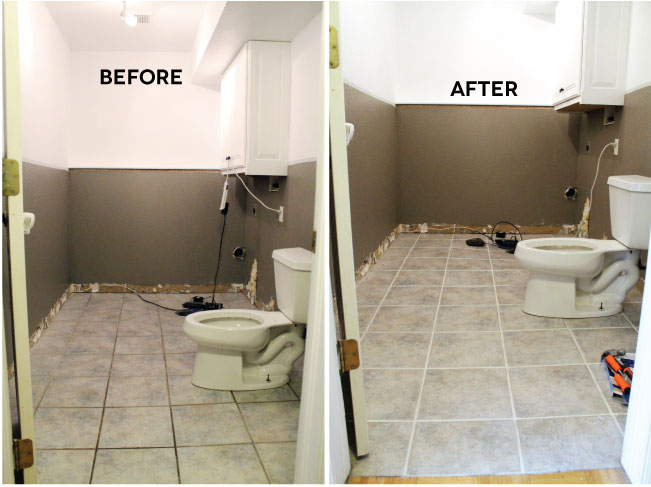
We were not ready to replace the tile floors in here. A few of you suggested getting peel and stick tiles--which we looked into, but because these floors slope down to a drain, peel and stick tiles aren't recommended--they are best for level floors and we'd hate to pour money into something that might now be suited for our space. Instead we committed ourselves to making the tile in our space look as good as it could. Enter this Grout Renew that we picked up at Home Depot for just under $12.

They had five or six different colors and I went for the whitest one they had, "Snow White." This product first came on our radar two weeks ago when I was looking for the best ways to clean grout. This blog and this blog both used this same product with great results. We were sold.
First, we cleaned our floors and our grout lines really well with soap, water and magic erasers. The Grout Renew goes on like paint--thankfully! I was worried with our grout so dark, that we wouldn't get results like the examples we loved, but we did. Woot.
Here's the basic play by play. I started behind the door and worked my way up to the back wall and then back so I could work myself out of the room. The bottle recommends letting things dry for 24 hours, but in my experience, it dried a lot quicker! Word to the wise, work in small sections. A tile at a time was a good rhythm for me.
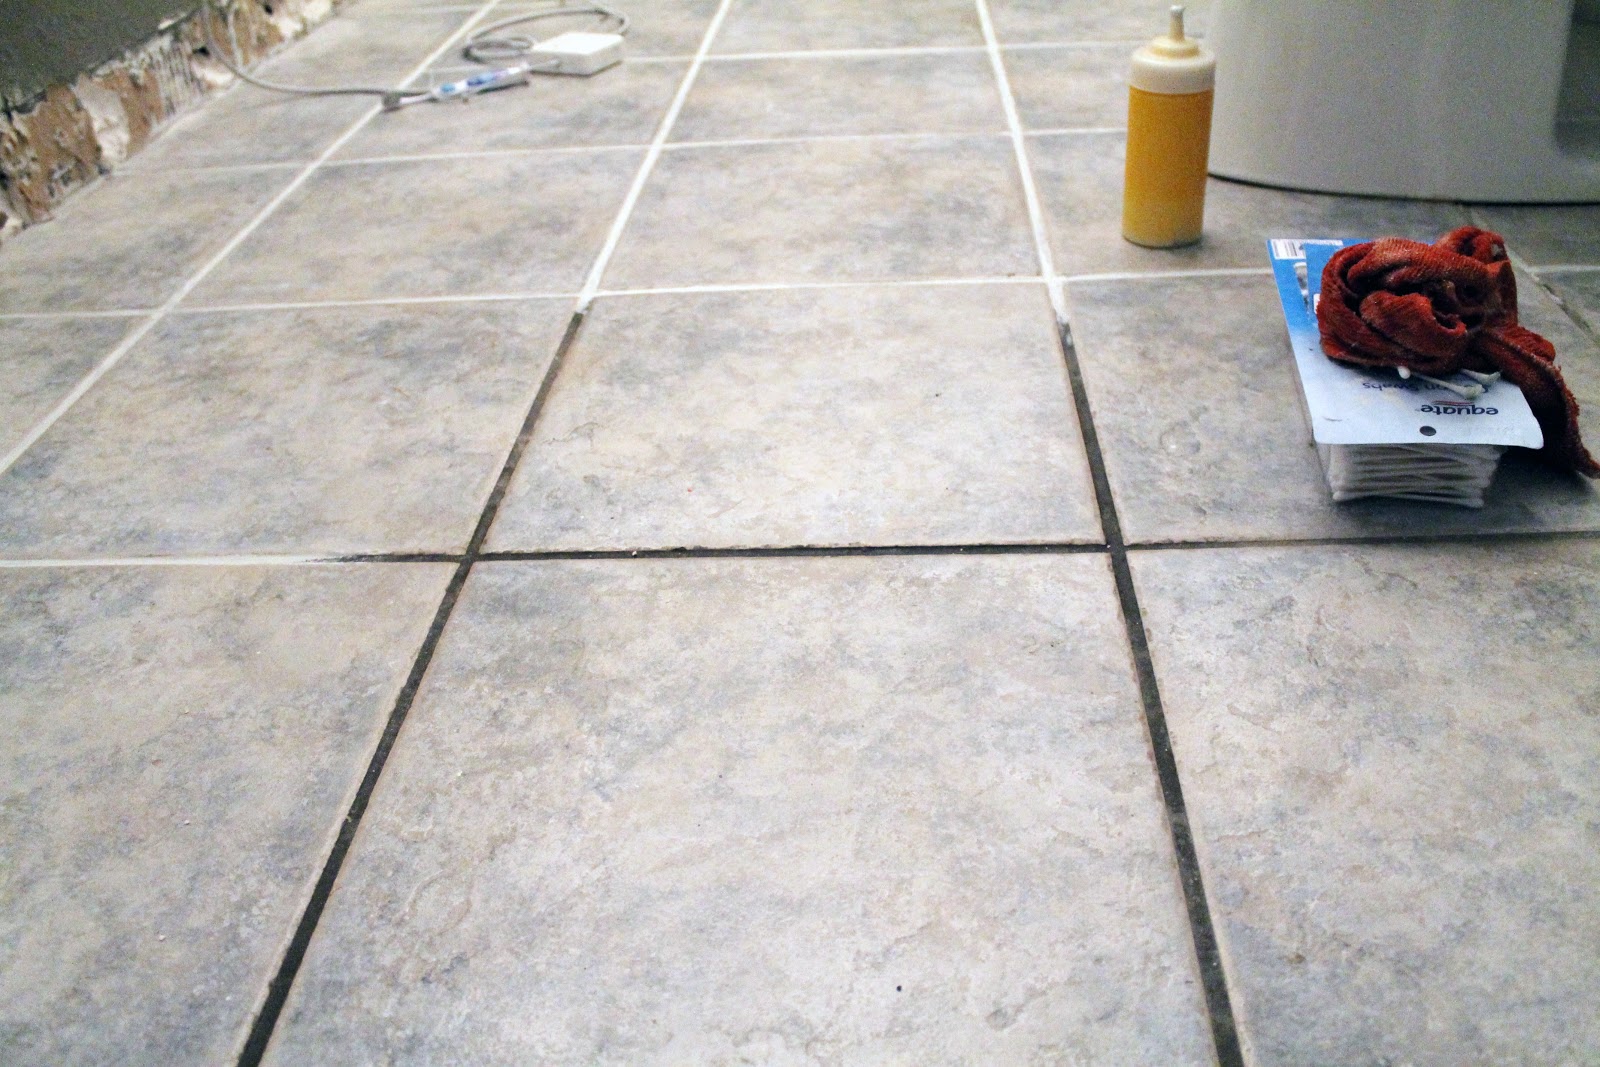
I chose to pour the product into a squeeze bottle with a small tip at the end for better aim.

When filling the grout line, you don't want to fill it--make more of a dotted line or you are going to have more clean-up to do and the clean-up takes the most time. Just a little bit will do.

Some people recommend using a child's toothbrush to spread the paint (I'm just gonna call it what it is)--tried that. It got out of the lines so much more, which meant more wiping, which translates into--say it with me--more time. I discovered a Q-tip was a great width to move things around while still (for the most part) staying within the grout line.

After I spread the paint, I took a damp cloth and cleaned up my edges.

Aaannddd....repeat.

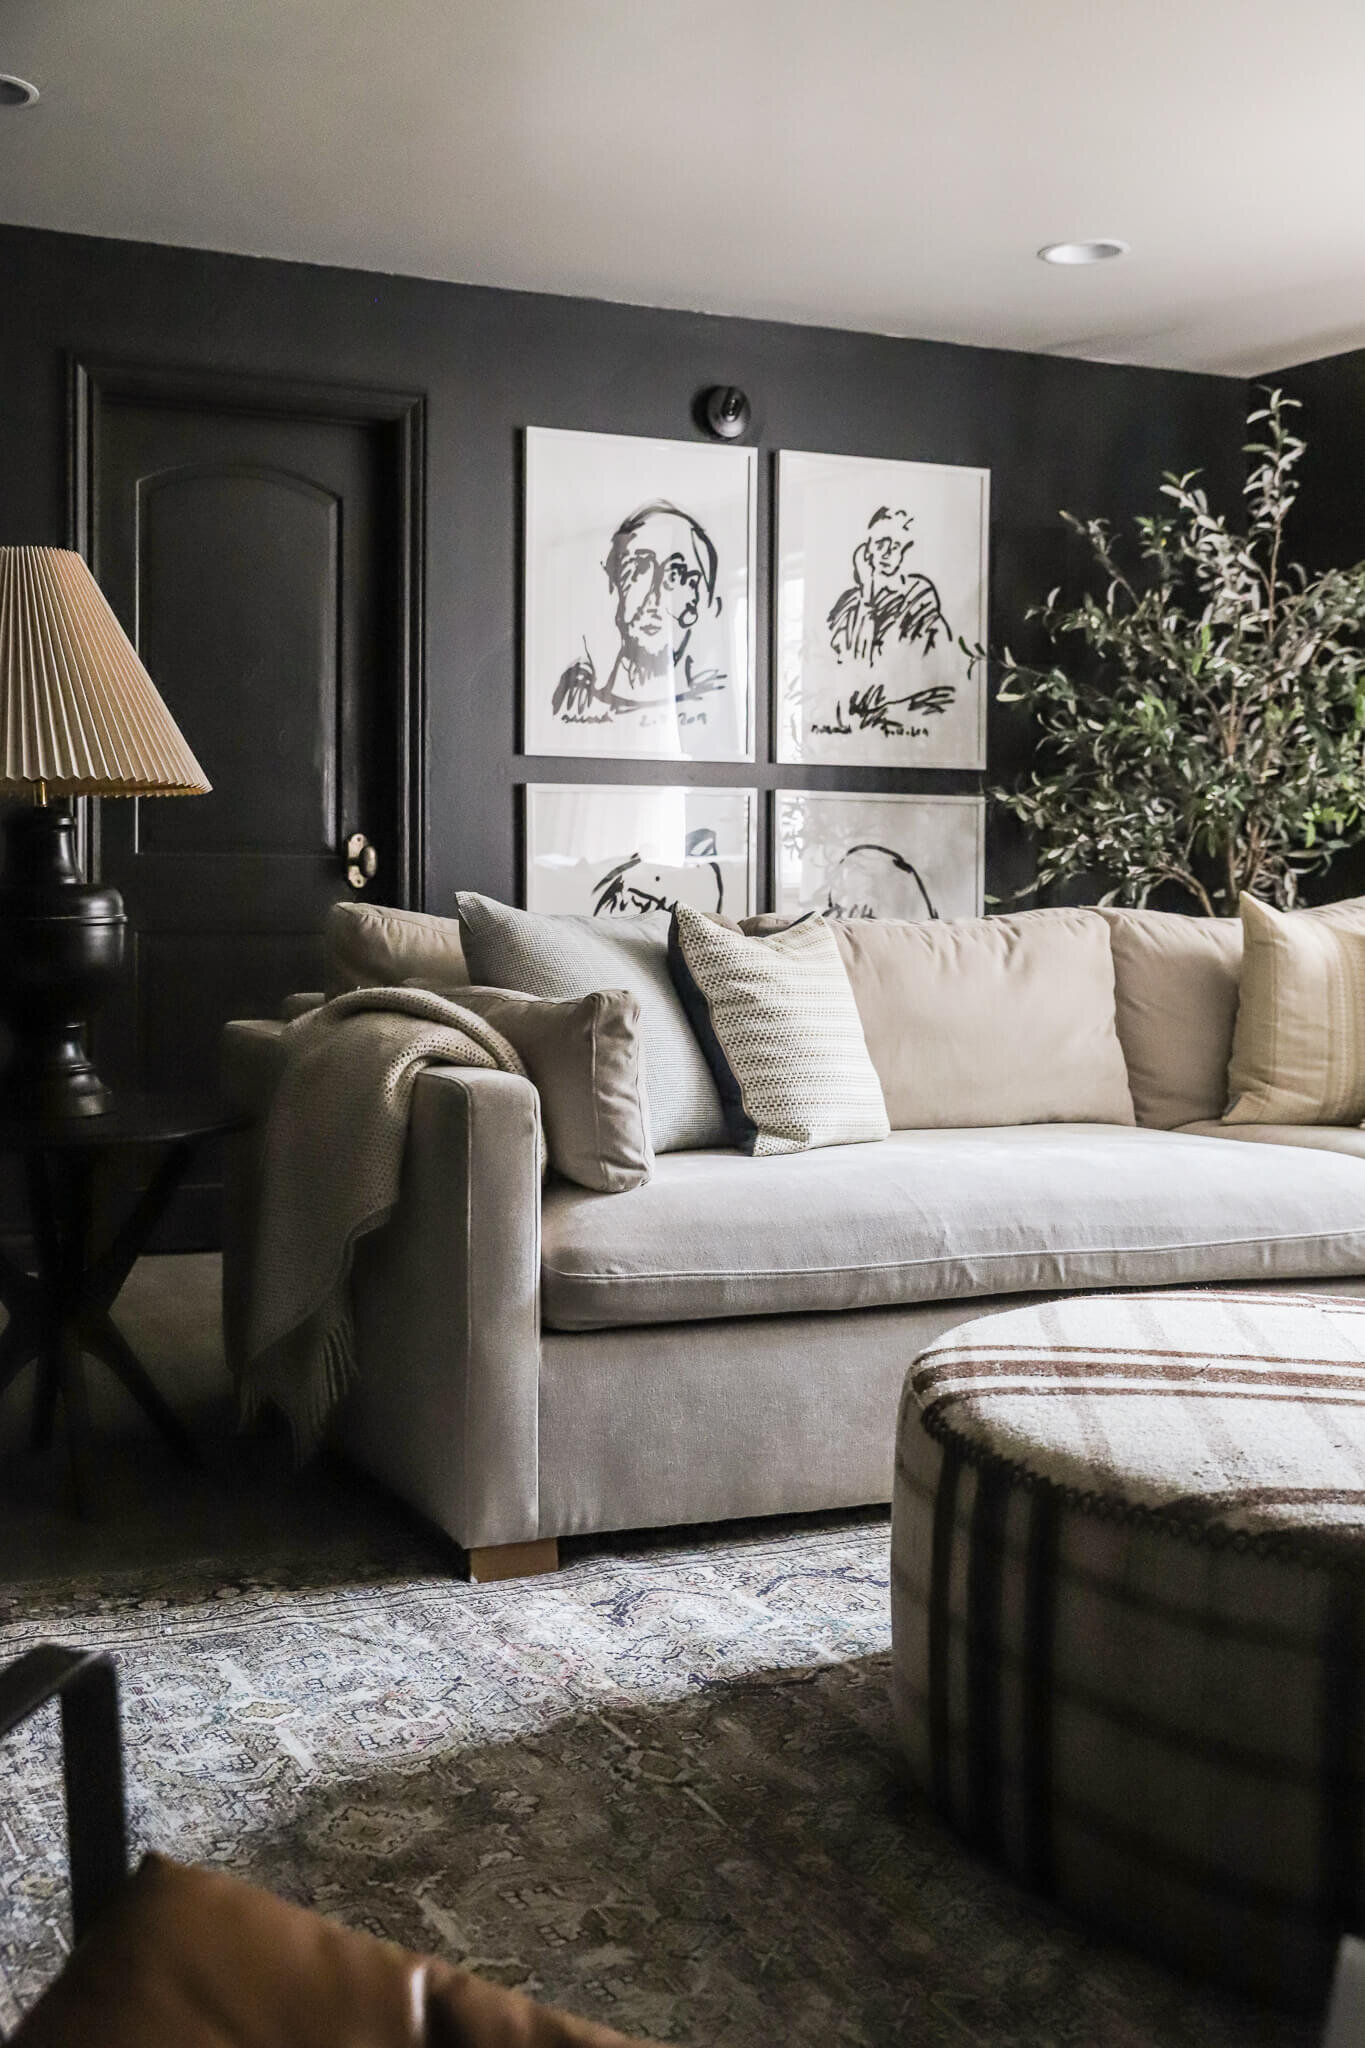
Even though this tile isn't my favorite, I don't hate it anymore. Which is 'uuuggeee. It feels so fresh and so clean (clean) and ready for some baseboards, don't you think?! Onward!
Has anyone else attempted the same thing or refreshed their floors in some other way? Heck, we even toyed with the idea of painting the entire floor at one point.
Psst...See how the room turned out here!
Leave a Reply


WE'RE CHRIS + JULIA
Portfolio
Projects


I would like to know if the grout paint has held up? I noticed that you didn't actually etch the grout first, which is recommended with an acid type cleaner according to the directions on the bottle, then let completely dry, THEN apply the grout paint and let that dry for 72 hrs before getting the floor wet. So, just wondering, has the paint held up?
My family all the time say that I am killing my time here at net, but I know I am getting familiarity all
the time by reading such good articles or reviews.
[…] Taking Grout from Dark and Dingy to White and Bright Chris Loves source […]
Being surrounded by renowned schools including Cedar Primary School, Maris Stella High
School (Primary), and the St. Andrew's Village suite of Kindergarten to Junior College education. the interlace
I just came back to reference this post. We have a 3yr old spec house & I don't know if the grout wasn't sealed or what happened. Twice a year, (its time again now), I scrub it with tiny brushes to get it bright & then it gets filthy dark again over time, ...repeat. I'd love to do this but its a 25x15 ft kitchen/ dining, with a half bath and laundry. I don't know how we could stay off it for the 24hr dry time.
Hmm...I would try just doing small sections at a time.
I love it!! The only thing I was questioning, does it need to be sealed after the painting? Does it clean up nicely the next time it needs to be swept/washed?
We didn't seal it and have no problems washing the floor. It is a permanent paint.
You and us both. We hope to finish up in the next two days!
I did the same thing a few weeks ago. It really is a game changer!
http://www.designocd.com/2012/10/refresh-your-grout/
That's the plan! Stay tuned, Caitlin. :)
Yay!! We feel the same way.
That looks so much better! I'm definitely going to have to look into this stuff for our tile floors!
Yesssss!!! Bonus points to Kate!
It's unbelievable how such a small change makes such a 'uuuuuuge difference. haha Getting rid of the yucky brown color makes the tiles themselves looks less brown/blue and more blue. I'm impressed!
Loving the Outkast reference...so fresh and so clean (clean) :)
Thanks, Debbie.
Of course!
This is simply AMAZING!!! You have inspired me to (one day) tackle our kitchen. We've got white-ish tiles with brown grout. Awesome, huh?? I just think I'd have to add at least 15 hours to my time because you finish everything in record time!!
Nice work, Julia!! Looks great! Thanks for including me as 'success'! :) ~ Virginia @livelovediy.com
Wow, what an improvement! Since you're still not in love with the tile, could you add a runner to the room to help disguise it a little more until you can replace it?
simply AMAZING.
I saw this mentioned in the comments of one of your posts last week and spent my Saturday afternoon recoloring the grout in my bathroom too! What a HUGE difference! It made an equally dramatic impact in your space too!! I was pretty set on redoing the bathroom next year (it's oooooold), but this small change gave it at least another year or 2 of life. Now I just need to gather to courage to tackle the (much larger) kitchen. Thanks for introducing me to the product.
Excited to see what's next in your space!
This looks so great!!! Completely changes the whole look of the room! Tedious work but soooo worth it. Can't wait to see the finished room!!
This looks NIGHT and DAY!!! Go girl! You guys are always thinking about ways to improve your space without doing complete renos or spending lots of dinero.
No applicator tip or brush! Hahaha. We had the squirt bottle on hand and the Q-tips (we even had a spare toddler tooth brush I tried), so it really wasn't so bad. and definitely worth it.
Holy crap this looks a million times better. It makes the tile look more subtle and blue, which goes with the new wall color, and less dingy and brown. TRUST ME I know the hatred for tiles..my bathroom...it's ...someone chose rust red faux marble for the floors and brown tiles. Seriously. gag.
Anyway that stuff seems cool but a pain to use. Do they have it bottle with an applicator tip or brush?
Hi ` nice job, I am going to do that in my kitchen. You mentioned that you felt like painting the entire floor. I did just that in a bathroom I have.I wanted a short term lift until I could do the big gut job, which I am happy to say is happening in the next week or so.
I painted the tile floor, it turned out amazing! I used Benny Moore Stix first, its a super duper primer product that allows you to paint over any surface....seriously, amazing. That floor has held up for the last year, not a scratch on it.
So when you get sick of that tile floor in your laundry room but don't feel like replacing it, try doing a coat of Stix and paint whatever color you want to.