It's been 2.5 years since we installed our black walnut countertop from CraftArt (more on that here) in our kitchen and this past weekend we took some time to refinish it. The wonderful thing about butcher block is it can be sanded down and made new over and over and over again and it's a pretty painless process, too. Before we get into how we did it, here's the wear and tear our countertop endured over the past 2+ years from daily life:
We never worried about our countertop or babied it (besides using hot pads when placing down pots and pans). The wood was scratched, worn, faded. Dinged. Marked with sharpie and nail polish, etc.
And that light spot was from when I used toothpaste to get out permanent marker...it took off the marker along with some of the finish. None of this really bothered us. We love the warmth of the walnut and even some of the character that's been added over the years of use. But the sharpie, nail polish and super glue (yeah, super glue) I could do without, plus! the wood was looking tired and tired wood is susceptible to things that can be a bad thing, like water damage.
Here's what we did:
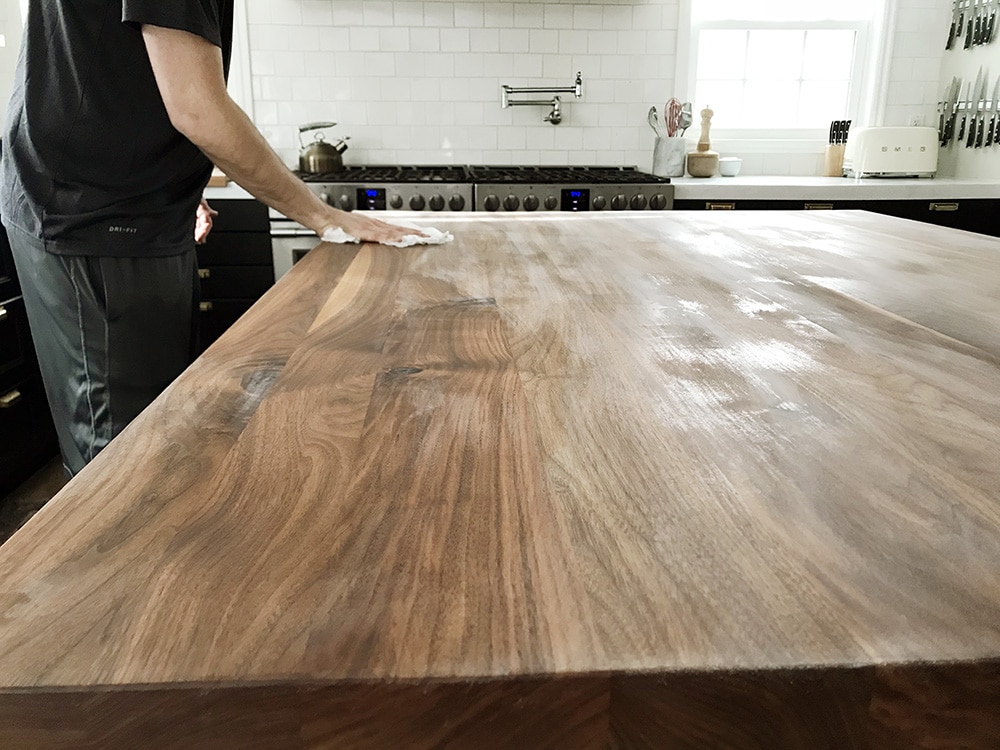
1. Sand the whole thing down. We have this $99 palm sander and love it. It's powerful and made quick work of the job, plus it has a dust collector/vacuum attached to it so the dust was really minimal (hence no coverings on other surfaces). If you don't have a sander that has a dust collector attachment, you'll definitely want to cover nearby surfaces for this step. We sanded, with the grain, until the unnatural imperfections were all gone. Kids, am I right?
2. After giving it a good wipe down with a tack cloth, we were ready to start coating it with Waterlox. This is the same satin finish that we used originally and we couldn't be happier with the protection it gave us. It's Waterlox's lowest sheen available which, I think, really allows the richness of the wood to be seen and is a lot more forgiving than a high gloss look. Besides the Waterlox, we'd recommend applying the sealer with a painting pad (we used this one) instead of a brush--it goes on a lot smoother with virtually no bubbles.
Just dip it in a small tray with Waterlox in it, and drag it across the countertop. You'll see an instant change. Note: Waterlox is not a stain. It's made from Tung Oil which brings out the wood's natural richness, in our case, black walnut.
3. This is after the first coat. It looks great, but it's not going to last. Prepare yourself for that.
4. Over the 24 hour drying time (the only downside about this project is the down time for sure!), the Waterlox will sink into the wood in some areas more than others. You are going to feel like you made a terrible mistake--you didn't. It just needs another coat.
5. Before the second coat, we lightly sanded with a sanding block and repeated the tack cloth wipe down.
6. Then we added our second and, in our case, final coat of Waterlox. We knew it was our final coat because the finish after 24 hours was even. If this is your first time sealing your countertops, you may need to/want to do up to 4 coats.
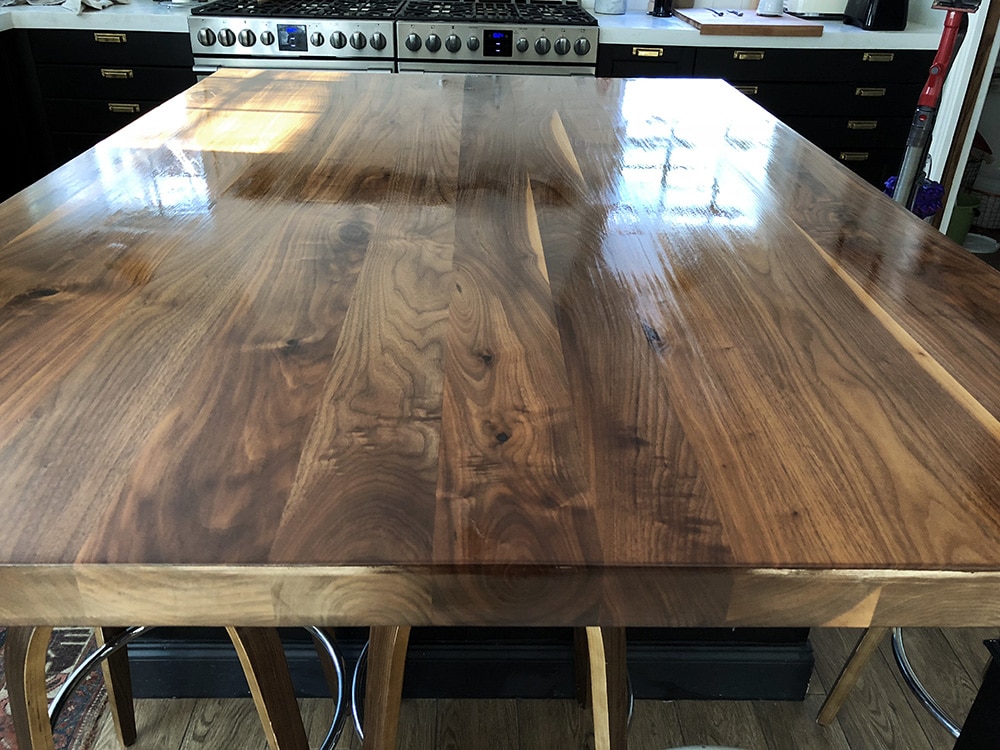
7. We're left with, what looks like, a brand walnut countertop!
In my opinion, wood countertops are the easiest things to care for because you can either seal in all the scratches and dents and natural patina that occur over the years (which we're really excited to get to one day when our kids are a little older) or sand away the blemishes and start fresh every few years for cheap! It's a win win!
Leave a Reply

WE'RE CHRIS + JULIA

Portfolio

Projects

















The Walnut countertop looks great I'm looking for I'm trying to decide if I should do wood and what color would work the best.
I loved I great explanations step by step
Thank you
Hi there! What is your wall color?
What do you use to clean the countertop with on a daily basis?
I love the look! Do you maintain the block with Mineral oil in between refinishing?
Hi! I just stumbled across this while looking to refinish and seal my butcher block dining table. It is wonderful! Can I stain first then use Waterlox? Thanks! Beth
Great post. Can you pls tell me where you got those stools and make and model?
Did Craft-art go out of business? I cant find them.
Thanks !
Great post! Question - how do you disinfect the countertops on a regular basis? I love the look of my butcher block countertops but I miss granite because before I could spray a disinfectant and wipe down like normal and now I can’t. How do you keep yours clean every day?? Is it the finish that lets you spray something on it, or do you use some kind of butcher block specific disinfecting product?? Thanks!
Hi! Thanks for this post. Clarification, the only product you used was the satin finish? I was looking at the Waterlox website and it mentions an original finish/sealer followed by the satin finish. You did not use the first product correct? Is this because your island wasn’t surrounded by white after? Thanks! Sammy
We just used the satin!
Best black walnut counter refinishing post ever.
Do you need a respirator to apply Waterllox?
We've never used one for the products we've applied, but you can check on the package and it should tell you.
I love these butcher block countertops! We have a black walnut island and I’m contemplating trying waterlox on it. Right now we just use mineral oil. After you used waterlox what products did you use for daily cleaning?
After you put the waterlox on did you put any thing else on it. In the one picture the table is real shiny is that a finish that you put on it.
That's the Waterlox. After multiple coats it creates a smooth, semi-matte finish.
I only ended up purchasing the satin finish, not the original. Because I didn’t want to drive 2 hours back to get the original, I decided to just try the satin finish without the sealer. Right now there’s only one coat... should I go back and get the original sealer and do that as the next coat, or do you think I could just do a few extra coats of the satin finish? ... it’s a birch butcher block countertop for my RV. Thank you!
Hello, I'm installing a wood countertop in our bathroom. Is an undermount or overmount sink recommended? (I don't like vessel sinks) Is bamboo the hardest wood or would you recommend another? You say "redo counter every year." Do you mean to sand it every year as well? Thank you.
We prefer undermount, and yes you should sand down and reseal the butcher block every year, especially around sinks.
I have a random question. I searched the craftart website for possible answers, but didn't see it addressed anywhere. They have pre-set widths/lengths so I can't just pick any length/width I want. I have a double wide island like you guys, but mine measures exactly 48" wide... Craftart only sells up to 48" wide. Is your island slightly under 48" so there is an overhang? I would love to go this route, but I don't want the top to be flush against the cabinets.
You can contact them and have them go a little wider with it. It costs a little more, but they can do it.
I made my butcher block countertops from Lodgepole pine, which is a soft pine. I am curious as to your opinion about the toughness of this product. I am leaning toward a urethane, or some hard finish to protect from dents and dings.
Would you use waterlox on a softwood countertop?
thanks
It doesn't protect against dents and dings, for sure. It's really just for water. We want our countertops to patina over time, so hardness isn't a concern, but if it is for you then you'll want to use a hard coat.
Hello... your kitchen is fabulous... we are renovating our kitchen and just got butcherblock counter tops for the whole kitchen what sealer would you recommend I use for around the sinks... thanks in advance...
Waterlox is what we've used. It works great!
Love the finish. Always loved the satisfaction and appeal of applying on varnish and clear
You can get sharpie off easily with hairspray!
I came here to look at the sheen of the original Waterlox. I just ordered the satin sheen four our wood vanity top, that I am going to build. Now I have second thoughts. :)
You’re my hero. I stumbled across your comment about hairspray and it saved my countertops from this awful purple sharpie! Thank you!!
I long for the day when we have a big gorgeous island like this, it's so beautiful. I'd love to get your input/advice on painting kitchen cabinets. We have 90's (yellow-brown) shaker style oak cabinets (which we love the aesthetic of, just
not the tone). We're scared to death to paint them (or even have a professional handle). Did you paint yours? Do you have any words of wisdom for us? :) Thank you!!
We have painted lots of cabinets on the past (search painted cabinets for those tutorials!) But now we have Ikea cabinets
Did you sand after the final coat of Waterlox?
No
Great Idea for storing your knives! Where from?
These are the Wusthof brand magnet strips.
I ordered this counter top and they had my buy 2 products to finish. They sent me the same Satin finish pictured here but also a sealer in a small bottle along with a cleaner. Any ideas?
We did that for our counters in our last house, because they were up against the sink where they would be exposed to water more consistently. Since this is just our island, we just used the one product.
Do y'all cut directly on your butcher block counter tops? Other than the look (and often price tag) I'm wondering about the convenience of having them. I recently came across a kitchen that had a butcher block only on one end of the island, and I'm curious if that was to use to cut directly on, or just for aesthetics.
Not sure about how someone else would use it, but we definitely don't cut on the countertops. Not even on the concrete, but that's more for the sake of the knives. In all of our homes we've just used cutting boards, and that remains the same with our butcher block.
Hey! I have this island- inspired by you- and I am wondering where you found your legs under the island. Thanks so much!
Check out this post for that info!
This is so neat! It's a beautiful counter top and island. Maybe someday!!! :)
I absolutely love this. Where did you get this beautiful walnut slab? I'm in Chicago.
We ordered it online through craft art countertops. They have a DIY slab we got.
We purchased a cherry wood countertop with a clear coat finish. Would your process work for us since we are starting with a different finish? Thank you.
You bet - we started by sanding it all down, and you'll just need to make sure you do the same thing.
would you do a wood countertop by your sink?
With Waterlox on it, you bet. You'd likely need to redo the counter every year, instead of every 2.5 years, but we did butcher block in the Pittsburgh kitchen we renovated a few years back and its going on strong.
Thanks for this post! My husband installed a butcher block counter in our new laundry area but
has not treated or sealed them yet. Do we do a light sanding before using the waterlox product? You mention it’s a satin finish? Thanks!
That depends on how smooth it is - you definitely want it smooth, so a light sanding with 220 is a good idea if it's already pretty smooth, or a more aggressive grit if it's rough.
How do you keep the Waterlox from bleeding onto the cabinets underneath? Tape? We have birch butcher block but I’m not crazy about the yellow tones. I’d love to try a stain and then Waterlox but I’m too afraid!
We added Waterlox to the underside before installing the butcher block 2.5 years ago. The finish is still fine there, so we didn't sand it down. Since this was refinishing, we simply sanded the top and applied to the top. In the case where cabinets are in place, tape could work, though you'd want to apply a couple layers of the tape to prevent it soaking through. Different consistency from paint.
Thank you very much for sharing! It looks great! However, I noticed that you didn't use any kind of wood conditioner before you added the finisher. Using a wood conditioner may have added an extra day to the plan (you have to let it sit overnight). But it would help to preserve the wood and help hold the sealant on better overall. I believe you can also use it after applying the sealant, but it's more effective if used before the sealant is applied.
Would you recommend this process for a dining room table with a wood veneer top? It’s a walnut mid century table that my kids have had a little too much fun with.
As long as the veneer is real wood and isn't too thin to sand, you could probably use this for it.
We purchased our home about two years ago and it has a butcher block island (no idea what kind, but looks very very similar to this). The old owners left oil and I’ve continued to use oil on it. Does this likely mean it was never sealed to begin with? It definitely has dings, scratches, and stains, so I’m really interested in doing this! Is oil still recommended if sealed?
There's no need for additional oil after using the Waterlox.
Hi! Two questions:
1. Since the Waterlox is made from an oil does any of that oil come off on paper or other things put on the counter after application?
2. Is the Waterlox food-safe? For example, is it safe enough to knead dough on, etc?
It has other stuff that causes it to dry to a semi-hard finish. Not oily at all. And it's definitely food safe - I make my bread on it all the time. :)
How was the smell after application? I’m dying to do this to our countertops but I’ve been holding off bc we have 4 month old and I don’t want to move out of my house for the weekend to complete the project.
It smells like varnish, really. We opened the windows, but it aired out quickly.
Can you include the various sandpaper grits you used at each level? We did a similar type finish on our dining table, and sandpaper selection was a nemesis of ours!
I used 160 for the first sand, and 220 in between coats.
Hi! I'm not sure the difference between this refinishing and staining? We have a piece of white oak that we are placing on top of our washing machine/dryer for a makeshift laundry room shelf, and we're not sure the best way(s) to treat it. Based on one of your recent posts, we were going to get one of the white stains you recommended (so we can keep the look of the wood we like) - but now I'm wondering if we should use a product like the waterlox instead or in addition? Thanks for all of your great advice and beautiful photos!
So, this process, Waterlox, will only enhance the wood's tone. If you want to stain it first, wait 72 hours for the stain to fully cure/dry and then you can apply the waterlox on top of it to seal.
Unless the stain you’re using has an oil (Tung Oil, Linseed Oil, etc.) in it, you should almost always plan to use something in addition to the stain. Stain alone doesn’t protect your wood surface. You should also think about how often you want to do upkeep when deciding between polyurethane or oil. Here’s a good article about the differences between clear coat finishes: https://www.woodmagazine.com/materials-guide/finishes/choosing-best-wood-finish
I’d recommend at least 2 costs of a polyurethane on top of a stain for a shelf- especially one where you might have drips of laundry detergent end up. Pay attention to the sheen when you pick poly- I prefer matte or satin for most projects. The article makes it sound super hard to apply- but it’s not. My parents own a custom woodworking business and they always tell customers to seal their products for longevity. I have a wooden coffe table and dining table both coated with poly and they look fantastic 5 and 3 years after sealing respectively. Poly seems to get a bad rap in the design world, but it’s durability really cannot be matched. Minwax water based poly is my favorite brand.
Thank you!
So can we skip the stain altogether if we like the look/color of the wood as-is and just want to protect it? And will the minwax poly change the color at all?
Yes, stain is for changing the color of wood. To see what it will look like with poly, wipe it down with mineral spirits. This will show you the rough color after sealing. Oil based poly will yellow slightly over time. The wood itself can change color over time as well, so this doesn't usually bother me. Water basted finishes don't tend to yellow, but are somewhat less durable. If you want a finish that you can spot touch up, pre-catalyzed spray laquer may be the way to go. Each layer "melts" into the previous one, but it has lots of VOC's.
This is exactly the type of info I've been looking for.
My husband and I had a table custom made for us last year, and I made the mistake of asking them to stain it gray. (Why did I do that!?!?!) Unfortunately the gray turned out blue-ish, and while it's actually kinda neat, it's not nearly as beautiful as it could have been with a more natural looking stain, or no stain at all.
So I'm wondering if I can sand the whole thing, and refinish it without adding a stain to it – doing what you did here with your butcher block. I wouldn't mind it if some of the gray were still visible; it'd at least lessen the blue.
OR do you think it might be smarter to just go ahead and sand and re-stain it altogether?
The wood is just a recycled white oak.
No worries if this is not an answer-able question in the comments section!
That's a tough one, especially without being able to see it in person. If something is stained, you can sand through that, but it takes a bit more sanding than we had to do here. So you'd definitely want to take the table outside so you didn't destroy the house. White oak is a beautiful wood and would probably look great with a Waterlox treatment (though it may turn out more yellow than our black walnut tops here), but it's really a balance of the other elements in the room as well.
All that to say - it's your call. But definitely worth considering! :)
Thank you so much for the thorough response! :-)
I restore a lot of antique wood. Rifles, military stuff, and furniture. What I use to remove stain is oven cleaner. You can spray it on a rifle stock that is 100+ years old and looks it with gun oil, old finishes, ect in the wood. Then simply let it sit for a few minutes and give it a quick scrub with a scrub sponge. This usually removes the finish and stain. I then simply wash the wood with soap and water to neutralize the oven cleaner. I will usually likely sand it with 220 grit afterwards depending. I've been doing this for 20 years with no damage to any piece of wood I've ever used it on and I've done it literally hundreds of times.
Another tip: You can actually steam dents out of wood. Simply put a cloth over it and use your iron. It will raise the grain then you simply give it a light sanding.
Thanks for this post! We have butcher block counters but never had them properly sealed (our carpenter just recommended oiling them... and to be honest we didn’t do that regularly the first few months...) we have them throughout our kitchen and around our sink so likely some water damage. Two questions - would you still apply this if there is slight water damage? Do you oil them in between sealing them?
I would sand them and then apply this. We never oiled in between!
Love this! speaking of countertops we were inspired by your kitchen and will be pouring our own Z-form white (with the white additive) countertops in our kitchen, laundry room (it's adjacent) and two bathrooms in the next few weeks. I am really curious about how you felt about your original sealer and if you used it again when you resealed them this last time? I am thinking it's the sealer to use but they also have a new one and I want them to be protected as possible.
Fingers crossed we don't royally screw it up, ha! We just finished painting every square inch of our new home, the kitchen cabinets are next along with the new door/drawer fronts.
BTW my husband and I are also in the process of laying 1550 sq ft of wood look tile and your tips and posts regarding them have also been helpful! Your posts help me convince him that wood look tile was the right choice although he might be silently cursing me since we are in the thick of the labor of it, lol!
The labor is intensive, but then you never have to worry about them again! It's great. As for the concrete countertops, we haven't resealed them. We are pretty happy with the original sealer we used. But it has chipped in a few places. However, we haven't had one stain and they still look beautiful years later.
How long are you keeping off the countertop? How long did it smell? Our 6yr old Waterloxed butcher block desperately needs a new coat, but I was worried about taking the kitchen out of commission for a week and the lingering smell impacting the kids.
It's a 24 hour dry time, so 48 hours total for this.
these came out really gorgeous! makes me wish my island had a butcher block top. I have the same issues (kids) and I feel like they've kind of ruined my quartz top :( :(
Quartz cleans incredibly well with Soft Scrub with bleach! I use a microfiber cloth (wet) to put on a fairly thick paste of it on any stains, and wipe the rest down with a thin coat. Takes a few passes with a clean cloth to get the grittiness off after, but it incredible how much better they look.
They look great. I had experimented with several coatings for our walnut countertops - thought the Waterlox might be too shiny but yours look terrific! We used Rubio Monocoat and I love the look. It adheres molecularly to the wood. But you can't touch up scratches, etc, which I think the Waterlox wouldn't allow. So excited you shared this!
You can touch up scratches with Rubio Monocoat. You just sand the spot and reapply. It only attaches to surfaces that don’t have it so it won’t change the look of the surrounding surface and the repaired section will match. We’ve done that to our floors.
Looks amazing! Is there a reason you decided to use Waterlox instead of mineral oil?
We've been so happy with the protection order the years. Especially in such a wet area.
In our experience, mineral oil is a 2-4 week solution. Looks beautiful but requires near constant upkeep. We'll definitely be trying waterlox next.
Looks gorgeous! I'm curious what level grit you chose for the palm sander and sanding block steps?
Your countertop is gorgeous! What grit of sandpaper did you use for the initial sand-down, and then for the sanding between Waterlox coats?
Are there any tutorials on the blog on how to sand properly? Thanks!
Do you have to be careful with water (water spots or drink rings)? Or does this sealer do a pretty good job protecting against those? We've been considering getting wood countertops, but I'm afraid they would be too high maintenance (especially with the sink).
The waterlox really excels at repelling water. We've never had any water spots or rings or whiting like that and I washed the counters with a washcloth multiple times a day.
We used Waterlox on our pine floors and any water sits on top as droplets.