This post is sponsored by eBay
I've been blogging for over 10 years and my cameras have kind of grown up with me. Being a very visual platform, my first purchase when I started was a beginner's Canon Camera and I've only upgraded twice since, the second time being in the last month when I saw a Canon 5D Mark IV come up as one of eBay's Daily Deals!
I also bought my previous camera on eBay and a few lenses as well! It's a source that some may look over, but I have been able to get some of the best deals on tech for our home (Also bought our Frame TV there!). You can buy new for a steal, or refurbished or used for even steeper discounts. I always ALWAYS make sure the seller has good ratings and check on shipping location and costs too.
Whether you are in the market for a budget friendly beginner camera, or feel comfortable using manual mode and want to upgrade or maybe taking pictures is a part of your livelihood and you want to go all out--here's what's in my camera bag, now (and then):
For the Trigger Happy Beginners (my first camera gear that served me well for years)
- Canon 4000D
- Cell Phone Tripod Adaptor (cell phones have come so far in photography--this tripod for them is a must have for any level!)
- Memory Card Holder (never ask, "where's my card?" again)
- This handy drawstring bag for your camera or lens is perfect to protect your gear while fitting into your every day bag.
For the "I'm Not Scared of Manual" Shooter
5. Canon 80D
6. Westcott Reflector (to bounce light around and block sun flares)
7. 50 mm prime lens (otherwise known as the "nifty fifty"--takes gorgeous photos!)
8. The Bowery Camera Bag by ONA holds a DSLR and lens, or a mirrorless camera with two lenses, as well as small accessories.
For the Seasoned Photographer
9. Canon 5D Mark iv (my new camera--she's a masterpiece)
10. Manfrotto Tripod
11. Canon EF 24-70mm f/2.8L II USM Zoom Lens (I had friends tell me for years this is the best lens out there, but it took me some time to save up for it and buy it. So now I'm telling you--it's the best and I use it almost exclusively.
12. DSLR Camera Canvas Backpack Front Open Large Anti-shock SLR Travel Camera Bag -- a really amazing price for a beautiful bag.
Of course there's SO many options out there, but I can only back these products since they are what I actually have and love! Hopefully this helps give you lots of options wherever you are in your photography journey!
Art from Artfully Walls — $1,000
Housewares from McGee & Co — $1,500
Lighting from Rejuvenation — $1,000
Window Treatments from Blinds.com — $1,000
Furnishings from Interior Define — $2,000
Paint and tools from Lowe's — $200
To enter:
Please...
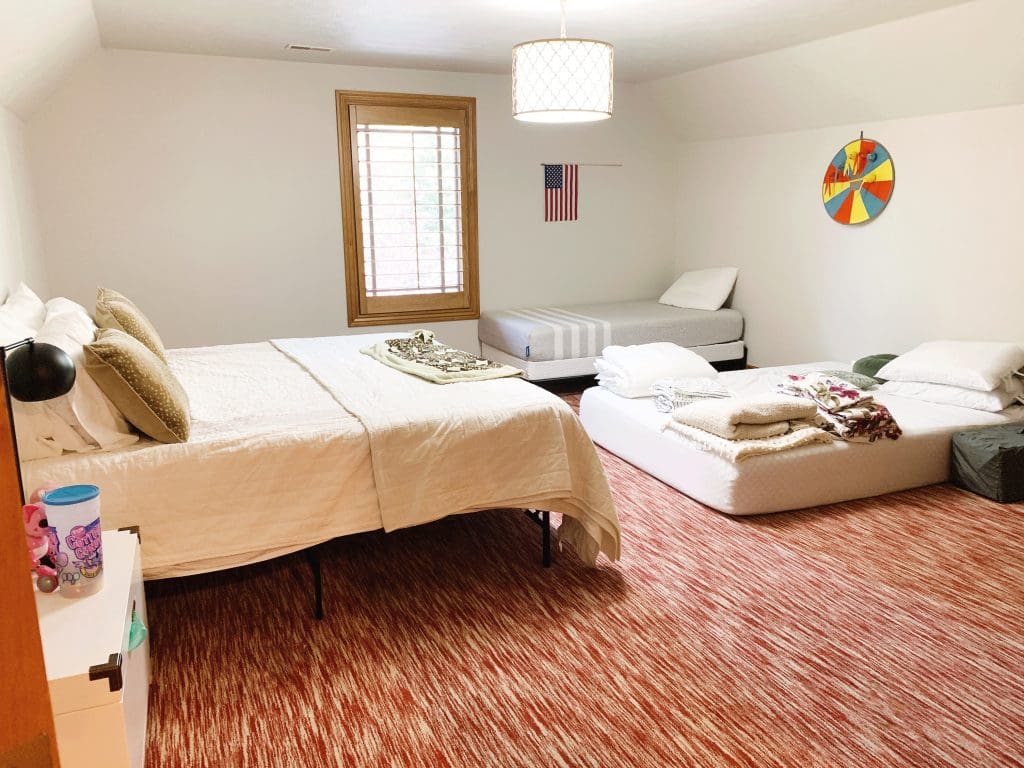
Behind the scenes, we have been playing musical beds 'round here. First Greta's room had a king sized bed and Faye's had a queen and the guest room (in the basement) had a queen. Then Chris's brother's family came to stay with us and with three little kids, it made more sense for them to have a room with two beds, so we bought another queen and moved the king into Faye's room and Greta's room had two queens. Besides family staying with us, the girls have a cousin near their age that sleeps over frequently so two beds in one room works for us. To be honest, that's when this room arrangement really started making sense--of course there should be a bed on either side of the window!
I ordered two of these queen gray Jenny Lind beds and we just dressed them in bedding we already had on hand for now, but the style is timeless and the color is warm. After I ordered them, I immediately second guessed myself and regretted not going with black--but once they arrived I was so glad we got the gray. It's soft and subtle and peaceful.
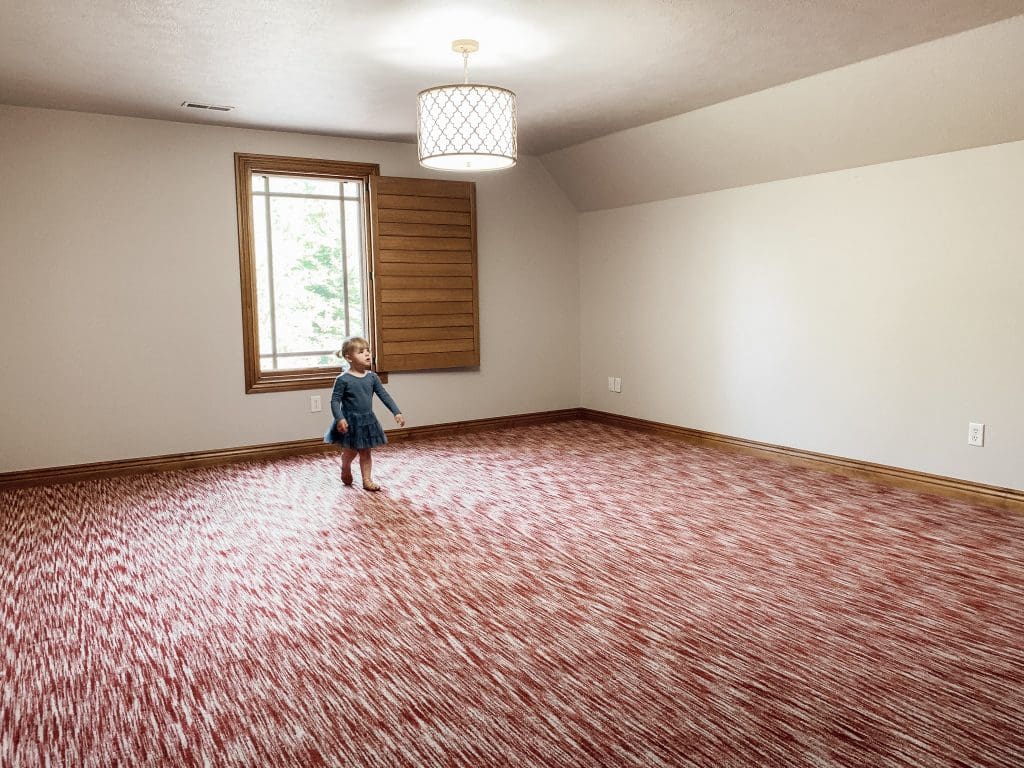
We weren't planning on working on the girls' bedrooms this year, but the carpet in here is so jarring and unrestful and we hit our head on that light every day--that we thought maybe we could do a little something in here. And then, you know, one thing lead to another and I started talking about wallpaper vs planking the walls in here and started pinning some inspiration images.
So how do I start designing a room? I start by finding inspiration. Sometimes I'll search "cottage bedroom" on Pinterest. Or "wallpapered attic bedroom"--an idea or feeling I want to implement and start there. When I do pin an inspiration photo, it very rarely if ever means--I want to do this exact thing! Sometimes a photo has a feeling I want to embrace or a note I want to take.
For instance, this bedroom below has a very similar ceiling line to Greta's room. I love the wallpaper in here! Although this is a little more color than I'm into for my home, I love the mix of patterns. The vintage rug, the heirloom chest, a quilt! I definitely want her room to have some traditional vibes mixed with more modern pieces.
I also pinned the photo below because in Greta's room, the ceiling comes down on the sides like this one (marked by the same texture). To me, it feels like the walls should go up to the flat part, but it was cool to see a version of it coming down. I've also been teetering between planking her walls vs. wallpaper and this photo is a gooorrrggeeous example of paneling done right.
And then sometimes, I pin an image like the one below not for the style or colors or shape of the room, but for an idea. A little dresser, mirror, vanity situation like this would have been my dream growing up and I'd love to give her something similar.
We're still flushing ideas out, and my next step is making a mood board for this space and nailing down new carpet. Can't wait to take you along!
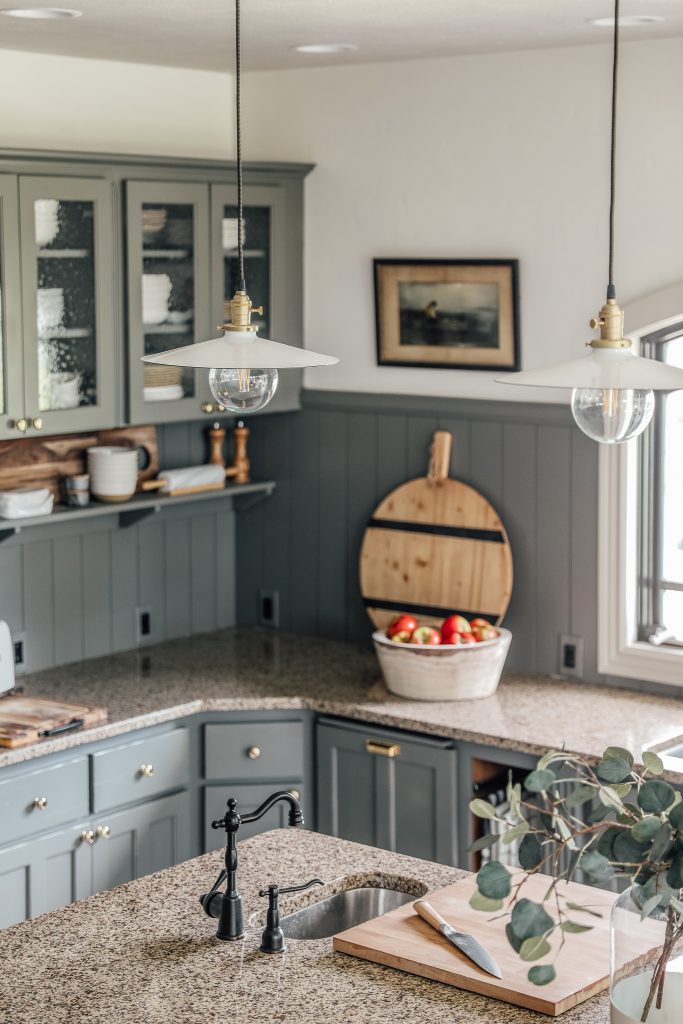
2 weeks ago, we started a phase 1 kitchen renovation. Our goal was simple--to spend only $1000 to bring our kitchen to a place that we could live with for a year or so until we had more time to live in the space and figure out how we want it to function. Our big motive was a Thanksgiving shoot we had earlier this week and I'm happy to say, we made the deadline. But what's more--we are sure we can now live with this kitchen much longer than a year, aesthetically at least.
Here's how it looked 2 weeks ago:
And today:
And the other side:
Same. Kitchen.
This renovation was all about working and using what we had. Countertops, floors, appliances and cabinets are big ticket items in any renovation, so we brainstormed ways to make what we currently had, look less dated and more like us without spending much money. It took a small financial investment and a relatively small time investment of two weeks (although I will say, we really pushed ourselves during that time) to make it happen.
So very many of you followed along religiously on Instagram the last two weeks and we can't thank you enough for that (I saved the whole process in my story highlights, start with 1-ktchn) but in case you missed a few details, here's a brief rundown of how we went from this:
to this:
Here's what we did to transform our kitchen into what it is today over the last two weeks:
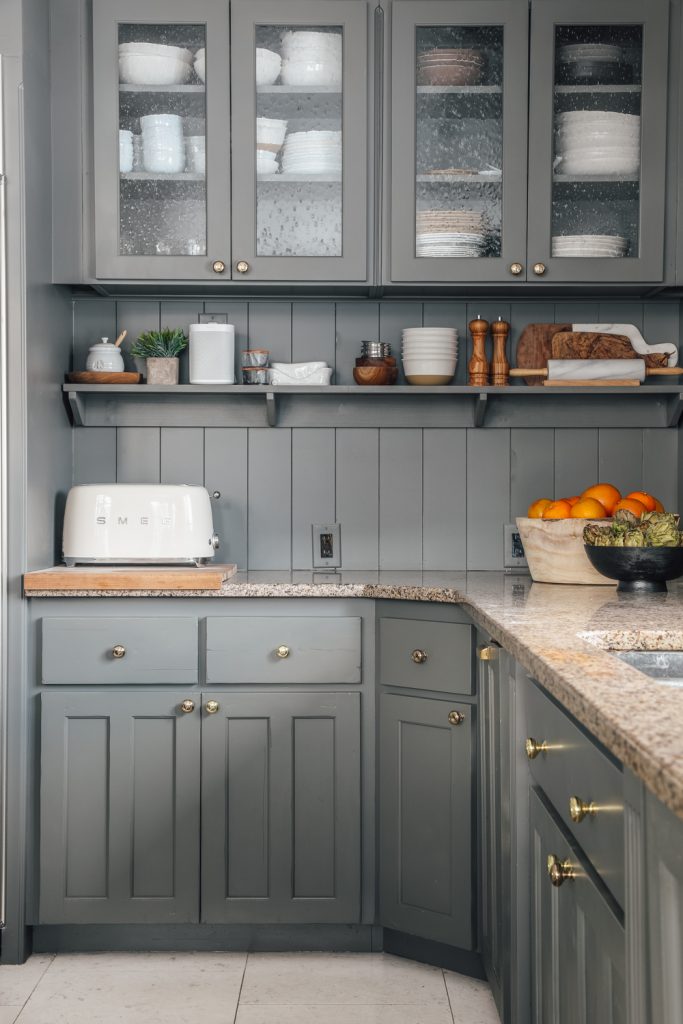
- Rearranged the cabinets. (read more here) We removed some uppers (and the kitchen desk area that only collected junk) to let the kitchen breathe, and moved others (the glass front cabinets by the range hood) and repurposed them in a place that made more sense. This also allowed us to have cleaner lines and get rid of the staggered upper cabinet look that we don't prefer.
2. Our plan was to move the range hood up because it hit us (tall folk) right in the mouth area at its current height) but when we demo'd the cover, we saw that they actually installed the wrong kind of hood entirely that didn't vent anywhere. Because we have another exhaust fan in the ceiling over the island area and plenty of windows in this area, we decided to go without a hood for this phase since in the future, we dream of moving our range to the other side of the kitchen.
3. Removed the tile backsplash and replaced it with vertical tongue and groove paneling. This decision was made during the project when the removal of some cabinets destroyed the tile. But it turned out to be a happy accident. We love the modern cottage vibe it brings to the kitchen.
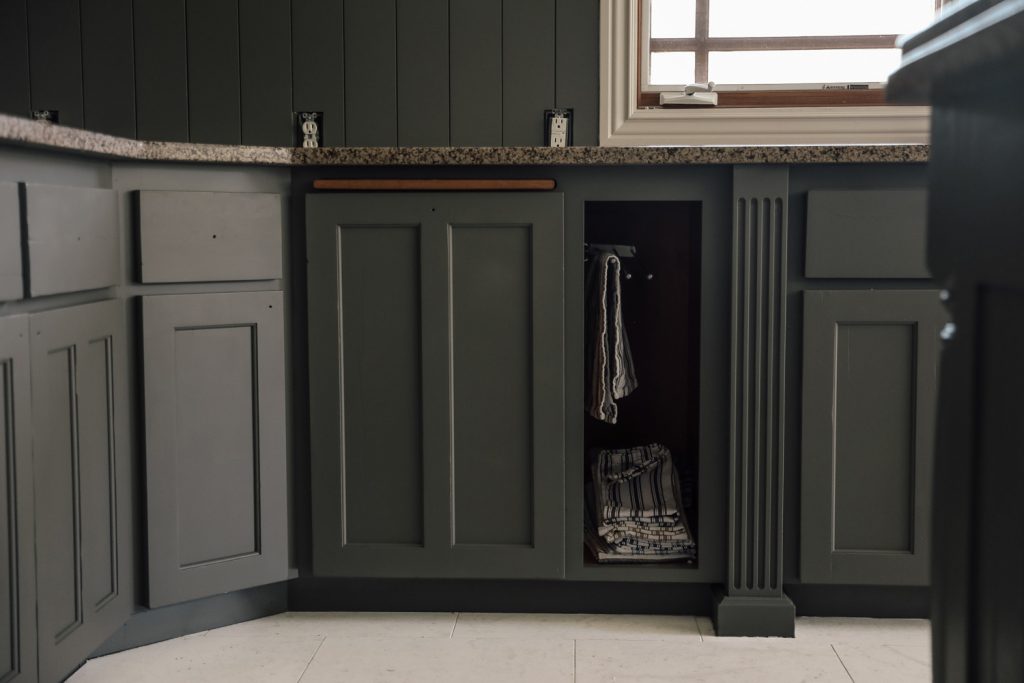
4. Painted everything the same moody green/charcoal/sometimes a tinge blue (it's a total chameleon that changes throughout the day!) Thunderous by Sherwin Williams. You can read the full tutorial on how we did that here. Painting all the cabinets and the backsplash the same rich tone really unified our somewhat disjointed kitchen. There were 3 different kinds of cabinet fronts and a monotone color makes none of them stand out. Whew!
5. Built two simple open shelves, below the upper cabinets (9" deep, 10" board) and in the range nook (11" deep, 12" board). Chris used 1" pine to whip these up and I painted them, again, the same color as the walls and cabinets so the pots, pans, mixers, bowls, boards--everything, popped!
6. Built and installed a cover for our panel-ready dishwasher. A few weeks ago, shortly after moving in, we had to get a new dishwasher because our old one sounded like a jack hammer when it was on. We went with a Panel-ready Bosch knowing we would eventually buy a cover for it, but instead Chris built one! The dishwasher came with a template for size and he used 1/2" plywood with these trim pieces and 1/2" cove moldings to make it. I primed and painted it and I can't believe we even waited this long to do this.
7. Swapped out the lighting. In the spirit of using what we had, I remembered I had purchased two of these 14" white enamel pendants for the cabin and never used them. I ordered one more and outfitted them with these slightly oversized G40 bulbs and I love the look and the memory that comes with them.
8. Updated the hardware. We had 5 bin pulls left over from our last house and I mixed in a bunch of these budget friendly polished brass knobs (they're beautiful and heavy!) to freshen up the look.
9. Swapped all the receptacles for black ones and painted the cover plates to blend in better with the walls.
10. Spray painted our faucets (sink, prep sink and pot filler) a satin black. They were all that brown oil rubbed bronze with copper-ish peeking through. Two weeks ago, I didn't even notice, but as the kitchen started to transform, it became clear they needed their own mini makeover, too.
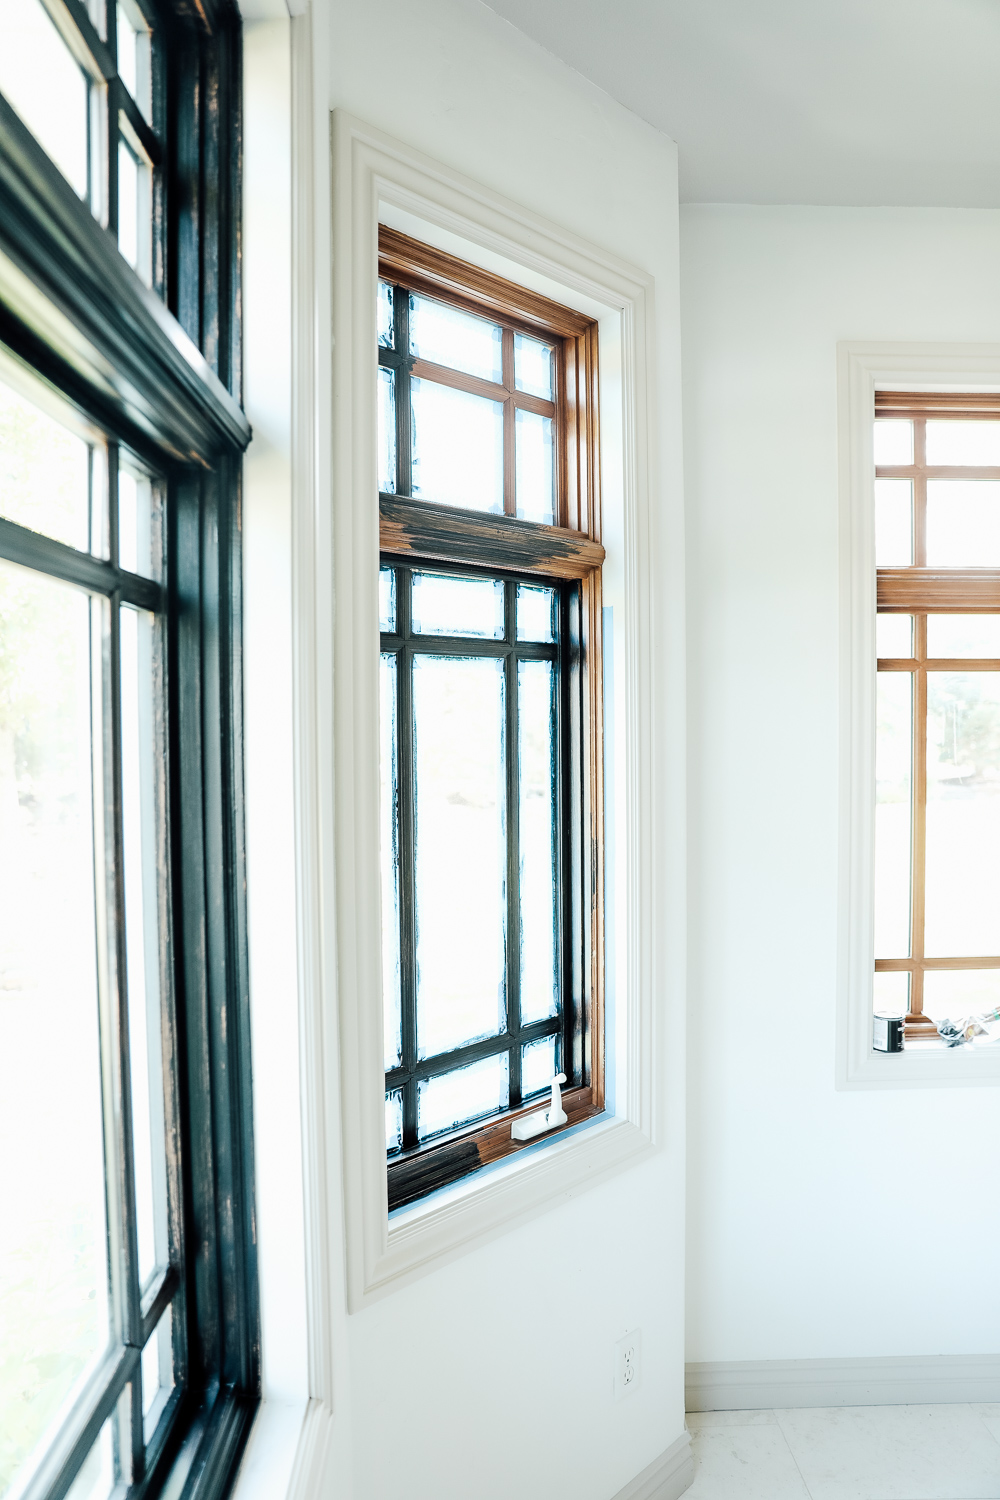
11.Painted the window sashes black--read that tale here.
12. And then the arched cabinet arrived on the day of our shoot. Just in time. I knew I wanted to get rid of the desk area and just put a free-standing china cabinet of sorts in its place to hold a lot of our servingware and table linens (those are in the baskets at the bottom) and this one was love at first site. It mimicked the arches we have everywhere in our home and the black and glass combo would have sold me. But then it was on sale for $1349 and I threw the budget out the window and ordered it, knowing I could and would love to use it elsewhere in our home even after we eventually really renovated the kitchen. Under the desk area there was tile missing and a whole house vacuum system (that we're still figuring out) and this cabinet doesn't exactly hide that, but I painted the floor the same color as our tile and it's pretty disguised. We shrugged our shoulders and said "phase 1!"
We said that a lot during this renovation--phase 1! There are so many MORE things we could have done and some things we did that many wouldn't do if they allotted $1000 of their budget to renovate their kitchen. And I think that's the beauty of this project and this exercise--it would yield different results for everyone that participated. But everyone would end up with an improved space. I'm so glad we didn't wait until a full gut renovation to spend time and money improving our kitchen.

There's so many valuable lessons to be learned in a phase 1, whether it's trying out a color or a skill or just the ability to fall in love with your house. A lot of you wondered what our final spend was on this kitchen, so I broke that down below. Please note, this was not how to redo your kitchen for $1000. This was a budget we set for ourselves knowing what tools, supplies, materials, cabinets, appliances, dishes and decor we already had. I encourage you to look at what you have and see how you can build on it!
window paint $9.96
brass knobs - $63.36
light bulbs - $29.94
black outlets - $179.16
lumber for shelves and dishwasher cover - $150.75
shiplap & crown - $297.82
painting materials - $122.96
sheetrocking materials - $33.83
extra pendant light - $143
SUBTOTAL: $1030.78
+ arched storage cabinet - $1349
TOTAL: $2379.78
Small investment. Huge impact. We can't thank you all enough for supporting us during this renovation, but also through this entire year that has been bumpy for us, and the last 10+ years we've been doing this. It just keeps getting more fun and we credit that all to you.
Sources below (note: Most of the accessories we've had for years, so I've linked what I could!):
Paint Color: Thunderous by Sherwin Williams in a Satin finish
Range Nook
Hardware Knobs
Hardware Pulls
Dinner Bell (old, similar)
Round Wood Footed Tray (old, similar)
Oil Cruet
Pepper Grinder
Marble Spoon Rest
Marble Utensil Holder
Copper Tea Kettle
Pyramid Cheese Grater
Mortar & Pestle
Mini Copper Cocottes
Large Strainer Stock Pot
White Enamel Dutch Oven
Copper Kitchenaid Stand Mixer
vertical tongue and groove paneling
Island
Pendants
Bulbs
Over the Counter Wood Cutting Board
Knife
White Dipped Vase
Eucalyptus
Rattan Tray
Candle
Stools
Cabinet Side
Cream Smeg Toaster
Honey Pot
White Speaker
Long Wood board
Natural White Speckled Melamine Bowls
Marble Rolling Pin
Olivewood Salt and Pepper Mills
Round Pizza Board
Wood Fruit Bowl (similar)
Art (vintage)
Soap Set
Black and Cream Striped Cotton Rope Baskets (these are the best and affordable!)
Marble Tiered Serving Tray
Live Edge Wood Serving Bowl (styled on its side behind plates)
Copper Planters
Faux Stems
Dining Room
Famous last words.
We were going to share after photos of the kitchen today, but the china cabinet we ordered arrived afternoon yesterday and we lost our ideal lighting before I could finish the other task I decided to start--painting the windows. The task of painting the window sashes black wasn’t even on the original “finish the kitchen” list. My sisters were hanging out and helping, and somewhere between the Indian take-out, the Something Corporate songs, and gabbing about “Bachelor in Paradise,” we all accidentally ended up with our own miniature can of black enamel paint and small edging brushes. (Oops!)
We were minutes into our task (but past the point of no return) when we were all wishing we had primed the wood first (did I learn nothing from my very own cabinet painting post?). The paint was going on so streaky! “The first coat will act as primer,” Chris reassured us, and we kept on keeping on. We're replacing these windows in the next year, but I just thought this would be a quick project!
Next, contorting ourselves into the sinks, kneeling on counters, and limbo-ing under ledges, we wished we had taped off the windows first. With surgical precision and at a snail’s pace, we slowly edged each sash — sharing just-discovered tips: “Let the brush drag along the trim, hanging just enough over the edge…” Still, the backlight of the setting sun was blinding. We couldn’t even see if we were doing it right! (Lesson learned: This task might be better suited for after the sun goes down.)
Hours passed, and we weren’t even halfway done. I had the brilliant idea to just paint one “willy nilly” and clean up all of the paint I got on the window with a razor blade. Can you guess what a big mistake that was?! The razor blade was hard to grip and scraping off all of the paint took just as long as carefully edging each piece of trim. Thankfully, I limited my experiment to one window pane.
My sister was next to experiment: “I’m going to tape this one.” She went about the fussy task of taping off 15 window panes and the exterior. We were halfway through an Adele playlist when the tape ran out. Victoria concluded that the time to tape + the time it takes to paint several coats = maybe no time saved at all.
In the end (read: in the morning), we all loved the black windows. And even said, "wow! worth it!" (note: we were not saying that during the 6 hours it took to paint.) I can say, it made a huge impact and probably cost a total of $15. And that was the biggest lesson: A project like this isn’t a financial investment — it’s a time investment. If we could start over, we’d prime all the trim and tape all of the windows. So, if you decide to take on this project (and you should! There’s so much wow factor!), take those notes and save yourself a few hours and a lot of squinting.
Or invite your sisters over and just surrender to the process. That part had rewards we couldn’t even measure. I can't wait to share with you how they look with the rest of the finished kitchen. Tomorrow! For sure!
(Ps. We used these 1" brushes and this black enamel paint)
This post is sponsored by Artfully Walls.
The task of designing, renovating, and DIYing a whole house can be daunting. Even when I’ve tried to narrow it down to one room, it’s been hard to pull the trigger on the perfect bedframe, the just-right dining table, or the couch on which we’re finally going to kick up our feet. (Jordan, we miss you AND your couch!) — But choosing the art is exciting for me. And, sometimes, it’s just the inspiration I need to visualize a paint color... new flooring? ...furnishings! Accents! So my advice: start with what excites you.
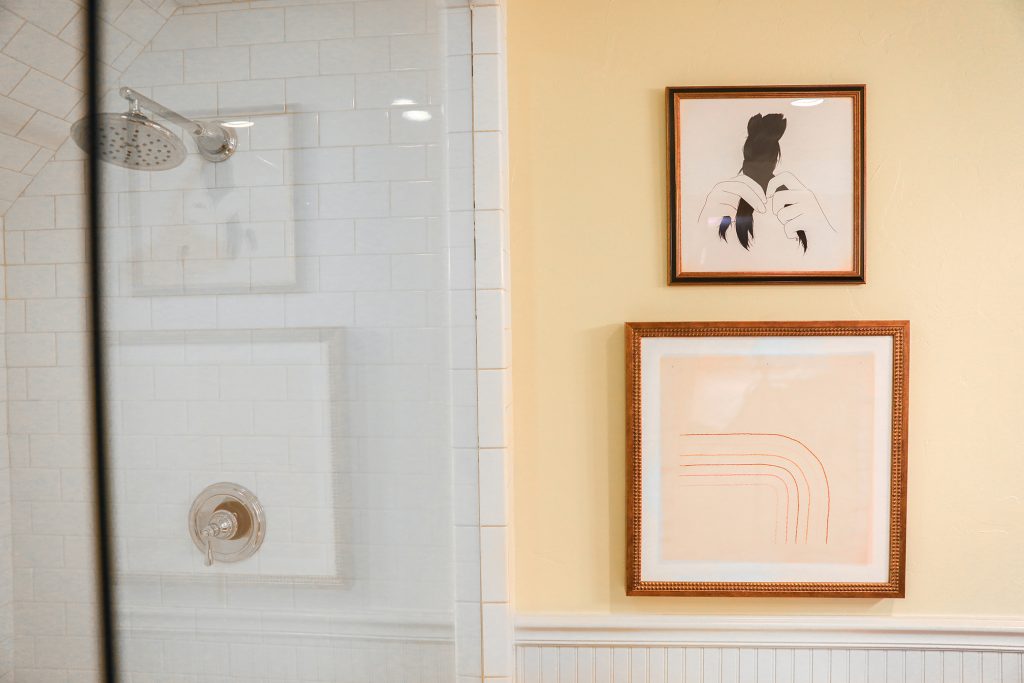
Directly off of Greta’s room is a small bathroom that’s just perfect for her. She’s our oldest daughter, so we like that she gets a little more privacy. And since Greta’s room will double as a guest room when company comes, we like that this bedroom gets its own bath. The bathroom itself is...decent. Really cute beadboard, a fun dresser turned vanity, the shower is huge and incredible. The yellow walls and laminate floors (and a few other accent pieces like mirrors and lighting) all could easily be swapped--but I just wasn't sure where I wanted to go with it.
(Sidenote: yellow bathrooms with no natural light are a true challenge to photograph!)
Before making any other design decisions, I started by finding inspiration through art. Artfully Walls is one of our favorite art-buying sites. I’m constantly turned on to new artists when browsing this site, and I love that it’s a cost-effective way to support those artists. I can heart my favorites and it automatically saves them so anytime I need art, I go there first to see what I'm loving.
For this room, I loved “Braid” by GG (a Canadian author and illustrator whose focus is on storytelling and quiet moments) and “Butter with Caramel Rainbow” by Emily Keating Snyder (a Los Angeles-based mixed media artist driven by a love of color). The two together felt playful and young for our 9 year old, but still something I love and admire.


If you can, I highly recommend splurging on the framing option. This helps me to hang the pieces as soon as they arrive (they even come with hanging hardware!)— no waiting around while I hunt for the perfect bargain frame or stall as I make other decisions for the room. These are ready to go up!
I chose the 16x16” print for “Braid” in the Black Gold Reverse Wood “Ornate” frame. “Butter with Caramel Rainbow” looks great in 24x24” with a white mat and the Gold Double Bead Wood “Ornate” frame.
This pairing really got my creative wheels turning, and I had so much fun shopping the site and put together some other fun duos for you: prints that I love looking at alongside one another and that I could easily see living happily ever after on the same wall in multiple different rooms.
- La espera BY FEMKE COLARIS
- Flowers with Green Background BY KATE LEWIS
- The Big Leap BY CARRIE SHRYOCK
- Grrr! BY PENNY MIN FERGUSON
- Butter with Caramel Rainbow BY EMILY KEATING SNYDER
- Braid BY GG
- Mountain Moon BY MATTHEW KORBEL-BOWERS
- Her Face Launched A Thousand Ships BY JANET HILL
- Dune Path BY PHILINE VAN DER VEGTE
- Untitled BY PAVEL FEINSTEIN
If you aren't confident in creating your own pairings, you can check out the recently relaunched wall designer tool on Artfully Walls. It looks much chicer than the previous version, is more fun to use, and has some new features, like…
- an interactive tool for browsing, grouping, and shopping for art
- a revamped GUI and simple “drag and drop” functionality for a fun, easy experience
- easy-change framing styles and matting options
- lots of wall paint colors to play around with
- discovery functionality to find similar works
- tools for Interior designers (export itemized art grouping proposal to PDF — with or without pricing — which can be easily shared with customers)
This post is sponsored by Lowe's
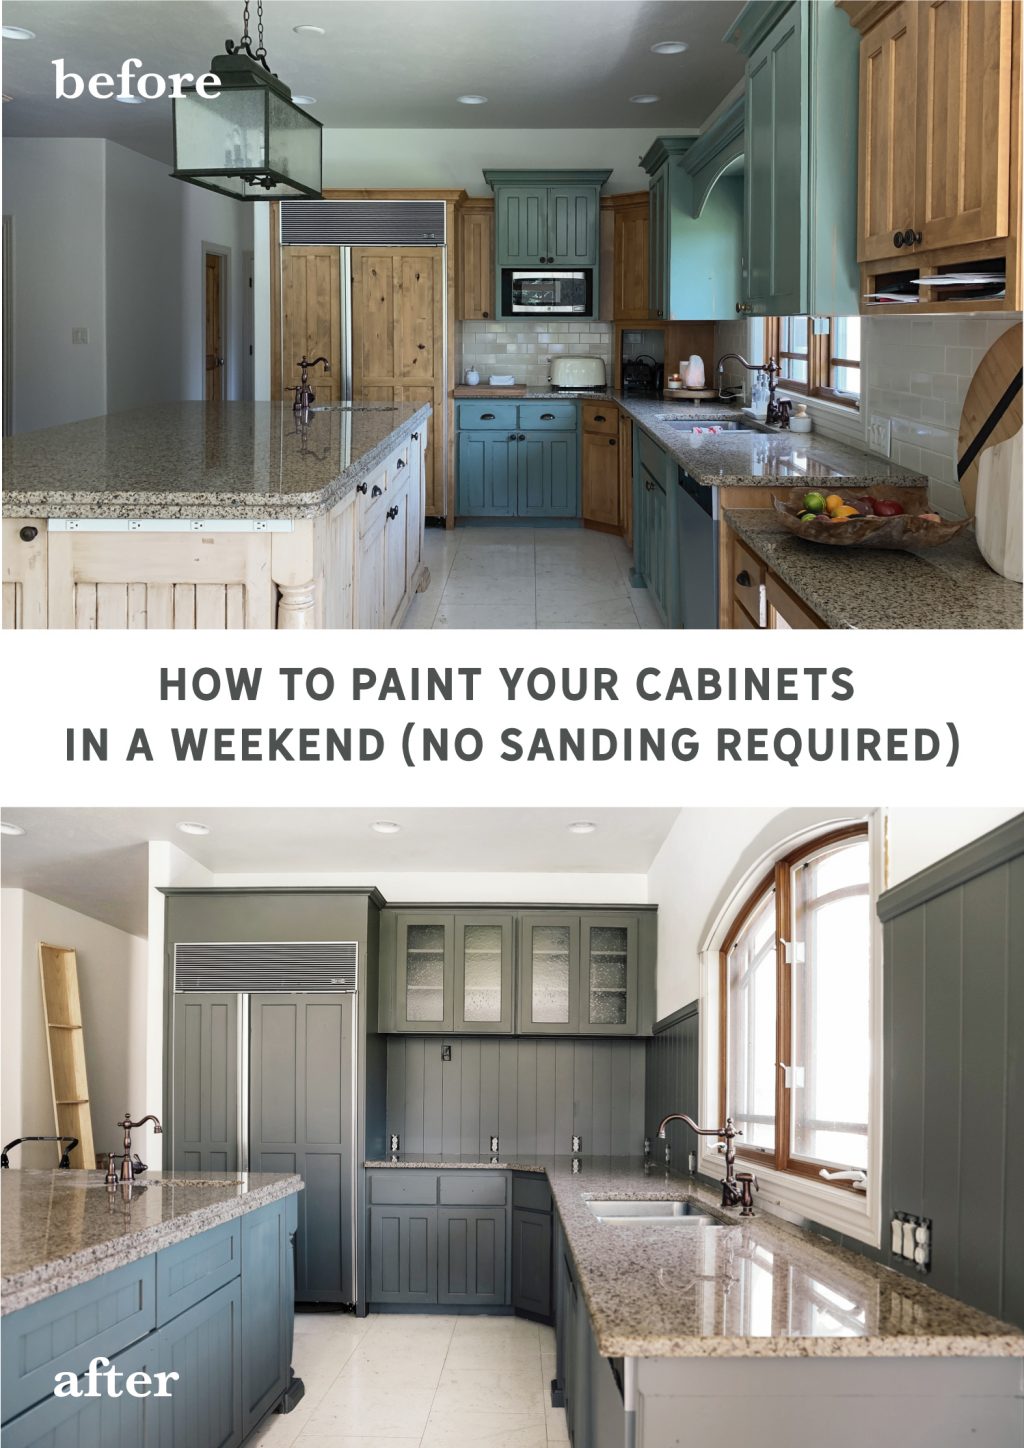
Our week-long phase 1 kitchen refresh is all but done now. The most dramatic change besides rearranging the cabinets (did you even know you could do that?) was painting the cabinets this past weekend. Everyone knows how transformative paint can be, but one of my favorite aspects is one hue isn't going to be more or less expensive than another. This deep green-gray color we chose (Sherwin Williams Thunderous mixed in HGTV Home by Sherwin Williams Infinity Line at Lowe's in a Satin finish) is really rich, unified our kitchen added a lot of depth and made everything look a lot more intentional (and even more expensive) for very little money (we also added a bunch of this shiplap vertically as our backsplash and wooooooow! It's a really amazing product that actually comes pre-painted white, but we painted ours the same green as our cabinets. Back to that...
Painting cabinets sounds really daunting, but this is our 4th time doing it and we're pretty confident we came up with a system that anyone can do. We even had my niece and nephew (both 17) to help us and they nailed it! Whether you're planning to eventually swap out your cabinets or they're going to be there for the long haul, this tutorial is for you. And there's a few time-saving (and sanity saving) tricks we can happily pass on! It's even the perfect weekend project if you time it right.
Shopping List--Here's what you need to paint your cabinets!
Paint: We used HGTV Home by Sherwin Williams' Infinity line in a Satin Finish available exclusively at Lowe's. It's an advanced hiding paint and primer and promises a one-coat perfection (we did two just because ), flawless finish and lifetime protection. It's the creme de la creme. Lowe's also carries an enamel paint specifically made for cabinets that has that dries super hard, but it only comes in a semi-gloss finish. Since we were trying to minimize some of the antiquing done to our cabinetry, we were happy to go with a lower sheen (Tip: the higher the sheen, the more imperfections will shine through, so if you have textured walls; or erm, cabinets, a lower sheen will minimize that!). The good news is that our paint dried hard with no tackiness at all--so far, so good!
Primer: No sanding required, but don't skimp on the primer (even if the paint boasts it has a built in one). This is what is going to make the paint on your cabinets last! Also, primer is significantly cheaper than paint, so a coat of primer will actually help extend your paint coverage. We really love Zinsser Bulls Eye 1-2-3 Interior/Exterior Multi-purpose Water-based Wall and Ceiling Primer. It's designed for all surfaces (interior/exterior drywall, concrete, wood, non-galvanized metal), dries quickly and my favorite--adheres to glossy surfaces without sanding. Tip: If you're going for a dark paint color like we did, the paint counter will tint your primer dark for you for free! It definitely cuts down on top coats.
Liquid Deglosser: No need to sand your cabinets and make a huge mess when you use this. We've tried a couple different brands and really prefer this Jasco Easy Liquid Sander Deglosser. It works on paint, varnish, enamel, lacquer, polyurethane, and stain--you name it. We've used it on cabinets, wood moldings and doors with great success.
Paint Applicator: You have options here. You can brush/roll by hand or you can spray. Spraying will give you the smoothest finish by far, which will help extend the life of your paint job, but it will require a bit more of an investment up front. Whether you go the paint sprayer or brush route--here's what we'd recommend.
- If you're going to brush/roll: Only brush the inset edges and do that first. I love this Blue Hawk short-handled brush. It's comfortable and easy to control. But the real MVP is this Whizzlock mini foam roller. It rolls on an even, smooth finish.
- If you want to use a paint sprayer: We've tried so many paint sprayers (two for this job alone) just because we feel like testing and providing feedback is a part of our job. This Graco Magnum Painter Plus Electric Stationary Airless Paint Sprayer is the best of the best. I was using a smaller paint sprayer to paint the cabinet fronts and it was taking about 30 minutes for each coat and then Chris painted our entire kitchen in, literally (literally!) 12 minutes with this paint sprayer. There's no watering down or thinning the paint. It sucks it right up from the gallon so there's not a ton of mess. No air compressor needed and it connects to a hose for fast and easy clean-up. This thing is tops. Couldn't recommend it enough.
- Of course the downside to using a paint sprayer is there is a LOT of taping off involved. I swear it took us 6 hours to tape everything off that we didn't want sprayed in our kitchen. But! it's always worth it when the actual painting takes less than 30 minutes total. (Plus, it's fun). If you're using a paint sprayer, add painter's tape and plastic and canvas drop cloths to you list to cover everything and some builder's paper for the floors and countertops!
Plastic Wood (optional): This was one extra product that we used to help fill heavy knots (the kind that have holes in them) and old hardware holes we weren't going to use again. It's the consistency of peanut butter and you'll apply it with a spackle knife. It dries really hard and then grab a sanding block (I promise the only time you'll touch one and it's only if you NEED to) and sand off the excess. Also, I'll save you some confusion--it's supposed to be stored upside down so the label is placed that way.
Okay, okay--so what exactly is the process?
HOW TO PAINT YOUR CABINETS IN A WEEKEND WITHOUT SANDING THEM
- Remove all cabinet doors. Tip: A piece of painter's tape with a number on it that matches a piece of tape with the same number on the back of the corresponding door will save you a lot of headache when you're done.
- Decide if you're going to paint the backs of the cabinet doors. We chose not to for our base cabinets because they weren't painted on the back originally, but we did for our uppers because they will be opened a lot more it feels like. If you're going to paint the backs of your cabinet doors--paint that side first! Place all cabinet doors up off the ground so you can easily reach the sides. We used Dixie cups to prop ours up and it was inexpensive and effective.
- Time to Degloss! You can just pour the liquid deglosser in a bucket and go to town with a sponge or rag. There's no need to rinse, there's virtually no odor. It also degreases so I kind of just combine the cleaning/deglossing step here. We used this on both the cabinet doors and boxes. I would recommend gloves and a mask.
- If you've got any knots or old holes you don't want anymore, now's the time to fill them with the Plastic Wood. Once dry, sand off the excess and remove any debris with a microfiber cloth.

- Primer time! I see a lot of people skipping this step and I kind of feel like it's the most important one. During this project I got a lot of paint and primer on my hands and guess what stayed through multiple showers and hand-washings--the primer! It's the glue. A good primer trumps it all. We started with our cabinet doors and then primed the inside of the kitchen and by the time we were done with the the doors were ready to get the first coat of paint. The Zinsser primer we love is ready to paint over in about 30 minutes!

- Painting. This is the finish line, but don't rush it. If you are using a paint sprayer, keep it moving and just plan on doing 2 coats (no matter what the can says). If you choose to paint the inside of your cabinet doors, do two coats (our can says to allow 2 hours between each one, but we only waited about an hour). But! Before you flip the doors over, I'd wait overnight. It would be a complete shame to ruin your paint job at the finish line.In the morning, flip it over and do two coats on the front, 1-2 hours apart and then let it sit at least 24 hours before reattaching the doors to the cabinet boxes. I recommend doing the fronts after the backs because that extra curing time will ensure there's no imperfections on the fronts.We painted the cabinet boxes the same day as the primer, so there was 48 hours of drying time before the doors and boxes were reunited. No stickiness or issues like that. Follow the instructions on the can for full curing, but for the INFINITY paint we used, it mentions to wait 14 days before washing the coating. So although it feels dry and hard--it won't be fully cured for 2 weeks.
- You're done! Reattach the doors and pop on some fresh hardware to really drive the new look home. We're using these gorgeous and inexpensive brass knobs (the online pictures don't do them justice) that are really gonna pop off the dark cabinets.
We hope this empowers you to take on the task of painting your cabinets! It's so transformative.
The color we chose is the definition of a chameleon color. Sometimes it's sage-y. Sometimes it's charcoal. Other times it leans blue. We love how it changes throughout the day. Our to-do list is not quite finished, we added a few shelves yesterday that still need paint and I'm determined to paint the wood window trim, along with bringing back in all of our plates and styling this kitchen! Can't wait to show you the afters--I think with all the accessories in it and hardware--it's going to look completely different than even these photos!!
This post is in partnership with Wayfair
I'm sorry I've been a little absent on the blog this week. We've been busy trying to wrap up our kitchen for a big Thanksgiving shoot next week and I've been mostly sharing on Instagram. I saved the whole thing in my highlights if you missed it! Then I got bit by some sort of spider (it's bad) and Chris's grandpa passed (it was expected, but we're also hosting family) and this week kind of got away from me.
But I wanted to check in because a few weeks ago we shared a mood board for the direction of our bedroom and I ordered a couple things (okay, basically everything but the bed) and as of yesterday it all arrived. But as of a couple weeks ago, the direction of our bedroom changed pretty drastically when we decided to swap the direction the bed was facing and add french doors and a balcony. As excited as I was--am--about that, I was a little bummed that the pieces we picked and ordered for our bedroom might not work as well.
On the bright side, they still might. And I guess even if they don't, the pieces we ordered are classic and can work in a variety of rooms and applications. We just unboxed the dresser yesterday and it was heart eyes at first site. Truly, I can barely contain my excitement over it and I'm crossing my fingers we can make it work in our bedroom after the big changes. Even Chris said, "Well! That's beautiful!" Dressers are one of those things that always look a little awkward to me, but this one is so good. In person, the wood grain kind of peeks through the black and the brass hardware is chic and unexpected!
The best news is that the dresser AND rug we have here in our room are a part of Wayfair's big 48 hour August Clearance Event happening this weekend, along with a lot of other great pieces across all of their sister companies too-- AllModern, Birch Lane, and Joss & Main. They're calling it their black friday. Our dresser is 20% off!! Sharing a few more favorites below!
The rug in our bedroom is a whopping 46% off!!
This rug we used in the Fullmer's kitchen (it comes in a lot of sizes) is over 50% off! Just $213 for an 8x10!
And speaking of bedrooms, snatch up this duvet insert for 67% off--under $40 for a king (normally $119)!! It's a great one, too.
Lighting Blowout up to 65% off!
Bedroom Furniture Blowout!
Everything from dining furniture to outdoor furniture (and covers!) are on sale for this weekend only! START HERE. I'm taking advantage and casually shopping for a bed for Faye, and this velvet one is too good.
Hope you all have a great rest of the weekend!
This post is sponsored by Minwax.
Note: For those that are following our renovation closely, know that this was written and scheduled before we started demo...and even painted. Wow!
Maybe you remember and are hearing this for the 25th time or maybe you aren't aware, but we sold 99.9% of our furnishings with our last house and have been living blissfully (and echo-y) with less since moving in at the beginning of June. For the most part it has actually been great and my only regret when staring at the tower of boxes filled with.....what? like what is in those boxes?!...is we didn't have time to have a big garage sale before we left and purge even more.
But on the other hand of that is feeling settled and at home for me does involve a place to prop up my feet. Sinking into a couch and placing my drink on a coffee table while I chat with family and friends at the end of a long day--I was missing that. We didn't want to buy living room furniture until we got the renovations underway (starting any minute!) but I still wanted to create a living room setting, even temporarily, so when we have people over, they can sense our warmth and feel good in our home.
We're using Jordan's couch from Article, and I brought this lamp with us but it was feeling super bare. Out in the garage, I found an outdoor coffee table we got years ago but it LOOKED like an outdoor table to me. The raw teak wood and black legs combination just felt a little out of place. We set out to give it a makeover in an hour!
Since the legs are so interesting, I wanted to keep it simple. Black on black. But before you reach for black paint--BLACK STAIN ADDS SO MUCH MORE INTEREST when you have a really beautiful wood. It allows the wood to breath and the grain to come through and even a lot of the warmth of the wood shines through in the end result. In summary, black stain is tres chic.
Since this was an outdoor table, it was treated with a finish to allow it to be outdoors so before staining, we sanded it down really well and wiped off the dust.
For this table, we decided to use Minwax's True Black stain is the little black dress of stain. It's classic. It's neutral (not too cool or warm) and it really enhances the wood and creates so much depth.
Going with the grain, we applied the stain with a foam brush and wiped it off after about 5 minutes.
Repeat, repeat until the table is finished! Because stain is meant for layering, we saved the sides for after. A few years ago, in a staining project we did the sides first and some got on the top and when you layer on the top, it can look darker in those areas. So we're always careful to do the most seen side first--the top in this case--and allow any layering that's going to happen to be on secondary planes.
You can see below what one coat looks like. We decided to do one more coat for just a little more depth.
And then finish with a 3 coats of Polycrylic. This is our favorite water based protective finish! It dries so fast, isn't stinky and cleans up easily. Drooling over that wood grain peeking through.
Here's the finished top! Isn't it the most beautiful moody table now? That's the magic of stain. You still get the beauty and depth of wood, even in a black.
rug | sofa | coffee table | rattan tray | greenery | black stain | jeans
Why I really had to have a coffee table? I just needed to get my styling muscles moving. (jokes!) It feels good to have a surface to anchor our temporary living room and giving this table a second life as equally as rewarding.
Last week we introduced our phase 1 kitchen renovation and we wasted no time diving in. Our first item of business was removing cabinetry and trim that we really didn't need to open up the kitchen a little bit and also rearranging a few cabinets that we did want to keep but just wanted in a different location and height. If you have staggered cabinets like we did, or just a LOT of extra cabinetry, taking some down or moving them to all be level is relatively easy--but may snowball into more projects, especially if you have a tile backsplash. Luckily, we have that on our short list for this phase 1 renovation, too.
After removing and rearranging, here's how our kitchen looks now:

Okay, I know, it looks worse in some ways. Haha. But it's gotta get worse before it gets better. Before we dive into what's left to do (ahem, a lot), here's a recap of what we did--you can also watch it in video form in my Instagram Story highlights.

We removed all of the upper cabinets, and the dip down desk area in the kitchen. We also removed the embellished trim around the range area. We got extremely lucky here because we assumed the walls would be unfinished behind the trim but it must have been added way after the fact because the walls were in tact and painted like the original walls were. It felt like the biggest win!
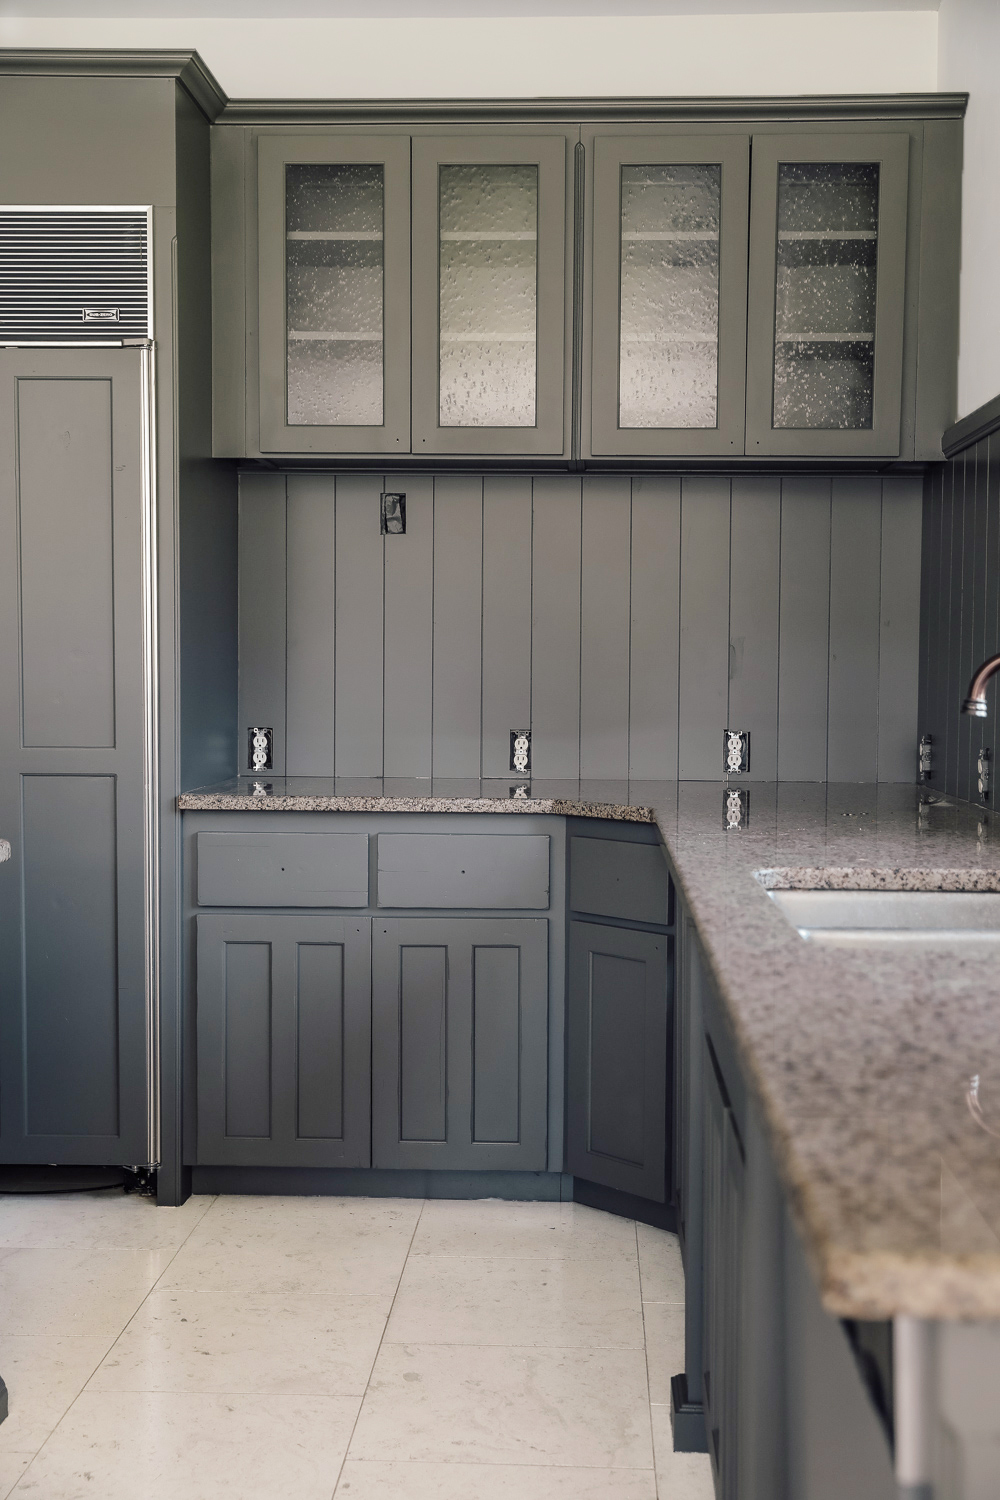
Even though we felt the glass front cabinets crowded the range a little too much over there, we loved the seeded glass and they were just about the right size to fit next to the fridge! At the last minute, we decided to hang them a smidge higher (our ceilings are a little higher than 9 feet in here) and add trim to the top of the fridge to make them all level and really take advantage of these taller ceilings. We'll also be trimming out the cabinetry (we saved all the filler pieces!) so it will be flush from wall to wall.

Here's what else is on our phase 1 to-do list this week:
• Trim out upper cabinetry and Refrigeratior
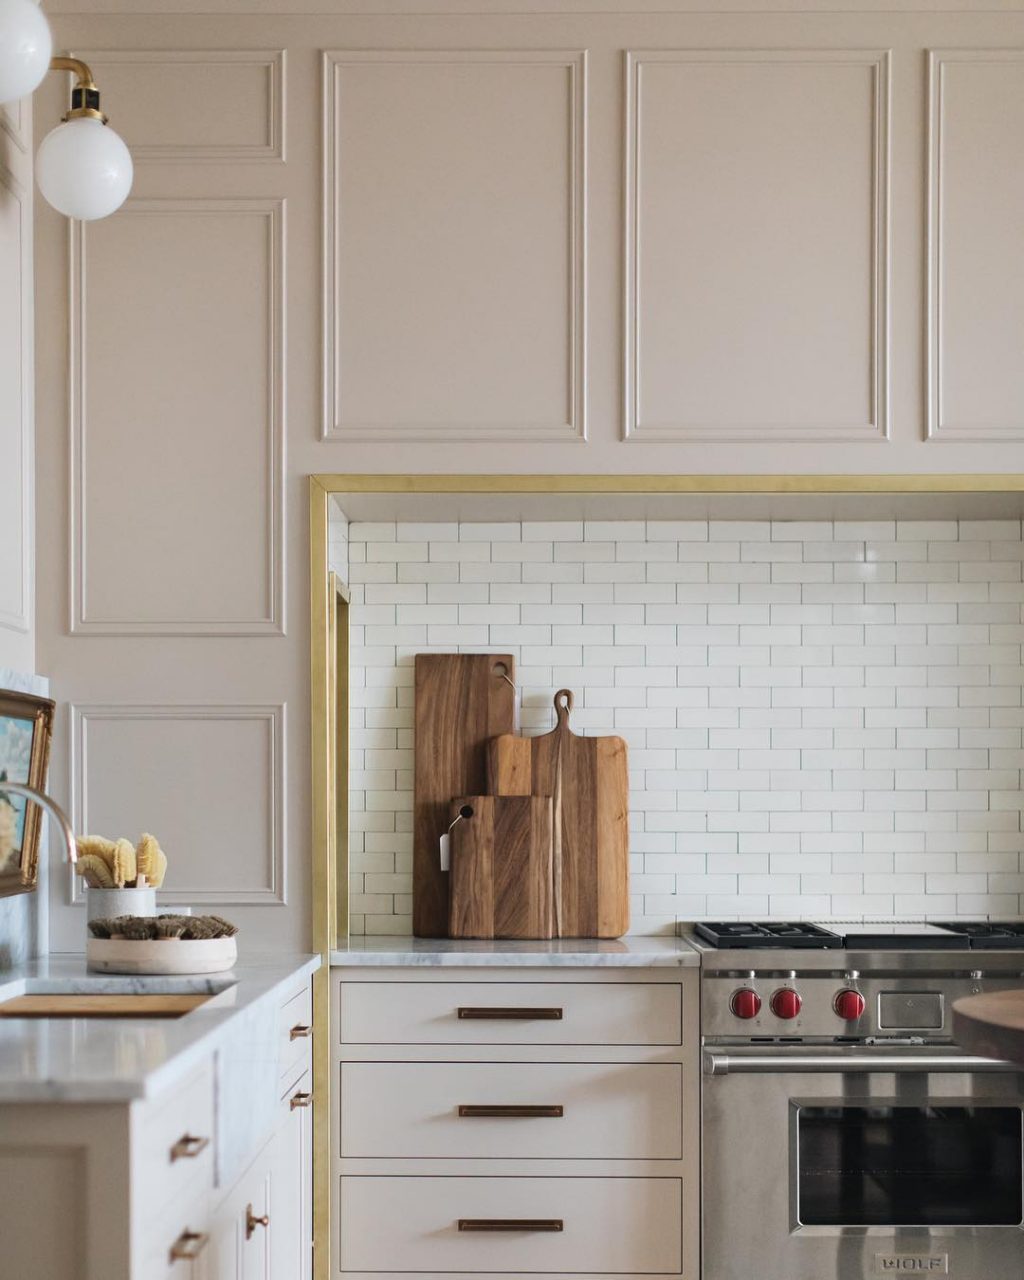
• Remove tile backsplash and hang beadboard. We were going to try to make this tile work, but it got damaged in a couple places when removing the cabinets (which are worth more than the tile anyway) and it kind of clashes with our new trim color. We took a note from on of our inspiration photos (below) and are going with beadboard painted the same color as the cabinets.
• Build a shelf under the glass front cabinets for extra pretty storage. We did this in the Baltimore kitchen and it ended up being one of my favorite little details about it, so we are excited to repeat something similar here!
• Degloss cabinets, Fill knots, Prime and Paint!
Last week I showed a bunch of examples of paint colors/vibes we're considering for our cabinetry and over the past few days I've held up so many swatches in our actual kitchen and came to a conclusion. I thought it might be interesting to walk you through how I got there.
My two favorite from last week's post were Farrow & Ball's Mouse Back
And Sherwin William's Pewter Green.

Which actually could not be more different. But I pulled both samples and held them up in our kitchen to see how they looked. I can't express the importance of being inspired by something and making it your own rather than saying--Emily used Pewter Green so I'm going to use Pewter Green. Because the truth is--it will not look the same and you might be disappointed! Instead be inspired to use a green-y gray or a warm taupe/brown and find a color that works in YOUR space.
The biggest challenge (?) obstacle (?) for us are our brown granite countertops. But we're committed to them for now so I wanted to make sure this phase 1 paint color was all about making them work. The taupe-y browns (mouse back is vertical below) I actually loved SO MUCH and it worked really well with our countertops, but it felt like a lot of brown next to our countertops, especially since we wanted to carry the color up with the beadboard.

Next I checked out Pewter green (pg 217 below) and it was much too cool for our countertops. I needed something to blend a little more. So I started looking at neighboring cards. Generally neighboring color swatch cards will gradually go one color direction. In this case--to the right went more green and to the left, blue. Right in the middle of Pewter Green and green-y greens, there was a card that contained a lot of great gray-d out warm greens and I was immediately drawn to them.
Below you can see the comparison between 217 (where Pewter Green lives) and 216 (that's a lot more neutral but still definitely green undertones.) It's almost like I mixed my two inspiration photos together and came out with this card. Chris and I narrowed it down to Link Gray and Thunderous pretty quick.
After holding it up on every plane and direction in the kitchen, we decided on....Thunderous! because this room gets a lot of natural light and can handle a deep color.
We'll definitely share our whole painting process as it happens on Instagram and a full how-to here! It's going to be an exciting week!
This post is sponsored by Blinds.com
When we finished the Fullmer kitchen a few weeks ago, there was actually one element that we were still waiting on and a few of you guessed it--window treatments! After the new windows went it, it was hard to think about covering them. But the truth is, good window treatments don't cover windows, they compliment them. That is what ultimately lead us to the beautiful, Deluxe Woven Wood Shades from Blinds.com.
We ordered a bunch of samples from Blinds.com (you get the first 10 free!) and quickly narrowed down our nine favorites. NINE!
San Lucas Flaxseed
Covington Silver
Mandalay Liana
Capri-Natural
Milos-Cotton
Kula Coconut
San Lucas Lichen
Linen Stripe Blue White
Hampton Barley 001
When we shared a few of our favorites on Instagram, there was a big push from the majority of our followers over there to use the Linen Stripe option and I get it--it's gorgeous!! The Linen Stripe Vanilla-Stone on top of the pile to the right is equally so. But when it came down to it, we were looking for a supporting character. We were looking for a shade that would block the glaring sun sets at night, add some subtle texture and warmth to the room, be beautiful and complimentary when closed. When we held the samples next to the other wood tones and finishes in the room, the Capri-Natural Deluxe Woven Wood Shade was the winner! We did the cordless option (the only way to go with little ones!) with a light-filtering backing.
It arrived and the installation was a breeze. It took Chris all of 10 minutes to get both hung.
Isn't that texture dreamy?? The shades are so easy to pull down and push up and they actually ADD so much to the space.
It's a warm, textural, quiet softness the windows desperately needed. They connect the other wood tones and really soften the windows. Don't be surprised if we use these same shades all over our new home now!

We carried the same shades into their living room to cover their HUGE window they had there. Because the window was so large, we had to use two shades together, but it works well and the Fullmer's love the ease of blocking out the afternoon rays now.
Blinds.com is having a big summer sale, up to 40% off site wide through August 4th so now is the perfect update your window treatments. (I'm gotta use that pinstripe one SOMEWHERE!)
Ps! You can see the rest of the kitchen sources right here. And the budget breakdown right here. And the look for less here.
Next year sometime, we'd love to do a full kitchen remodel. We're taking notes as to what isn't working for us, but so far the main things are the interior of the cabinetry is too small, the oven behind the island (where the girls sit) feels out of the way and dangerous and we'd like to rearrange most of the appliances and be able to access the pantry from within the kitchen instead of around the corner. The island is big and bulky. It's all really exciting, but we're taking a year to save up and plan and continue taking notes to see what is and isn't working. In the meantime, we're gonna give our kitchen a quick and inexpensive phase 1 makeover. Here's how it looks now:


There are a few things that I think are really making our kitchen look dated: the tri-color cabinetry in a high-gloss, distressed finish, with a glaze on the island. Uppers hung at multiple levels (nothing dates a kitchen faster). Partial overlay cabinet doors and full overlay with shaker and beadboard mixed in and all the ornate trim work. We're going to try to minimize all of these things in our phase one renovation, and address a few other things, too. But first! The color. Our brown granite countertops are staying through phase 1 (womp womp) so that's the main thing we're working around. Our white-ish tile floors are also staying until the full renovation probably next year.
We have a big video/photo shoot for THANKSGIVING (how?!) in our home mid-August--in just a few weeks!--so we are under a tight timeline to make this look a little more like us and we're getting started this week. Paint is a great way to update a space on the cheap and just requires a bit of a time investment. We're also going to be reconfiguring the upper cabinets and removing some. We'll definitely share the whole process here when we're done (and lots of sneak peeks on Instagram stories, too) but for now, I'm just trying to decide on a color.
Here are the colors I'm considering and the inspiration photos I'm drawing from:
1. A Warm Taupe-y Brown
I was first turned onto this color years ago when I was researching for our last home's kitchen. This kitchen from Traditional Home, designed by Christopher Peacock, below has been saved ever since and now might be a fun time to give the look a go. The color here is Farrow & Ball's Mouse Back.
Recently, Brittany Chinaglia used a similar tone (Farrow & Ball's Salon Drab) at her new Vintage Rug Shop store (in progress) and I fell in love all over again.
I think this would work well with the existing countertops but we would definitely need to add a more streamlined, modern element to the kitchen to pull this off with our current cabinets. Maybe fresh hardware would do the trick.
2. A Green-Blue
I really am into this cabinet color for our home and the cottage vibe we're going for. It being the trial run, and working with a lot of existing things, I must say I'm worried to try this and it not work with the countertops (for instance) and it turns me off of it for the future. But, then again--is that even possible?
Emily Henderson really nailed it with this perfectly grayed-out green (Sherwin Williams Pewter Green) in her Portland kitchen project. Please note that all of the upper cabinets are lined up so nicely. Haha.

Or something a little deeper/inkier like this beauty from deVOL kitchen. (I believe the color is Farrow & Balls' Pantry Blue)
The House of Silver Lining used Pratt & Lambert Essex Deep Green in their laundry room and it is easy on the eyes.
3. Something Light.
We aren't very accustomed to a light kitchen after having black cabinets for the last few years (that we loved and would absolutely do again in a heartbeat but also want to try something new) but maybe now is the time to try.
These light gray cabinets from Amber Interiors feel fresh but classic thanks to a traditional hardware.
Jean Stoffer used a light beige in her storefront kitchen, Stoffer Home, and I've basically pinned every angle. We could even extend our trim color here if we wanted to! (I'm not sure of the exact color here, but our trim is painted Sherwin Williams accessible beige at 75%.)
I can't do white because of our current tile floors. But I feel good about the options here. Although my mind is racing and part of me just wants to rip out the entire kitchen now (like, a big part of me), I love the challenge of working with what we have. I love the idea of seeing what we can do with $1000 (that's the budget we've set for ourselves for this makeover) and a couple weeks' time.
Can't wait to take you along for the ride! Any favorites from above?
This post is sponsored by Pottery Barn's Sustainable Collections
When school got out at the end of May, we decided we were going to do a screen free summer for the girls. No iPads, TV, stealing our phone to watch a show at a restaurant (even the baby when she got fussy!). To be honest, I didn't really announce it because I wasn't sure how it would go. It seemed to somehow become part of our and their routines. It started with just 30 minutes of screen time a day and then it grew to an hour. And then they'd sneak it before school. We noticed their moods weren't great, their attention was worse and their creativity was plummeting. There was tension in our home and it was our responsibility to take a step--a leap, really--to change it.
At first we weren't sure if this was the time to try it. We were moving away from all of their friends and Chris and I were going to be really busy trying to get settled in a new house, but I am SO glad we did and stuck with it. So much so that I'd love to extend an invitation to all kids: FINISH THE SUMMER SCREEN FREE! It took about a week for them to stop asking for shows and devices and their moods improved drastically almost immediately.
Our girls haven't made many friends yet, but they are playing together now and rediscovering their toys and getting up and running outside. Our personal parenting style is not so much to create fun for our kids. We aren't in charge of their happiness or boredom or creativity. But we do provide opportunity and tools and support!
Sometimes that looks like a pack of traffic cones that they could set up and create a course for their bikes. Letting them help make meals. Giving them opportunities to earn money (we pay a quarter a chore around here!). Unpacking the craft box before anything else. Teaching them how to play sardines or a fun card game and letting them loose. Lessons for something they're really interested in (Greta is taking Horse Back riding this summer!). A blow up pool! FREE TIME. Like literally schedule nothing. A library day once a week and a new lounger under the trees to read.
Isn't it amazing what a piece of furniture in the right location or even a new location will do? (Seriously, go move a chair into a new corner and I bet everyone wants to sit in it!) We got two of these Indio Mesh stacking outdoor chaises last month and put them under one of the trees on our property and it's like we built our family a clubhouse. They are perfect for lounging, reading, chatting, warming up after the pool. And Chris and I love to relax after work (screen free ourselves!) and just watch the girls play. The chaises are a beautiful part of Pottery Barn's sustainable outdoor collection.
We can change our homes and the world by making responsible decisions one at a time. Pottery Barn is watching out for their family (and ours!) by consciously choosing to shrink their ecological footprint and protect the health of their customers and factory workers — from sourcing reclaimed and recycled materials to partnering with organizations that restrict the use of harmful chemicals.
The list of environmentally friendly products is constantly growing and Pottery Barn is keeping up, selling sustainable products including organic bedding and bath textiles; recycled PET flooring and rugs; reclaimed-wood furniture; eco upholstered beds and sofas; and lighting made from recycled glass, to name just a few.
Here are a few favorites from their outdoor collection (bonus: most are on super sale now!)
1. Indio Outdoor Sofa $1,004
2. Rectangular Outdoor Umbrella $331
3. Indio Occasional Chair $535
4. Indio Storage Bench no longer available
5. Indio Buffet $561
6. Hampstead Painted Stacking Dining Chair $92
7. Hampstead Painted Extending Dining Table no longer available
8. Ibiza Occasional Chair $286
9. Bamboo Kitchen Compost Bin $39
10. Indio Extending Dining Table $799
11. Indio Porch Bench $374
12. Indio Side Table $224
13. Ibiza Sectional Set $1,457
14. Indio Coffee Table $336
15. Round Outdoor Umbrella $104
16. Hampstead Painted Occasional Armchair $465
We'd love to have you on board for the screen-free kids challenge for the rest of the summer--let me know and we can all support each other. And hey, maybe treat yourself to a new sustainable piece to celebrate with. ;)
Arched Mirror | Area Rug | Pouf | Heels | Jeans | Homebody Tee
Well, I haven't ordered a bed for our master bedroom yet, but we did get this amazing arched floor mirror from Rejuvenation that has doubled the size of our room, I swear. Here are some other fun arch mirrors!
1. | 2. | 3. | 4. | 5. | 6. | 7. | 8. | 9. | 10. | 11. | 12. | 13. | 14. | 15.
I also somehow ordered two beds for Greta's room. That's right--two! Currently, we have a king mattress in Greta's bedroom and a queen in Faye's since Greta's room has an en suite bathroom, it serves as a great second guest room and then Greta and Faye could bunk together in the case of lots of guests. But! This week, we welcomed Chris's brother's family for a few days and they all stayed in Greta's room and we kept thinking how nice it would be to have two queen beds in there, on either side of the window and move the king bed to Faye's room. Greta's doubly excited about the idea because we often have her cousin (similar in age) sleepover and this means they can each have their own bed.
Below is Greta's room before we moved in:
Here's Greta's room after hosting family this week (we brought in another queen and twin mattress):
So I have unofficially started designing Greta's room in my head and purchased two of these gray Jenny Lind beds (so gorgeous and classic!). We also keep hitting our heads on that light fixture so that has to go sooner than later. I have a lot ideas for the space, a pretty wallpaper on all the walls and maybe some trunks and the foot of the beds. But none of the designs include the red carpet that is currently in place. We may replace it sooner than we planned just because it's so busy and hard to work around. But I'm also trying not to put more on our plates right now. We're starting our mini kitchen makeover next week! (more on that next week!), so perhaps a pair of new beds and a new light fixture will work for now...or maybe I'll just make a mood board to whittle away at. ;)
Other fun things this week
• We got a surprise call from our contractor on Wednesday saying that they would be starting demo yesterday instead of in a few weeks! We were happily surprised and cleared a few rooms immediately. They really only prepped yesterday and hopefully will get a good start today. I realize I still owe you concrete plans of what we'll be doing and that's coming. We've been working with a great architectural draftsman (Sundance Drafting & Design for you locals) to help put all of our ideas to code and to paper and even 3D renderings to show you! We figured waiting until those are ready would be more helpful than trying to explain it all through just words.
• Speaking of kids rooms, this one (via @erinkestenbaum) is big time inspiring me for Faye's. it just feels so fun and classic and whimsical and Faye.
• The Nordstrom sale is public access now and you can see all of my picks here. But here's what I actually ended up buying:
- These heels I've had for over a year (in nude and black) and couldn't recommend them enough!
- This long black pencil skirt.
- These cut out booties in suede (although I really love the black, too!) to transition me into fall.
- These nike bike shorts!
- This black raincoat with a removable hood---I love the long length!
- This super cuddly UGG throw in charcoal that makes the best gifts.
- And this cozy oatmeal sweatshirt with matching joggers for lounging.
What about you? Get anything good?
• Tell me you've seen Tom Hanks as Mister Rogers. Tell me you cried, too.
• I've been meaning to upgrade my camera for a couple years and finally bit the bullet and ordered this Canon 5D Mark IV on sale. I can't wait for it to arrive!
• Lastly, we brought our favorite group game, LCR Wild, to the Marcum reunion last week (below is a photo I snapped of Chris and his whole family! He's the youngest of 8!) and played with 29 Marcums!! We told everyone ahead of time that we had a fun game to play and anyone that wanted to needed to bring 4 $1 bills. The game lasted 3 hours and we laughed and screamed the entire time. In the end--GRETA WON $116!! And it was like we all won--her reaction was the best. If you haven't played this game with a large group, it's a must. Here's more of our favorite games!!
Happy Friday!!!
This post is sponsored by eBay
eBay has been my favorite place to hunt for deals for a long time. It's just so amazing to be able to find brand new, vintage antiques, trendy and formerly out-of-budget pieces all on the same site. I don't generally bid on items (although that's a great way to snag a deal, too) but I love sorting for "buy it now" pieces. I am ALWAYS checking out the Daily Deals page--I found my camera equipment, including my favorite lens, workout clothes, my favorite Dyson--all from that page!
And when I am searching for something in particular, the search bar is my bff. This month, I purchased four things from eBay and they all kind of have a different background in how I found them so I thought it would be a good lesson in how I shop on eBay.
1. The first thing (errrr things) I bought were 2 vintage hand-knotted persian runners from this eBay store. I LOVE the look of vintage rugs and they are so great for disguising dirt and spills, but it's really hard for me to spend a fortune on one right now with a bunch of little kids. This eBay store frequently has Buy 1, Get 1 35% off, so I was able to get both extremely large runners (4x10 and 3.5 x14) for our home for right around $600--a steal for real-deal vintage persian rugs. We have a lot of long walkways in our home that these will cover. Each has already been professionally cleaned, too! They're so good, right?!
2. My second eBay purchase this month was a Dyson Supersonic Hair dryer. I've heard amazing things about it--how it dries your hair really fast without damaging it. And even promises to increase smoothness and shine while cutting frizziness and flyaways (I have EXTREMELY kinky hair so this was a big one for me). But even with all of those promises, the $399 price tag was not something I could swallow.
But! I found it on eBay through Dyson's eBay store (exactly where I got all of my other favorite vacuums) and they are having a sale, plus an extra 20% off with code JOY4DYSON making my new beloved blow dryer $223. It does EVERYTHING it promises, has cut my drying time by probably 60% and my hair feels so much healthier and it cut down the frizz so much, I'm impressed.
3. Coupons! I've said it before and I'll say it again--I LOVE to buy coupons on eBay for my favorite retailers, before making any large furniture purchase for our home. You can just search “______ coupon” (insert cb2, wayfair, pottery barn, crate and barrel, west elm, serena & lily etc!) Even if the coupon is $2-$5, you'll usually save between 15 and 20%. I’ve saved hundreds and hundreds of dollars by doing this. The seller information, and rating, is always listed on the right hand side. In the example below, you can see that the seller has almost 100% positive feedback so I would have no hesitation buying this coupon.
Besides that, I always make sure that the coupon can be used on furniture and sometimes it can only be used on full-priced items and can't be stacked with sale (sometimes it can). So just keep those things in mind. I also be sure that the seller will email me the code instead of shipping it so I can use it the same day. This month, I've bought a plethora of coupons as we begin to furnish our home and every time, I think, I HOPE EVERYONE IS DOING THIS!!!!
4. The last thing I bought was a Fjallraven Kanken Classic Backpack. These trendy, durable and waterproof packs are the perfect size and the colors are so good. They normally sell for around $80, but a bunch popped up as a daily deal for $54 and I pounced! I originally got it for packing to the park or pool because we're just about grown out of our diaper bag days (is this real life!?), but Greta has already claimed it as her own for school.
Have you got anything good on eBay lately?! Here's a few favorites!
A few weeks ago, when I introduced our new table, I mentioned that I also bought new dining chairs but they hadn't shipped yet and I didn't want to risk putting them on backorder for too long by sharing them before they arrived. But now that they're here, I just want to plaster their picture everywhere because, man, they're good.
If you've been paying attention, I hinted in this post that caned dining chairs were the it chair of the year and I was on the hunt for some for our dining area. I looked for a few weeks and added many to my cart on a lot of different sites, but could never pull the trigger. That's how I know I haven't found the item yet. We were ready to buy dining chairs, we set aside a budget, but I just hadn't found the ones that made me worried they would sell out before I bought them--you know the feeling.
These popped up new on cb2 and I couldn't order them fast enough. They were the exact shape I was looking for--a nod to the past, but refreshed. It's kind of the whole vibe we're going for in this home. The frame is a shiny black beech wood with a natural rattan back and a plush black boucle seat. I was a teensy bit worried about an upholstered seat with kids, but it being black eased a lot of my concerns and we're going to spray the seats with scotch guard as an extra precaution, too. The seat is firm, but so incredibly comfortable.
Although there are six around the table here (and I think we'll keep it that way for every day use) I actually bought 7 chairs since we could fit one more easily and I wanted to have a matching spare. Plus, this chair is so cute it would look amazing by itself tucked under a painting, in an entry, or corner of a bedroom. It has so much personality it could definitely stand on its own.
And although this post is more about the new chairs, I'd be out of line if I didn't point out the sneak peek of the fresh paint job that's happening here! The paint is still in progress and taking a little longer than we thought, but every day it's like we can breathe a little easier. We have a full post coming about it, but in case you're wondering, the walls are Sherwin Williams Alabaster and the trim is Sherwin Williams Accessible Beige at 75%.
Eventually we'll replace the flooring and windows but I'll probably paint the window sashes until we get around to that. And I'm currently on the hunt for a pendant to replace the current light. I'm thinking of a more solid pendant, with a vintage/industrial vibe. I think because the chairs are more of an attention grabber, having a light that's less busy will really balance out this breakfast nook. I'm rounding up favorites to share soon!
For now, here are some more caned dining chairs I love and considered!:
This post is sponsored by The Outdoor Greatroom Company
It's summer and we have been spending so much time as a family outside and even entertaining our family and friends. So, although a little ironic, we somehow have more lounge-y seating outside than inside right now. We are enjoying these warm months to the fullest and wanted to share some photos of our patio setup this year.
Our outdoor sofa and chairs were one of our very first purchases and we love them so much, we ended up buying an additional sofa (still waiting on its arrival). The cushions are a light oatmeal color but read almost white outside and somehow resist all dirt. We don't have furniture covers yet and through rainstorms and windstorms I've just swept them off with a broom. They are cozy and cushy and really substantial in person (you can almost fit two people in the chairs).
We have missed the outdoor fireplace from our last house but The Outdoor Greatroom Company recently sent us this 30" Cove fire table and we have fallen in love with it! It has really completed this living space out here. It lets off a great amount of heat (essential for our chilly Idaho evenings), and uses Crystal Fire® Burner Technology which produces a more natural flame pattern, is UL listed (meaning it has been safety tested to stand up to wind, rain, outdoor elements and still operate safely --I can attest to that!).
It's a two-in-one fire table and coffee table with the burner cover that makes this area even more versatile. We can serve drinks on it during the day and have s'mores after the sun goes down. We eventually plan to run a gas line to the fire pit but for now, we are just using a propane tank with a hose running to it. We'll get a cover for the propane tank in the mean time but right now it's just tucked behind an end table.
The fire table comes with a valve key, so it's really easy to operate. You just turn on the propane and then turn the key slowly to ignite the flame as big as you'd like.
These string lights were actually in place before we got here but I found the same ones on Amazon (with perfect reviews) and we've been so happy with how resilient and beautiful they are. We sold our new outdoor dining set with our house, but my parents moved at the same time and had no room for theirs so they passed it along to us and we've loved having dinner out here.
The best part about our patio is obviously the scenery. We fell in love with this property before we fell for the house and having a cozy spot to enjoy it has really made our summer special.
This space will surely continue to evolve but it's so great to start with a solid base. Updating the back of the exterior is the first major project underway. We met with an architect last week and can't WAIT to share the plans. It's going to be amazing. More on that hopefully next week!
My sister is getting ready to take on a cross country move to Seattle and facing the decision whether to pay to move all of her things ($$$$!) or sell it and start over. She, along with many of you, asked if we regret selling our furnishings with our last home. After 6 weeks of living here, I feel like I could finally share my thoughts on it.
Moving is emotional in a lot of ways and I'll admit not having furniture has probably added to feelings of being unsettled over the last month, but I also think it just takes time to get used to a place. We hadn't planned on selling our furniture or decor but when the buyer (moving here from another state) asked if we were open to it, we thought about it for a few days and decided -- sure, why not!
We knew from a previous move that furniture rarely transfers into a new space. (And that was made clear again when all of our rugs that we brought with us suddenly look tiny. ) But what made us say yes was actually thinking fondly of our previous home and a lot of the pieces in it felt like they belonged with that home. It would have been more sad for me to keep all of my furniture, move it here, get frustrated that it doesn't fit and then decide to sell it and replace it. Like maybe some of the fondness associated with our home or the pieces in it would be lost. Of course that's not always going to be the case, sometimes furniture will transfer fine and you can be set up and settled and give it in a new life in your new space and that's a sweet scenario, too.
Bottom line for us, although our new home is a little echo-y right now (with the exception of Jordan's sofa and our new rug ) , we don't regret selling our furniture and we're excited to choose pieces that feel like this home over time. In fact, I am a little bummed we didn't have time to have a yard sale before we moved and sell more...as I'm still staring at a basement full of boxes that I haven't even wondered what was in them once since moving here.
So how did we actually sell our furniture? How did it work? While keeping specific details private for the sake of the new homeowner, this is how it went down. The sale of our home was 100% separate from the furnishings sale. We received two separate deposits at closing. The buyer specifically asked for certain things in our home and then said he had $x set aside to purchase other furnishings. Of course it was up to us what we wanted to sell and we priced things accordingly.
We made a spreadsheet in excel, divided by room, of each item we would sell in that room. We wrote the original retail price and then what we would sell it for (depending on condition, wear, and honestly how attached we were to it). For instance, our short wood round coffee table in the green room I really loved and would have brought with us. We purchased it for about $1500 and I priced it at $1000 and the buyer decided to purchase it--which was fine! That was the price I would let it go for. Most things, we priced at around half the original cost, some things even less. Our kitchen stools had some wear and we sold all 4 for $50. We knew our dining table wouldn't translate to our new home so selling it for half of what we paid for it and not having to move it, saved us money, too.
At the end of listing the items for sale in each room we did a subtotal of what it would be to buy new vs. what we were selling it for and added everything up to show a grand total for everything in the house, too. In the end, the buyer pretty much bought everything on the list--I think the way we organized the excel sheet helped for sure.
It took 6 years and many iterations to get our last house just right so I'm not anticipating rooms to come together at once. Some spaces/pieces we are investing a little more in up front and some I'm completely happy with a phase 1 find for now.
Hopefully that answers some of your questions! If you were moving across the country, would you bring everything with you??
It's Amazon Prime Day and just like last year we are watching out for the best deals throughout the day and sharing them in real time on Instagram stories and updating this list below as well! There are different types of deals: things that will be on sale throughout the duration of the sale and flash sales that are unbelievable prices but limited quantities--they tend to go quick. We're keeping an eye out for our favorite blackout drapes to go on sale, Linenspa All-Season Down Alternative Quilted Comforter - Hypoallergenic. We also keep an eye out for gifts! These prices will be better than black friday so follow along @chrislovesjulia and keep checking back here if you aren't active on Instagram.
These sales are already live!
• Echo Dot $22 (was $56) : A great way to add Alexa to every room. You can even use it as a speaker and drop in to a room!
• Ring Video Doorbell Pro with Echo Dot $169 (was $298)
• Echo Input $14 (was $34) :This tool brings Alexa capabilities to any speaker!
• Fire TV Stick 4K $24 (was $49)
• 50" Toshiba Smart TV $304 (was $379)
• Instant Pot $55 (was $99!) I have never ever seen it this low of a price. This was the number one best seller last prime day and I bet it will be again. This is a great easy to use pressure cooker!
• Apple iPad 128 GB $299 (was $429) or you can get the 32 GB for $249 (was $329): This is the latest version, 9.7 inch and supports apple pencil. This is an INCREDIBLE price.
• Apple AirPods--latest model with charging case. $179 (was $199) : Chris and I both swear by these.
• Linenspa All-Season Down Alternative Quilted Comforter - Hypoallergenic 30% off!: A queen is just $25, A King $55! This is our favorite
• Opal Countertop Nugget Ice Maker $341 (was $418)
• Philips Sonicare Toothbrush $39.95 (was $69.99)
• Dyson Cyclone V10 Motorhead Lightweight Cordless Stick Vacuum Cleaner $379 (was $499)
• Keurig K-Mini Single Serve Coffee Maker (our girls love it for hot chocolate and cider!) $49.99 (was $79.98)
• Crest White Strips (my favorite) $27.98 (was $68!)
• New Balance Sneakers 40% off! Some are less than $30!
• Shark Rotator TruePet Vacuum $168.99 (was $399.99!)
• Sunjoe Pressure Washer $92.14 (was $144)
• Ancestry DNA Kits $49 (was $99) - we did this as a family for Christmas and it was so fun!
• Yeti Coolers 30% off!
• Oakley Sliver Round Sunglasses $34.94 (was $69.95!)
• Phillips Hue Bulbs + Amazon Alexa Kits Up to 60% off!!! We have and love these bulbs so much!
• Life Straw Person Water Filtration $9.98 (was $17.47)
• All-Clad Stainless Steel Cookware 30% off!
• Granite Mortar & Pestle $24 (was $37.48!) Chris uses his almost every day
• Melissa & Doug Wooden Fold & Go Farm Play Set $27.56 (was $49.99)
• Disney Princess Royal Doll Collection $70 (down from $100!)
• Exploding Kittens Game (one of our favorites) $14 (was $20)
• Melissa & Doug Scoop & Stack Ice Cream Play Set $16 (was $30!)
• Radio Flyer Lean & Glide Scooter $28 (was $40)
• River Run Floating Tube $12 (was $42!!!)
• Melissa & Doug Toy Shopping Cart $37 (was $58) Our girls have this and it's so solid! Takes a beating and they absolutely love it
• Sorry Board Game $12 (was $22!)
• Monopoly Deal Card Game $5 (was $8) this is a really fun one and much quicker to play than real Monopoly - only like 10-15 minutes per round!
• Ravensburger Evening in Paris 1000pc Puzzle $15 (was $22)
• Wooden Castle Building Blocks Set $12 (was $24!)
• Play-Doh 24 Pack $12 (was $21!)
• Fingerlings Glitter Monkey $6 (was $18?!?)
• 500 Chip Poker Set $31 (was $70!!)
• Vitamix Venturist V1200 $290 (was $450!) This specific product is a renewed product (used, but looks and works like new) - brand new this blender is $630!!!
•
We'll keep you updated! Anything in particular you'd like us to watch for??
1. Stripe Pillow Sham $25
2. Gray Rug $118
3. Velvet Accent Pillow $29
4. Small Forged Iron Bowl $19
5. Forged Iron Bowl $29
6. Forged Iron Serving Platter $39
7. Amelie Medallion Area Rug $49
8. Olivia Area Rug $134
9. Amelie Distressed Area Rug $49
10. 'In the Wild' Throw Blanket $119
11. Frayed Edge Stonewash Quilt $118
12. Fuzzy Throw $69
13. Embroidered Chambray Shower Curtain $25
14. Living Proof Set $55
15. Stripe Shower Curtain $19
16. Butter Dish $15
17. Hydroflask $29
18. Wood Cheese Board $49
1. Faux Leather Tote $45
2. Charm Short Necklace $49
3. Face Palette $50
4. Tortiseshell Hoop Earrings $23
5. Heart Stud Earrings $21
6. Ear Cuff & Hoop Earring Set $31
7. Sport Tank $20
8. Bike Shorts $25
9. Ribbed Tank $25
10. Sweatshirt $25
11. Knit Joggers $25
12. Pajama Set $42
13. Stripe Crewneck Sweater $44
14. Mesh Funnel Neck Top $19
15. Rib Hem Sweater $44
16. Fleece Pullover $49
17. Mock Neck Sweatshirt $39
18. Crew Neck Sweater $44
19. Leopard Cardigan $45
20. Cortez Sneaker $49
21. Midi Pencil Skirt $49
1. Leopard Bomber Sweater $97
2. Genuine Calf Hair Mules $54
3. Tiger Stripe Sweater $58
4. Cover-up Maxi $60
5. Plaid Fleece $99
6. Blazer $69
7. High Waisted Ankle Jeans $64
8. Faux Leather Leggings $64
9. Crop Wide Leg Jeans $99
10. Toby Flat $84
11. Loafers $69
12. Pointy Toe Bootie $84
13. Pointy Toe Bootie $84
14. Hunter Rain Boots $99
15. Rain Boot $79
1. Fleece Coat $129
2. Puffer Jacket $129
3. Raincoat $118
4. Trench Coat $146

WE'RE CHRIS + JULIA

Portfolio

Projects


