This is a post that’s been a long time coming and so many of you have asked about it, so we’re happy to share some progress in the girls’ bathroom downstairs.
You may recall our last update, where we moved the vents and drains. Since that was nearly 3 months ago (what?!), here’s a refresher of where we left off:

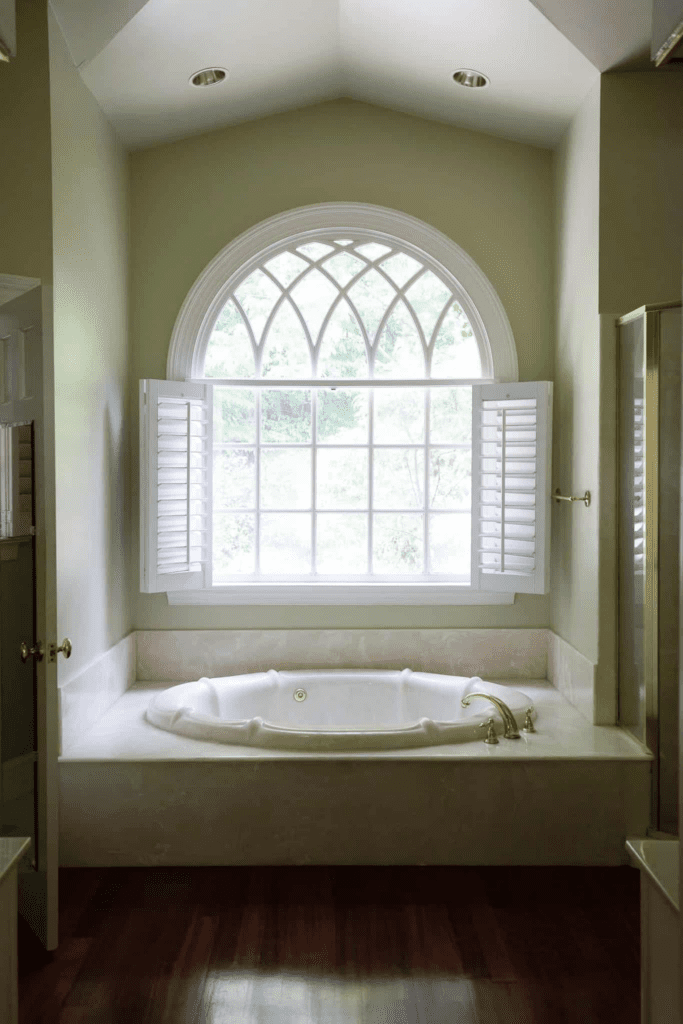
Since then, the concrete has cured completely, the water lines have been moved, the tub secured in place and framed out, and concrete board added. Here’s how it looks today:

The first things you may notice is the wall to the left of the tub. Some of you reading this are probably thinking, “Wow that’s great!” But it’s the rest of you I want to address right now – the ones who are thinking, “They just built a big square box in the corner? What a waste of space!”
To those of you thinking that, I totally get it. In fact, one reason progress in this room has been so slow, besides waiting on some backordered parts, is because Jules and I have been unable to let go of that same thought. I mean, it’s not a large bathroom, and we’re already taking up a larger footprint with a tub as opposed to the corner shower we ripped out. The original plan was to turn that corner into additional storage, with a cabinet door or open, recessed shelves or something. But every time we went to make decisions on cabinet door style or shelf depth or any other number of dependent things, it just didn’t jive. The opened shelves would be off-centered or a door would have to open into the vanity and only on the top half of the wall. It all felt off.

(Worry not, that vanity light will be replaced) After measuring, planning, and finally deciding on a vanity, we realized that the reason the cabinet/shelf idea wasn’t coming together was because it wasn’t the look we wanted, nor was it something we actually needed. We removed a second vanity from the other side of this bathroom, which gave us more than enough room to move the toilet and include more storage. And as soon as the idea was presented to simply close it off, and add recessed shelving in the shower on that wall, and simple towel rings on the outside, the rest of the plans clicked into place.
Of course we did utilize the corner for a couple useful things that make sense for us. First, we moved an outlet there to free up space on that back wall. But you’ll also notice these great shower wall niches we received from Dük Liner.

They were really simple to install – just a few sheetrock screws through the predrilled holes into our studs and cover the front with Durock.


We went with the Yellow Dük Liner, but they offer several shapes and sizes. The niches will be tiled for a custom look, while adding a bit of storage to keep the girls’ bath bubbles and Disney character shampoo off the perimeter of the tub.
And though we still have a long way to go, the finishes have been pouring in, including the vanity (not pictured) which is even better than it appeared online. :

Tub spout | Shower Head | Shower Curtain | Sink Faucet | Shower Valve | Mask Print | Beaded Mirror | Wall Sconce | Striped Shades | Floor Tile | Vanity | Cabinet Pulls | Drawer Knobs

Next on deck is tiling the walls, which we’re anxious to check off our list in the coming weeks and then it should all fall into place relatively quickly–knock on wood.

Hi :) I’m not sure what is the best way to contact you. Instagram or email, so I’m doing both. Sorry if that is too repetitive. I’m just wondering what tub you used for the girls bathroom, what style it is and where you got it. I love it, and it would work well with what I am needing. Thank you in advance.
All the source links should be in this post.
I’d love to know where the tub is from!! I read through the bathroom posts and couldn’t seem to find it. Thanks!!
It’s a kohler tub from Lowe’s
What kind of rug do you think you would put in there?
Good question! Hmmm.
Just curious what’s on the backside of the vanity/new bumped out wall? You could potentially access that space from the room on the other side, making it a built in dresser/bookshelf/closet or something custom that wouldn’t ‘waste’ that space, it would just not belong to the bathroom anymore (but it already doesn’t since you walled it up) and add function/storage to a different room. We did that at our old house, using space under a set of stairs for a triangular pantry…
I can’t wait to see when it is done… loving the tiles…