
The bathroom made a lot of progress last week and it all seemed to happen in one, big exciting day. Our countertop, backsplash, faucets, and mirrors all got installed the same day. And even though they were all the result of months of decisions and planning and some waiting, it felt like instant bathroom!

Months ago, we picked out our countertop from a local stone yard that had a great selection of quartz material (which is what we wanted). This particular supplier came highly recommended by our contractor, and after looking at a few other options we understood why. The quality is, of course, top notch; and the installation was perfect; but the best part was they only charged us for the square footage we needed, not for an entire slab of quartz like most stone yards do. If you live in Northern Utah or Southern Idaho, we used Valley View Granite.
While we were shopping for our countertop (that early in the process!) we had to pick a sink and even what we wanted the hole to look like. For our sinks, we wanted something almost square, with gradual sloping on the sides and a fairly shallow basin. From our experience, that’s the sweet spot in terms of convenience and cleanability (not a word) in a bathroom. Of course, if the basin is too shallow then you get splatter from the faucet, but we found these beautiful Kohler sinks on Wayfair that are perfect. We sent the dimensions to the countertop people and on game day (install day) the cut outs were perfect.

Over and over we were told that the undermount sinks are just attached to the countertop with silicone, but I couldn’t wrap my head around it because these sinks were so heavy. These particular sinks are metal, which means they’re a bit heavier than normal. So to prevent damaging the countertops from the weight, the installers did end up adding some supports on either side of the sink to relieve some of the stress on the quartz.

Once the sinks were in place, a little bead of silicone was added around the edge and the countertops placed on top. I caught the guys carrying in the countertop in the video below that I shared on my InstaStories, live. It was such an intense moment that, spoiler: ends just fine. You can watch below.

The backsplash is another area we put a lot of thought into. How high we wanted it, were side splashes really necessary? We opted to extend the quartz up the wall 8 inches, putting it 2 inches above the faucets. The holes for the faucet were cut on site after verifying the final measurements, and the backsplash added. We nixed side splashes all together. They always look so fussy to me and the countertop company said they’re great for kids’ areas, but usually adults don’t splash as much–ha! Also, it actually saved us money by not having them. Imagine that–it looks better and is cheaper! The valves for our wall-mount Kohler faucets were already in place, our contractor simply needed to add the handles and spout.

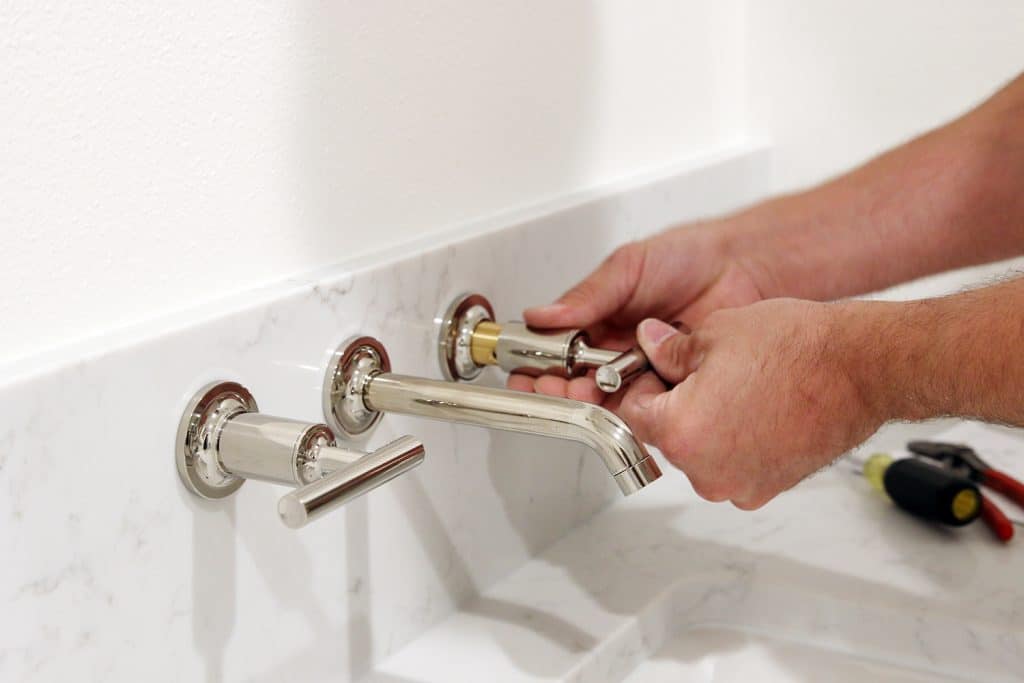

And of course once the faucets were in, we had to get the mirrors up immediately after.

Chris and I are both so excited about the ease of the wall-mounted faucets mixed with an undermount sink. Not only is it a look that I love, but the clean up–what a breeze!
It’s amazing to see things planned so long ago come together even better than we imagined them. We’re so close to the end, and every day there are more finishes being added that get us so excited. Not only at the progress, but at the thought of getting to live with this bathroom, every day. It’s been a very long time coming and we can’t wait to show you the rest of our progress and a finished bathroom, soon.
We’ve had a few questions about mixed metals in here (which are abundant around our entire home), and we’ll definitely talk about that as soon as our shower faucets get installed.


I am doing the exact same configuration…wall mounted faucets and under mount sinks. My builder just called and asked if I had considered the depth of the sink -height of the spout- possible splash up issue. WHHHAAAATTT???
I have been searching to find anything on how high the spout should be and how deep the sink should be…ANYTHING. So far, lots of wonderful advice and reassurance on the “look” but nothing on a distance between spout and bottom of sink so as to not cause splashing….should it be a large distance or a small distance. And the builder wants an answer from me yesterday! Yikes.
Simone, Your spout should be 6″ above your sink, give or take an inch. The spout should also come out far enough to be in the center of the sink/over the drain. You can control the splashing by closing the valve/adjusting the water flow – usually it just takes a quarter turn to eliminate the splashing. Hope this helps, Tara
Hi guys! Your write ups on vanity planning are invaluable. I just did a reno in my kids’ bathroom and we also designed our own vanity, as the prefab builder models are such an inefficient use of storage. My question – can you show an inside shot of your drawers? I’d love to see how the plumbing/sinks and drawer storage work together. And do the plumbing/sinks affect the top drawers only? Or the second drawer as well?
Love this, Just wanted to make sure for wall mount faucets, 6 “ above counter/sink?
hi. Great bathroom. What are the measurements for the sink? Cant find it anywhere? Also whats it made out of?
China? ceramic or steel? Thanks
Hi! This post has helped me so much with my bathroom reno. I am struggling at the moment on a decision of whether to install double sinks. I only have room for a 54″ vanity and am torn on whether to sacrifice countertop space for double sinks or not. I have combed the post for the size of your vanity and haven’t located it. Hope I am not asking you a question you have already answered, but what size is your vanity?