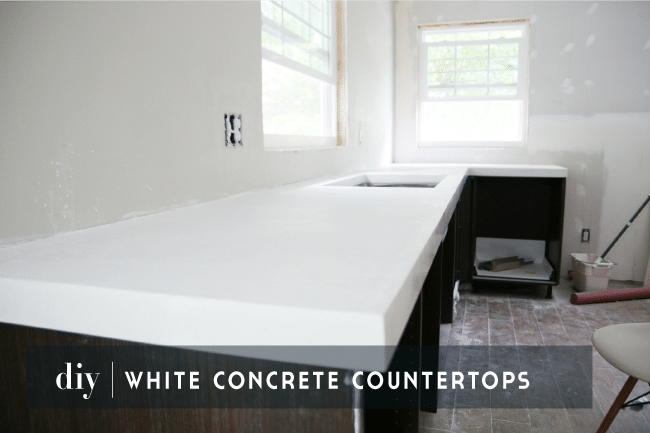
Definitely one of the most popular projects of our kitchen renovation so far has been our DIY white concrete countertops. You can read the whole post here (if you scroll down to the bottom of that post, Z Counterform has even offered up a discount code to our readers after the post went live).
There was one final, very important step after that post and that was sealing the counters. These countertops staining or not holding up has been a concern for a lot of you (which we so appreciate!), but rest assured we researched the heck out of sealers before we even settled on this countertop idea. The sealer can truly make or break concrete countertops and we were looking for something food safe and virtually indestructible. After going through a dozen options, we felt confident going through with Preston’s top recommendation, even though it was the most expensive.
We purchased Stonelok’s E3-2k Countertop Kit in Low Gloss from VSeal Concrete Sealer for just over $200. But the protection it provides is really unmatchable. It has the highest chemical and abrasion resistance of any topical coating system , is food safe, has unmatched stain resistance against coffee, wine, soda, vinegar, citrus, Tabasco, acetone, gasoline, Clorox (and more), unbeaten abrasion resistance, and 400 degree heat resistance–they said a lit cigarette wouldn’t even harm it! Here’s a video that we found on Youtube the demonstrates its durability:

One thing it doesn’t necessarily protect against is sharp knives cutting into it. In the video you can see them taking a utility knife to it and it leaving scratches. This didn’t deter us because cutting on any sort of stone dulls your knives (Chris and his knives forever!) so we’ve always used cutting boards in our home.
To begin the sealing process, we waited a full week for the poured countertops to cure. While they were smooth, they were chalky to the touch. We taped off the backsplash and around the sink and mixed the first solution following instructions that came with it–lots of shaking for x amount of minutes, waiting x amount of minutes, shaking again and then finally rolling it on.

The first step in the sealer process “E3” was an epoxy resin and they sent us a high gloss even though we ordered a low gloss finish. Preston assured us that only the final coat, the “2K”, would really matter and as much as I worried–he was right. We picked up a “mirror finish” Purdy roller to apply both steps so we could get the smoothest finish possible.

The sealer did darken the countertops very slightly (you can barely see the line between sealed and unsealed in the photo above) but Chris and I both actually prefer the more peppered look–photos of that at the end of the post. Once the first step was rolled on, we removed all the tape which is very important or that will get sealed on too. ;)
You have to wait at least 12 hours before applying the second step. Preston came over the following day, taped everything off again and started mixing the “2K” which is a polyurethane resin.


Although there is a lot of wait time in between, the actual rolling doesn’t take more than 30 minutes. Preston rolled the tops (of course) and all the sides making sure there were no harsh roller marks as he went. Because both the E3 and 2k systems are AB (meaning you mix two bottles together, a lot like you would hair dye) to create the solution, there is a window of time they must be used in. It’s a generous amount of time to get the job done, but you can’t really save any to use again if that makes sense.

After sealing, the countertops have to cure 6 days before they can get any water on them. They were dry to the touch the next day and we were able to cover them with rosin paper after day 3 to install our sconces above them, but we waited to install our faucet and really go to town with them until after the 6 days.

These countertops have our hearts. They now have a smooth, satiny finish that will stand up to almost anything. When we first approached Preston about doing concrete countertops, he asked us if we had any concerns or what we envisioned the end product to be. I said it was very important to me that the finished countertops be cool to the touch, a characteristic of stone that you just don’t get with countertops like laminate or some manufactured stone. Not only have these exceeded our expectations in every other way, now that they are sealed they are cool to the touch and everyone that has come over has been blown away to learn they are concrete. We’ll be sure to keep you posted in the coming months and years how they wear, and in the coming days how they look in the final kitchen reveal. :)
UPDATE: SEE HOW THEY LOOK IN THE FINAL KITCHEN HERE.
We wanted to give a shout out to our friend and favorite musician, Preston Pugmire, who truly made these countertops a success. You can check out more of his work through his Custom Concrete Finishing Facebook page and if you’re local, by all means, you will find no one better and more detail oriented for your custom concrete job. Also, we have an exciting update on their home for you in the coming weeks!


Hi! We’re considering doing white concrete counters and I am curious how your counters have held up after all this time! Hope you receive this comments:) thank you!!
We’ve moved twice since then so unfortunately can’t speak to that!
Gorgeous work!
I’m considering white &gold concrete countertops, so I have to ask, how have these held up over the years? Any problems?
Incredibly! The sealer is the best.
Can’t wait to try this!!
Which sealer would you have used to reseal your concrete counter tops? We are in the process of choosing a sealer for ours but are finding it hard to locate good testimonials. Your opinion is much appreciated! Thank you!
What color grout did you guys use on the white tile?
Warm gray from Lowe’s.