A lot of projects in our home are tied together and stem from each other right now, so if it seems like we’re bouncing from project to project — we kind of are, but only because they are connected. We also made a goal to finish renovating this home by the end of 2021 (you can read more about that here), which means we’re already looking ahead to the next project — our bathroom!

Having just finished our last bathroom before we moved, we knew we wanted to move this one up on the renovation calendar. We originally had it scheduled for April, but like many others, we needed to put things on pause due to Covid-19. This gave us time to tackle our closet (it’s 95% done!) and clear out our clothes from our previous closet. The old closet was attached to our current bathroom, through that door at the end. Now that that space is empty, we can include that area in our new bathroom plan and GET! STARTED!!
Demo officially starts July 13 and one rule that we try to live by during renovations is to order EVERYTHING before it even starts. It keeps the timeline more concise and there are fewer setbacks due to backorders or waiting on something to come in. It’s not fool-proof, but it really helps.
Although it may seem like we’re just getting started with the bathroom when the demo sledge hammer swings, we will have actually been working on it for months leading up to this point. So I thought it would be helpful to share what our process looks like behind the scenes.
A rough order of events around a major renovation looks something like this:
1. Gather Inspiration — I’m all over this. I tear out images from magazines, Pin Pinterest images, save Instagrams to a categorized folder, and even screenshot while I’m scrolling! But I have found it best to put all of the images in one shot, usually in a Pinterest board dedicated to the project, even scanning in printed images with the CamScanner app on my phone.
(Saved this shower door design from Katie Martinez Design)

2. Set a Budget — Try to think of budgets as freeing instead of restricting. By assigning money to a project, you’re allowing yourself to spend that money. It doesn’t matter if it’s a couple hundred or a couple thousand dollars — always set a budget! When it comes time to choose product, this will allow you to decide what you want to splurge and save on.
3. Design a layout — Some spaces are just more challenging, I’ve learned. And this bathroom definitely falls into that category. We had a few ideas of what we knew we wanted to do (i.e. integrate the former closet into the new bathroom square footage), but when we went to Kohler in February, we got a very clear direction! …or so we thought. We started second guessing things and went back to the drawing board several times, re-working the layout over and over (you can see all of those iterations in this post). This is the step where you can and should spend the most time. Reworking a layout is a huge undertaking and will be costly, so moving around shapes on the computer over and over may feel redundant or tedious, but it’s also free. So do it until you’re 100% sure.
Here’s our final layout design:

Our exterior plans ended up impacting our bathroom layout plans which sent us almost back to the beginning. We reworked the layout idea we got from the Kohler designer, making the shower larger, the vanities wider, tweaked window sizes and placements until we were 100% happy with it.
4. Make a mood board — We’re sharing the official bathroom mood board below! Woot! But first — It’s hard to make a mood board without being able to visualize where things are going to be, which is why I like to do this step after layout design and after figuring out a budget. This part generally takes me a couple weeks. I love to use Pinterest for this initially, starting a separate (usually private) board within my inspiration board of any product that catches my eye for the space. I edit it frequently (if I find a sconce that I definitely prefer over the other three I already pinned, I’ll delete the other three), so I have a working mood board of where we’re headed and I can constantly see how a new piece to the puzzle will look with the others.
Once I have everything narrowed down, I’ll make my actually mood board. I use Photoshop/Illustrator but we did a whole post on other mood board-making options right here!
5. If working with contractors, now is the time to meet with them to discuss timelines, schedules and budgets. I like to have my materials selected and layout determined before this point because sometimes materials (like laying a herringbone tile) or layout (like moving plumbing) will affect the timeline and budget if you choose to bring in a pro.
6. Make an excel sheet of everything that needs to be ordered & order it! — Don’t leave it to your memory and your overfilled inbox to try and remember if you ordered something or when it’s expected. I make an excel sheet that has the SKU number, product name, link to it, amount ordered, price and total price (if more than one was ordered), order confirmation, and tracking number. It’s like a master list and life saver all in one.
7. And then…after all that…Start demo.
Over the last few weeks, we have been working through this checklist, and I have been simultaneously designing the mood board and choosing finishes. I truly feel like I just designed my dream bathroom in our last house, but it was fun to put a modern cottage spin on this one and somehow… I love it even more!
Ready to see it?!:
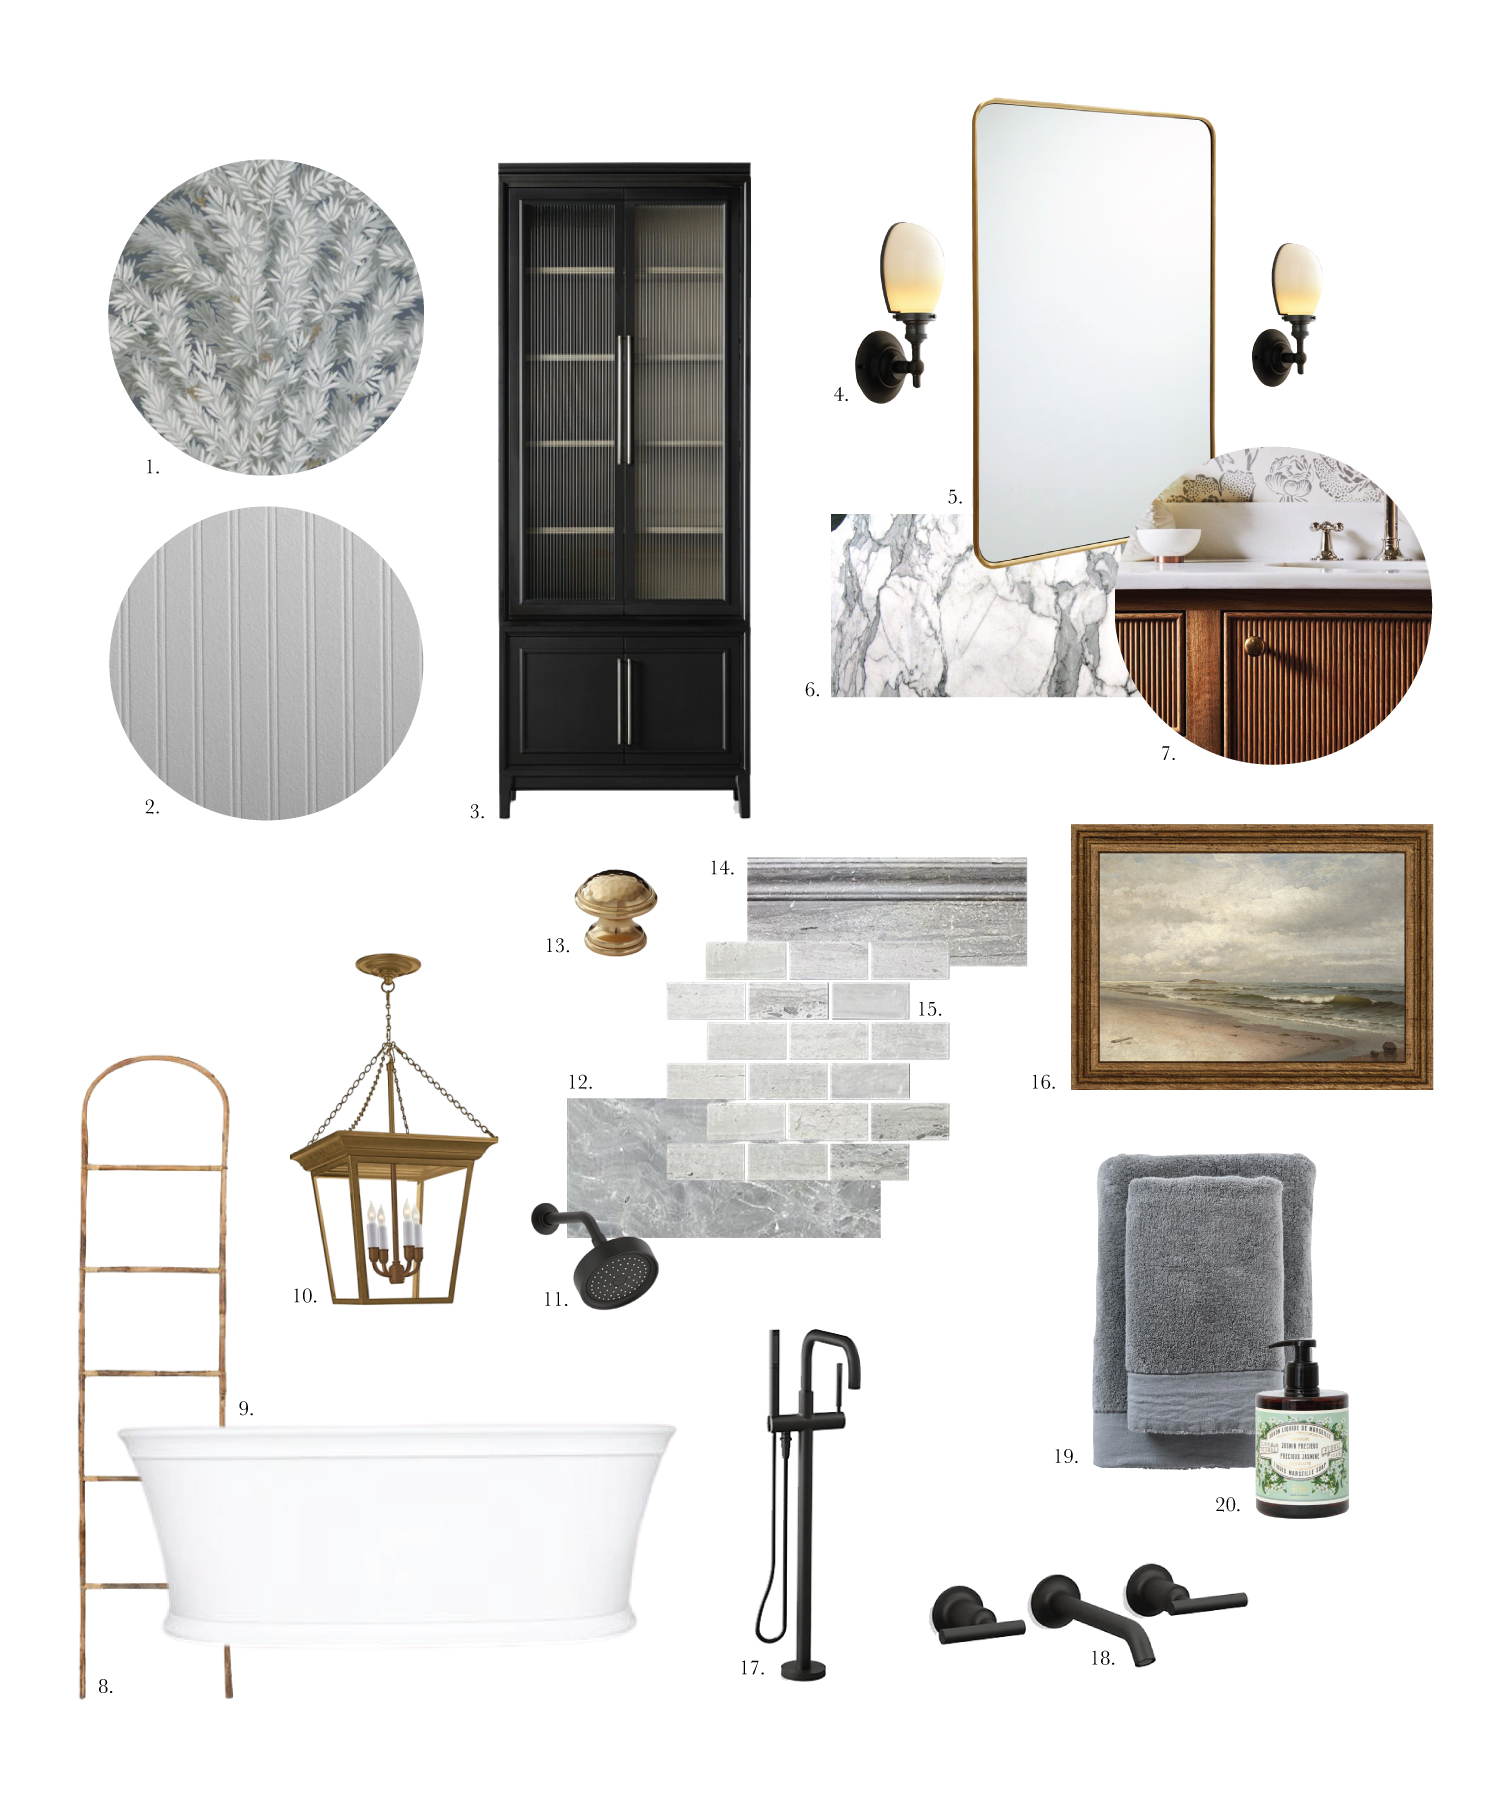
1. Florencecourt Charcoal Wallpaper
2. Beadboard (for the water closet)
3. Rowan Cabinet
4. Vintage English Oval Sconce
5. Rounded Rectangle Metal Framed Mirror
6. Marble Countertop
7. Wood Fluted Vanity (we’ll custom make this to length and, more importantly, HEIGHT!)
8. Bamboo Stick Ladder
9. Bathtub
10. Cornice Small Hanging Lantern
11. Purist Matte Black Showerhead
12. Limestone Floor Tile
13. Brass Ella Knob
14. Limestone Wall Skirting
15. Limestone Wall Tile
16. Cloudy Beach
17. Bath Faucet
18. Sink Faucet
19. Stone Towels
20. Soap
In the 11th hour, I swapped polished nickel for matte black faucets to bring a modern edge to a more traditional bathroom design and it made the BIGGEST difference. It was the missing piece. I ordered everything this past weekend, and my excel sheet is currently rocking (haha!). It will be a few weeks until the bathroom starts, but now that I can really visualize it, I’m more excited than ever. Can’t wait to take you along for the ride!


Where is the water closet console sink from? I love it!!
It is from Kohler!
Julia, are you using backslash tile over the sinks or the wallpaper?
Tile in the main area, wallpaper in the water closet.
CLJ – I would love to know more under the step “start demo.” Your design process is inspiring but I’d also love to see more deep dive into the process for those of us who follow you and are doing more DIY. So after demo done, what then? Do you start framing, then electrical, then plumbing, and so on? This information is put there but I’d love hear your phases process
We’ll definitely share that once the reno starts! We love sharing the whole process.
Thrilled you landed on my favorite layout for the bathroom. Where are you putting that amazing Rowan cabinet ?
It will be on the wall in the nook next to the tub on the left side.
Wow! I absolutely love the layout. I think having the toilet and shower closest to the entry really makes sense. This is going to be great.