To catch you up, we found 2 of these large (two!) solid oak doors next to the dumpster–you can read the rest right here. We hung up our barn door this week and have a slew of photos to show you and probably too many words about the process, too!

We never really wanted a barn door that looked like a barn door, ya know? We wanted something a little more modern and industrial (I think I just realized this week my style might be modern farmhouse–still looking into it!) and we really feel like we hit the jackpot here. So this set up isn’t done done, but we couldn’t wait another minute to show it to you, hung. I couldn’t even wait for a sunnier day, I guess. (Sorry about the lighting!)


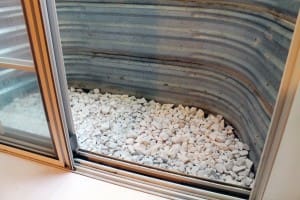
Aaaand closed. So yes. This is one area that still needs fixed. The door is so tall. 89″ to be exact, so it is much taller than our doorways. When we renovate that back area into a mudroom/laundry, we’ll tackle raising that header. Luckily the door is open 95% of the time so it isn’t as noticeable. We also plan to frost the glass in the coming week. I already bought some window frosting (sounds delicious?) but we wanted to hang it first just to double check that we absolutely wanted to frost it. And, yes. Yes we do. Especially once that is part laundry room part mudroom. In my mind it will be so functional and gorgeous it will always be neat–but I am also trying to be realistic. Maybe I’ll wait to frost it until that renovation is done. I’m torn.
We got the hanging hardware from NW Artisan Hardware. They have been just amazing to work with. Ugh, I can’t say enough good things. The hardware is well made and beautiful, and the customer service is just as brag-worthy. Isn’t that the best? We ordered vintage horseshoe hardware (that was amazing!) to fit our DIY door initially, but it didn’t feel like it went with this door. We really wanted the door to be the star and they were so good about letting us exchange it for this classic top mount after we found this door.

The prep on this door was kind of a doozy. We decided not to touch the wood itself, and I gave the backplate a quick shine, but left enough so it still felt vintage-y (although in these photos the light on is making it look extra shiny!!). The main task was removing the hinges and prepping the door for hanging.

After we removed the hinges, we were naturally left with big indents and screw holes in the wood. Luckily the door was solid wood so instead of filling the gouges, we planed off a little over 1/8″ so it was smooth again. And then filled the holes with wood filler.

We sanded it smooth after that dried which left hardly any evidence that hinges ever existed!

Before Chris planed it, I shaved off a piece of wood to bring to the hardware store with me so I could get a matching stain.

English Chestnut was the winner and a seamless match. Here’s a shot of that side of the door…that also shows off the hardware a little better.

The top sliding rail is secured into 5 studs and the rolling mechanism is attached to the door 3 times on each side. It is so secure! To keep the bottom from swaying out and the whole door steady, the hardware came with, basically, a 2 inch L-bracket (I can’t believe I didn’t take a photo!) that we screwed into the tile floor–which maybe was the hardest part of this whole thing. The L-bracket slides through a groove that Chris sawed through the bottom of the door with a circular saw.

All the hardware together makes moving this 150+ lb door easy. In fact, even Greta can do it. And she does, quite frequently.


The door has transformed our great room once again and inched us closer to making this home feel more like us. I wish you could all see it in person–the pictures just don’t do it justice. It feels so grand and massive and really makes the room feel taller. Have the best weekend, you guys! We’ll be working on Greta’s room some more and enjoying the fall weather, too. Yesterday it was in the 50s here!


and it looks amazing!!!
I am considering doing one of these doors for a bathroom, a question i have been thinking about is, did you also put a handle or something of the sort on the inside?
thank you
The inside of the door has a backplate but no handle. However, the door glides really easily on the track–a little push on the backplate does the trick for us.
Julia – what do you mean by back plate – I had the same question. We are considering these for an addition that is not all that well insulated and makes the rest of the house COOOLD! I’d like to be able to close it off from the rest of the house. Good to know that the door also hugs the trim closely (that was one of my other concerns).
looks great! I too wondered about hardware on the other side of the door. Will you have some kind of handle on that side to make it easy to open from the closed position and close it from that side?
Love the door!
Is there something weird going on with your site when you open it on iphone? Every time I open your site on my iphone for the last week, it automatically pops over to the App Store and opens a page for a random app.
Chris and I both noticed that too recently! We’re on it. Thanks, B
If you’re not sure about frosting the glass, there’s a product at Home Depot that is basically a giant window cling. It’s printed with different designs (like stained glass, landscape) or frosted glass. We used it on one of our windows that looks out on the neighbors house. It’s great because it looks like the window is actually frosted but the film is completely removable! You could try out the film and if you don’t like it you can just remove it :)